Table of Contents
Introduction to fully automated data entry UserForm Part 2 (Edit and Delete Features)
This tutorial is the second part of ‘Fully Automated Data Entry UserForm in Excel and VBA’, where we will be adding two new functionalities to our UserForm: Edit records and Delete records.
Before proceeding, it is recommended to read through the first part, which covers the below points:
- Create a new Excel file that includes two worksheets named ‘Home’ and ‘Database.’
- Set up a Database table with the required headers in the ‘Database’ sheet.
- Add a Launch Button to the ‘Home’ sheet.
- Insert a UserForm and Module in the VBA Window.
- Create the necessary Sub Routines and Functions to submit the data and reset the UserForm.
- Assign the Macro to the Launch Form button on the ‘Home’ sheet.
Note: Our YouTube channel, @TheDataLabs, has step-by-step video tutorials for a Data Entry User Form. The tutorials are divided into five parts that cover all the essential features, explanations, and VBA codes needed.
YouTube Tutorial
Watch on YouTube @thedatalabs fully automated data entry userform part 2
Prerequisites for Automated Data Entry Form in Excel using VBA
To get the most out of this tutorial, it is suggested that you have a fundamental understanding of Excel operations like worksheets, cells, and ranges, as well as some knowledge of the VBA programming language.
If you face any challenges during the process or need assistance with your current project, please leave your comments. Our team will review your feedback and queries and provide a suitable response.
Step-by-step guide for creating Fully Automated Date Entry UserForm Part 2
Adding additional controls in UserForm
- Open the first part of the Excel file called Fully Automated Data Entry UserForm.
- Go to the Developer Tab and click on the Visual Basic button located in the code group. Alternatively, use the shortcut key ALT + F11 to launch the Visual Basic Application code.
- In the Visual Basic Application window, double click on UserForm to open the design view.
Add a TextBox named ‘txtRowNumber’ in the ‘Enter Details’ section. Set the properties value for ‘Locked’ as ‘True’ and ‘Visible’ as ‘False’. This TextBox will store the row number of selected records in Listbox to perform Edit and Delete operations.
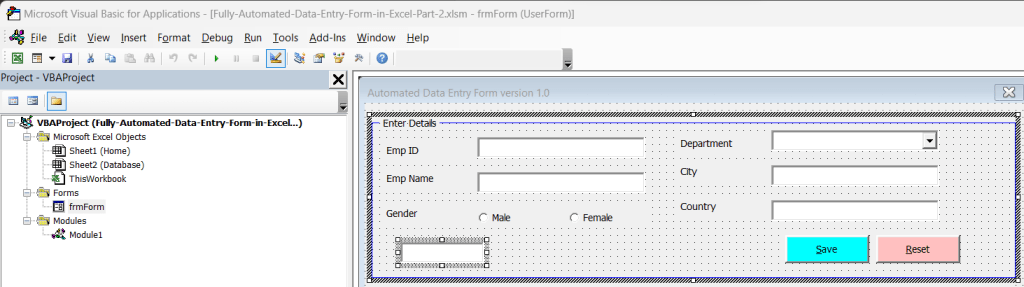
- In the ‘Database’ section, add two command buttons named ‘cmdEdit’ and ‘cmdDelete’ with Captions ‘Edit’ and ‘Delete’ respectively. These buttons will be used to perform edit and delete functionalities in this Fully Automated Data Entry UserForm.
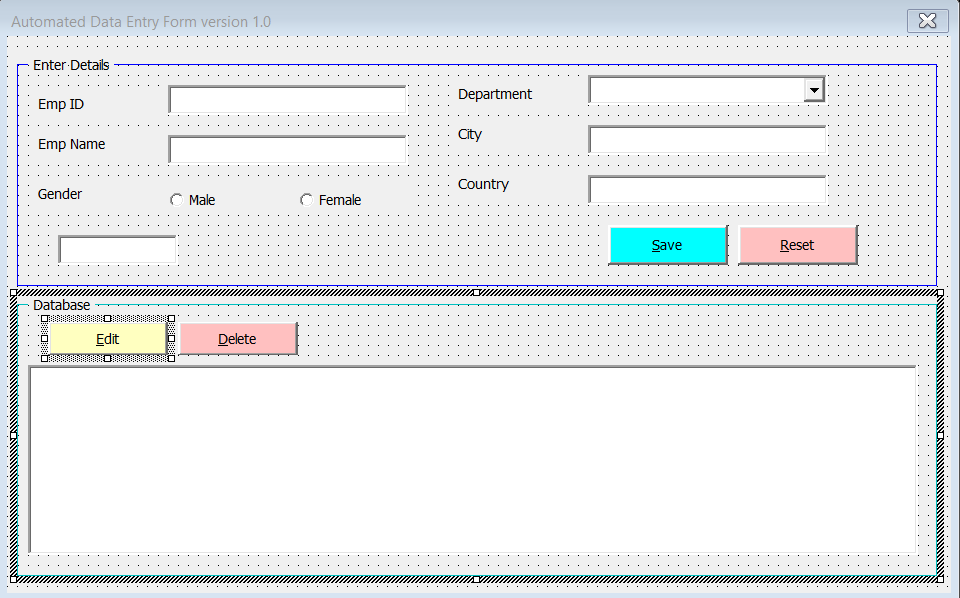
Logic: whenever the user clicks the Edit or Delete button, the VBA code will validate whether they have selected any row in the listbox available in the ‘Database’ section. If there is no selection, a message will appear stating ‘No row is selected.’
If there is a selection, then the selected row number will be stored in the recently inserted TextBox i.e. ‘txtRowNumber’ and the value will be used to edit the record.
VBA Code to Edit the record(s)
- Double click on the Edit button to move to the Code window. Write the below code on the click event of cmdEdit.
Private Sub cmdEdit_Click()

    If Selected_List = 0 Then

        MsgBox "No row is selected.", vbOKOnly + vbInformation, "Edit"

        Exit Sub

    End If

    'Code to update the value to respective controls

    Dim sGender As String

    Me.txtRowNumber.Value = Selected_List + 1

    Me.txtID.Value = Me.lstDatabase.List(Me.lstDatabase.ListIndex, 1)

    Me.txtName.Value = Me.lstDatabase.List(Me.lstDatabase.ListIndex, 2)

    sGender = Me.lstDatabase.List(Me.lstDatabase.ListIndex, 3)

    If sGender = "Female" Then

        Me.optFemale.Value = True
    Else

        Me.optMale.Value = True

    End If

    Me.cmbDepartment.Value = Me.lstDatabase.List(Me.lstDatabase.ListIndex, 4)

    Me.txtCity.Value = Me.lstDatabase.List(Me.lstDatabase.ListIndex, 5)

    Me.txtCountry.Value = Me.lstDatabase.List(Me.lstDatabase.ListIndex, 6)

        MsgBox "Please make the required changes and click on 'Save' button to update.", vbOKOnly + vbInformation, "Edit"


End Sub
Explanation of the Edit code
This code is for the “Edit” button on a form. The purpose of this code is to update the values of the selected record from a listbox to the corresponding form controls for editing.
- The first part of the code checks if any row is selected in the listbox. If no row is selected, it displays a message box with an error message and exits the sub.
- If a row is selected, the code updates the value of the hidden text box “txtRowNumber” to the index of the selected row in the listbox plus 1. The “+1” is because the index of the first row in the listbox is 0, but the corresponding row in the worksheet is 1.
- The code then assigns the values of the selected record to the corresponding controls on the form. For example, the value in the second column of the selected row is assigned to the “txtID” textbox on the form. The value in the third column of the selected row is assigned to the “txtName” textbox on the form.
- The gender value in the third column of the selected row is assigned to a string variable “sGender”. If the value is “Female”, the “optFemale” radio button is selected, otherwise the “optMale” radio button is selected.
- The code then assigns the value in the fourth column of the selected row to the “cmbDepartment” combobox on the form. The values in the fifth and sixth columns of the selected row are assigned to the “txtCity” and “txtCountry” textboxes on the form, respectively.
- Finally, a message box is displayed instructing the user to make the necessary changes and click on the “Save” button to update the selected record.
VBA Code to Delete the record(s)
- To write the VBA code to delete any of the selected row(s), just write the below code on the click event of cmdDelete button.
Private Sub cmdDelete_Click()

    If Selected_List = 0 Then

        MsgBox "No row is selected.", vbOKOnly + vbInformation, "Delete"
        Exit Sub
    End If

    Dim i As VbMsgBoxResult

    i = MsgBox("Do you want to delete the selected record?", vbYesNo + vbQuestion, "Confirmation")

    If i = vbNo Then Exit Sub

    ThisWorkbook.Sheets("Database").Rows(Selected_List + 1).Delete

    Call Reset

    MsgBox "Selected record has been deleted.", vbOKOnly + vbInformation, "Deleted"

End Sub
Explanation of the Delete code
The code is for the “Delete” button’s click event in the UserForm. It performs the action of deleting a selected record from the “Database” worksheet. Here’s a breakdown of the code:
- The first line of code checks if a row is selected in the ListBox. It does so by calling the function “Selected_List” which returns the index of the selected row. If no row is selected, the message box pops up with the message “No row is selected.” and then the code exits the sub.
- If a row is selected, the code then prompts the user to confirm the deletion by displaying a message box with the message “Do you want to delete the selected record?” and the options to click “Yes” or “No”.
- If the user clicks “No”, the code exits the sub.
- If the user clicks “Yes”, then the code deletes the selected row from the “Database” worksheet using the “Rows” method and the “Delete” method. It first adds 1 to the index of the selected row because ListBox indexing starts from 0, but row numbering in the worksheet starts from 1.
- After deleting the selected row, the “Reset” subroutine is called to clear the form controls.
- Lastly, a message box pops up with the message “Selected record has been deleted.” to notify the user that the deletion was successful.
With these steps, all the required codes for the features in Edit and Delete in the Fully Automated Data Entry UserForm in Excel and VBA are added.
Download ‘Fully Automated Data Entry UserForm Part 2’
Click on below button to download the Excel file with source code (Complete Code & Functions Covered in Videos 1 to 5).
Previous part of Fully automated data entry UserForm tutorial (1 of 5)
Next parts of Fully automated data entry UserForm tutorial (2 to 5)
The upcoming sections of this tutorial fully automated data entry userform (2-5) will cover the following features:


