Fully Automated Data Entry UserForm in Excel using VBA: A Comprehensive Guide
Table of Contents
Watch on YouTube @thedatalabs fully automated data entry userform
Introduction to Fully Automated Data Entry Userform
MS Excel is a widely used application for data entry and data analysis job in the business world. However, manual data entry can be time-consuming and error prone. Data entry forms provide a convenient and efficient solution to these issues. Automated data entry forms are especially useful in eliminating human error and saving time. In this comprehensive guide, we will walk you through the process of creating a fully automated data entry form in Excel using VBA.
Note: Our YouTube channel, @TheDataLabs, has step-by-step video tutorials for a Data Entry User Form. The tutorials are divided into five parts that cover all the essential features, explanations, and VBA codes needed.
Topics covered in this tutorial ‘fully automated data entry userform’
This tutorial is the first part of a series that will cover the necessary steps for creating an automated data entry form using Excel and VBA. Throughout this section, you will learn how to:
- Create a new Excel file that includes two worksheets named ‘Home’ and ‘Database.’
- Set up a Database table with the required headers in the ‘Database’ sheet.
- Add a Launch Button to the ‘Home’ sheet.
- Insert a UserForm and Module in the VBA Window.
- Create the necessary Sub Routines and Functions to submit the data and reset the UserForm.
- Assign the Macro to the Launch Form button on the ‘Home’ sheet.
Prerequisites for Automated Data Entry Form in Excel using VBA
To get the most out of this tutorial, it is suggested that you have a fundamental understanding of Excel operations like worksheets, cells, and ranges, as well as some basic knowledge of the VBA programming language.
If you face any challenges during the process or need assistance with your current project, please leave your comments. Our team will review your feedback and queries and provide a suitable response.
Step-by-step guide – How to Create a Data Entry Form in Excel?
Preparing Worksheet and Database Table
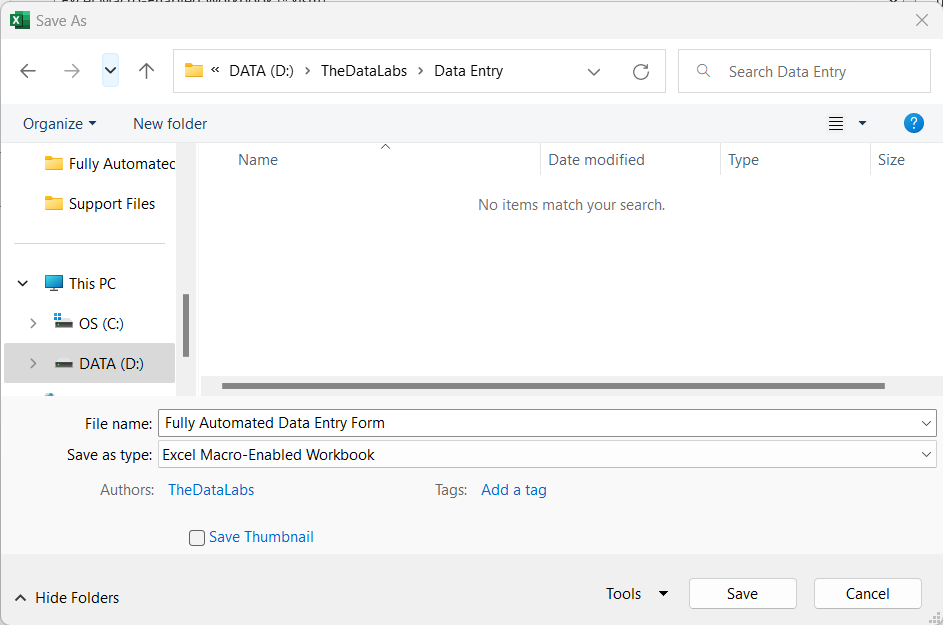
- Open a new Excel file and save it with the macro-enabled extension ‘.xlsm‘. Name the file ‘Fully Automated Data Entry Form’.
- Insert two worksheets and rename them to ‘Home’ and ‘Database’.

- In the ‘Database’ sheet, create a table consisting of 9 columns titled as ‘S.No.’, ‘Employee ID’, ‘Employee Name’, ‘Gender’, ‘Department’, ‘City’, ‘Country’, ‘Submitted By’, and ‘Submitted On’. This table will serve as a storage space for data entered through the data entry form.

- Insert a rectangle shape on the ‘Home’ sheet and add the caption ‘Launch Form.’ This rectangle will function as a button to open the data entry form on the click event. Later, a macro will be assigned to it after completing the VBA code.

Opening Visual Basic Editor Window to Design the Form and Write Code for fully automated data entry userform
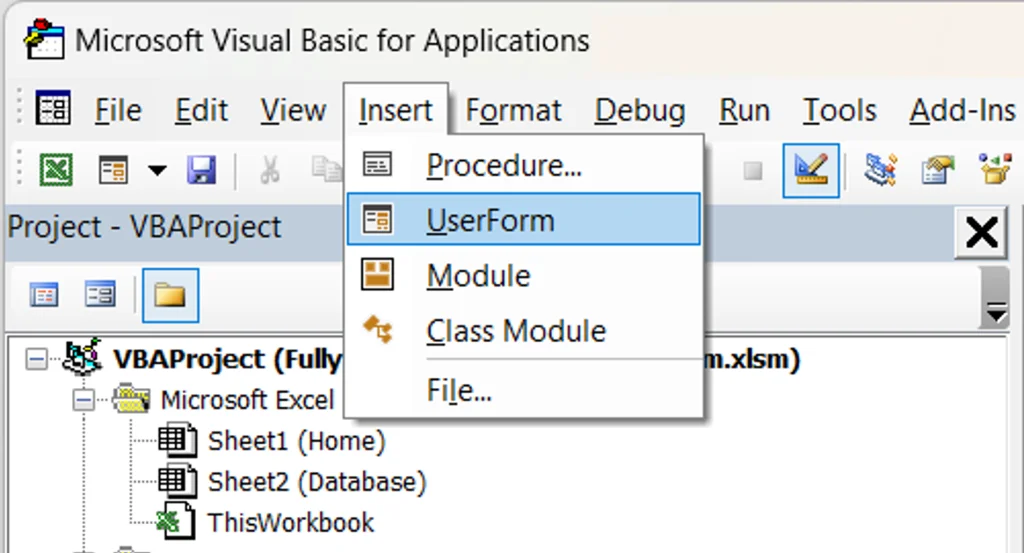
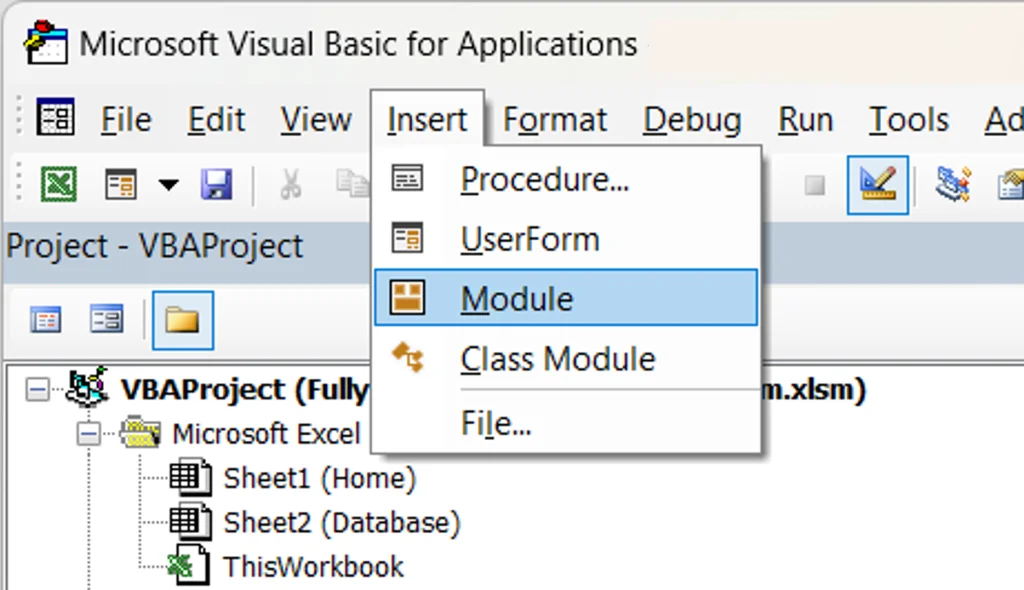
- To begin creating the UserForm and writing VBA code, click on the Developer Tab and select the Visual Basic button located in the code group. Alternatively, use the shortcut key ALT + F11 to launch the Visual Basic Application code.

- In the Visual Basic Application window, add a UserForm and Module to create the User Interface of the data entry form and write the essential VBA code, including Sub Routines and Functions.
Designing the UserForm
- The UserForm needs to be designed with two sections: “Enter Details” and “Database.” In the “Enter Details” section, we will include several input controls, such as an entry text box for Employee ID and Name, option buttons for Gender (male and female), a Combobox for the department, and text boxes for City and Country. We will also add a Submit button to submit the data and a Reset button to clear the input fields.
In the “Database” section, we will add a list box to display all the data submitted through the data entry form. This list box will be linked to the “Database” sheet.

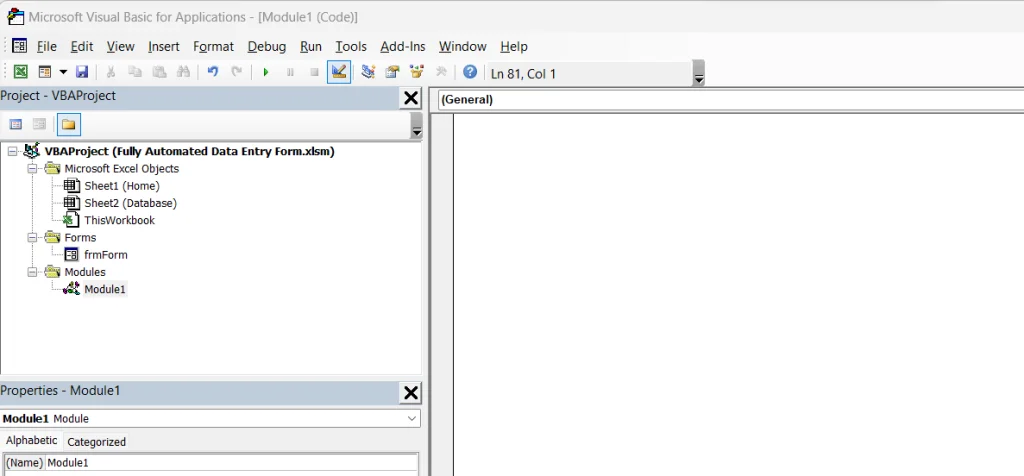
Writing Subroutines and VBA code
- Proceed to the module window and start writing the required VBA codes. Here, we will add three separate subroutines: ‘Reset’, ‘Submit’, and ‘Show_Form’ to manage the essential functions of the first part.
Reset Subroutine
- Paste the ‘Reset()’ subroutine provided below into the Module window. This subroutine will enable the resetting of the form upon clicking the Reset button or initializing the User Form.
Sub Reset()

Dim iRow As Long

iRow = WorksheetFunction.CountA(Sheets("Database").Range("A:A")) ' identifying the last row

With frmForm

    .txtID.Value = ""
    .txtName.Value = ""
    .optMale.Value = False
    .optFemale.Value = False


    .cmbDepartment.Clear

    .cmbDepartment.AddItem "HR"
    .cmbDepartment.AddItem "Operation"
    .cmbDepartment.AddItem "Training"
    .cmbDepartment.AddItem "Quality"

    .txtCity.Value = ""
    .txtCountry.Value = ""

    .lstDatabase.ColumnCount = 9
    .lstDatabase.ColumnHeads = True

    .lstDatabase.ColumnWidths = "30,60,75,40,60,45,55,70,70"

    If iRow > 1 Then

        .lstDatabase.RowSource = "Database!A2:I" & iRow
    Else

        .lstDatabase.RowSource = "Database!A2:I2"

    End If

End With

End Sub
Understanding the VBA Code of Reset Subroutine
The “Reset” subroutine is used to reset the data entry form when the user wants to start over. It starts by declaring a variable named “iRow” of the “Long” data type, which is determined by using the “COUNTA” function. This function counts the number of non-blank cells in column A of the “Database” sheet and gives us the index of the last row with data in the sheet.
The subroutine then updates the values of various controls on the data entry form using a “With…End With” block. The values of the “Emp ID”, “Emp Name”, “Gender”, “City”, and “Country” textboxes are reset to blank or default values. The “Department” combo box options are also reset to default values, which are “HR”, “Operation”, “Training”, and “Quality”.
The subroutine also sets the properties of the “lstDatabase” list box control to configure its appearance. The “ColumnCount”, “ColumnHeads”, and “ColumnWidths” properties are set to display the appropriate number of columns, column headers, and column widths, respectively. Depending on whether there are existing records in the “Database” sheet or not, the “RowSource” property of the list box is set to display either all records in the sheet or just the headers.
Overall, the “Reset” subroutine sets the form back to its initial state so that the user can enter new data.
Submit Subroutine
- Use the “Submit()” subroutine provided below to submit the data from the User Form to the Database sheet. Simply copy the code and paste it into the module window. This subroutine will handle the process of submitting data.
Sub Submit()

Dim sh As Worksheet
Dim iRow As Long

Set sh = ThisWorkbook.Sheets("Database")

iRow = [Counta(Database!A:A)] + 1

With sh

    .Cells(iRow, 1) = iRow - 1

    .Cells(iRow, 2) = frmForm.txtID.Value

    .Cells(iRow, 3) = frmForm.txtName.Value

    .Cells(iRow, 4) = IIf(frmForm.optFemale.Value = True, "Female", "Male")

    .Cells(iRow, 5) = frmForm.cmbDepartment.Value

    .Cells(iRow, 6) = frmForm.txtCity.Value

    .Cells(iRow, 7) = frmForm.txtCountry.Value

    .Cells(iRow, 8) = Application.UserName

    .Cells(iRow, 9) = [Text(Now(), "DD-MM-YYYY HH:MM:SS")]


End With

End Sub
Understanding the VBA Code of Submit Subroutine
This code is used to submit data from a user form to a worksheet named “Database”.
First, the code declares a variable “sh” as a worksheet object and assigns it to the “Database” sheet of the workbook. The code then uses the COUNTA function to determine the index of the next empty row in column A and assigns it to the variable “iRow”.
The “With…End With” block is used to set the values of various cells in the “Database” sheet. The values of the cells in columns 1 through 9 are set to the values of various controls on the user form, such as “Emp ID”, “Emp Name”, “Gender”, “Department”, “City”, and “Country”.
The code also sets the username and current date/time in columns 8 and 9, respectively. Finally, the code submits the data to the next empty row in the “Database” sheet.
Show_Form Subroutine
- Add the “Show_Form” subroutine to the module window by copying and pasting the code. This subroutine is responsible for showing the UserForm when it is called. To open the UserForm, you can assign this subroutine to the Launch Form button on the home sheet.
Sub Show_Form()
      frmForm.Show
End Sub
Call Reset and Submit subroutines on Click and Initialize events
- In the code window of User Form, call the ‘Reset’ subroutine on the Initialize event of UserForm. Use the VBA code as mentioned below.
Private Sub UserForm_Initialize()

    Call Reset

End Sub
Explanation of code: This VBA code is used to automatically reset the user form when it is loaded into memory. The code is triggered by the “Initialize” event of the user form and calls the “Reset” subroutine.
- In the User Form code window, call the ‘Reset’ subroutine on the click event of the ‘cmdReset’ button. Use the VBA code as mentioned below.
Private Sub cmdReset_Click()
    Dim msgValue As VbMsgBoxResult

    msgValue = MsgBox("Do you want to reset the form?", vbYesNo + vbInformation, "Confirmation")

    If msgValue = vbNo Then Exit Sub

    Call Reset
End Sub
Explanation of code: This VBA code is for the button named “cmdReset”. When clicked, it displays a message box asking the user for confirmation to reset the form. If the user selects “No”, then the code exits. If the user selects “Yes”, then it calls the “Reset” subroutine to reset the form.
- Keep your cursor in the code window of User Form, call the ‘Submit’ and ‘Reset’ subroutines on the click event of the ‘cmdSave’ button. Please check the below codes.
Private Sub cmdSave_Click()

    Dim msgValue As VbMsgBoxResult

    msgValue = MsgBox("Do you want to save the data?", vbYesNo + vbInformation, "Confirmation")

    If msgValue = vbNo Then Exit Sub

    Call Submit
    Call Reset


End Sub
Explanation of the code: This VBA code is executed when the user clicks the Save button on the UserForm. It displays a message box asking the user to confirm whether they want to save the data or not. If the user clicks “No”, the code exits the subroutine. If the user clicks “Yes”, the code calls the “Submit” subroutine to save the data to the worksheet and then calls the “Reset” subroutine to clear the UserForm for the next entry.
Assign macro on Launch Form button in Home sheet
- Move to the Excel window and assign the ‘Show_Form’ subroutine on the Launch Form button available on the ‘Home’ sheet by right-clicking on the ‘Launch Form’ button and selecting Assign Macro. In the Assign Macro window, select the ‘Show_Form’ subroutine and click on ‘Okay’ button.


You have now completed the first part of creating a Fully Automated Data Entry form.
Download the Excel file with VBA code
Click on below button to download the Excel file with source code (Complete Code & Functions Covered in Videos 1 to 5).
Next parts of Fully automated data entry userform tutorial (2 to 5)
The upcoming sections of this tutorial how to create a data entry form in Excel (2-5) will cover the following features:
- In Part 2 of the tutorial, you’ll learn about the Edit and Delete Features.
- Part 3 of the tutorial will focus on the Search and Filter Features.
- The next part, Part 4 of the tutorial, will cover Validation, Dynamic Serial, and Print Features.
- Finally, in Part 5 of the tutorial, you’ll discover Additional Features, including Full Screen, Zoom, and Dynamic Drop-down.
")


It is no free because it is no possible to change and add some items to the code.
Dear Sir,
Am stuck on the part 3 where am having an error mgs and my search is not working.
iDatabaseRow = ThisWorkbook.Sheets(“Database”).Range(“A” & Application.Rows.Count).End(x1Up).Row
I have added some some fields more and am still trying to have the search filter to work.
Regards,
Jean
Hello Jean,
You have used 1 in place of L (XLUP) in your code. The correct code is as mentioned below.
iDatabaseRow = ThisWorkbook.Sheets(“Database”).Range(“A” & Application.Rows.Count).End(xlUp).RowIts a wonderful tutorial.
Based on this tutorial, I made an entry user form with textbox for entry value in currency. I would like to format textbox entry with thousand separator.
I made syntax as follow:
Sub FormatPrice()
Dim sPrice As Double
sPrice = frmpForm.txtpPrice.Value
frmpForm.txtpPrice.Value = format(sPrice, “#,##0”)
End Sub
But it did not work.
Appreciate if you could correct me
thank you
Thanks for your feedback!
The correct code would be
frmpForm.txtpPrice.Value = Format(sPrice, “#,###”)If you want to show decimal numbers as well then you need to use IIF function along with Format. Use the below code to show decimal numbers.
frmpForm.txtpPrice.Value = IIF(Right(Format(sPrice, “#,###.##”),1)=".", Format(sPrice, “#,###”), Format(sPrice, “#,###.##"))When the data is saved from part 5 it displays a run time error.
Hello, could you please share the line of code where you are getting error. Thanks!
Thanks for your tutorial Part 5 is having error ” .cmbDepartment.clear “. Please take a look at it again and advise accordingly. Thanks.
Thanks for highlighting the issue! Please remove this line of code.
.cmbDepartment.clearIt will start working.
Thanks i was also finding the same error and after commenting the line its working
Hi!
Team The Data Labs thanks for your publishing these kinds of beneficial videos.
I have sent an email on your provided email ID to regarding the VB work. Please have a look on that and reply accordingly.
Thanks
Regards
hello datalabs,
i am currently using this tutorial and im very thankful for this. and in return may i point out that there is an error on part 4, when u used the sheet “Print” instead of “Database” for verifying duplicates. and also when i corrected that error, i also noticed that when you edit your data, the duplicate verifier stops you from saving the changes. In solution to that problem i made another save button that does not use the verify sub. Again this is very helpful especial for me that is not that good in programming.
This is really great job,
Is it possible to keep the data base protected and just keep the filter function working. to filter the data base based on some entries.
This will be very helpful to me as i utilize it in my maintenance activities Log.
Hello,
Awesome Demo!
Error keeps calling out the iColumn:
Application.ScreenUpdating = False
Dim shDatabase As Worksheet ‘ Database sheet
Dim shSearchData As Worksheet ‘SearchData sheet
Dim iColumn As Integer ‘hold selected column # in Database sheet
Dim iDatabaseRow As Long ‘Store the last non-blank row # available in Database sheet
Dim iSearchRow As Long ‘hold the last non-blank row # avaialbe in SearchData sheet
Dim sColumn As String ‘store column selection
Dim sValue As String ‘hold search text value
Set shDatabase = ThisWorkbook.Sheets(“Database”)
Set shSearchData = ThisWorkbook.Sheets(“SearchData”)
iDatabaseRow = ThisWorkbook.Sheets(“Database”).Range(“A” & Application.Rows.Count).End(xlUp).Row
sColumn = frmForm.cmbSearchColumn.Value
sValue = frmForm.txtSearch.Value
iColumn = Application.WorksheetFunction.Match(sColumn, shDatabase.Range(“C10:AA”), 0) ‘Change, if number of columns change
If IsError(iColumn) Then
MsgBox “Yes”
Else
MsgBox “No”
End If
‘Remove filter from Databse worksheet
If shDatabase.FilterMode = True Then
shDatabase.AutoFilterMode = False
End If
‘Apply filter on Database worksheet
If frmForm.cmbSearchColumn.Value = “Name” Then
shDatabase.Range(“C10:AA9999” & iDatabaseRow).AutoFilter Field:=iColumn, Criteria1:=sValue ‘Change, if number of columns change
Else
shDatabase.Range(“C10:AA9999″ & iDatabaseRow).AutoFilter Field:=iColumn, Criteria1:=”*” & sValue & “*” ‘Change, if number of columns change
End If
>>>>>>> iColumn = Application.WorksheetFunction.Match(sColumn, shDatabase.Range(“C10:AA”), 0) ‘Change, if number of columns change
This is great, I’ve been learning a lot. I tried duplicating this for another tab/sheet but the code breaks and get differnt errors when changing the reference names of “Database” to something else. How can I change the code to use the code name of the sheet instead so hopefully i can reuse this for a new tab/sheet of my own naming?
For instance from: iRow = [Counta(Database!A:A)] to iRow = [Counta(Sheet2!A:A)]
or
iRow = [Counta(MySheetName!A:A)]
Or
If iRow > 1 Then
.lstDatabase.RowSource = “Database!A2:I” & iRow
Else
.lstDatabase.RowSource = “Database!A2:I2”
End If
To
If iRow > 1 Then
.lstDatabase.RowSource = “Sheet2!A2:I” & iRow
Else
.lstDatabase.RowSource = “Sheet2!A2:I2”
End If
Thanks!
Hi
Team The Data Labs thanks for your publishing
I just download a example and i have an error with ColumnWidhths does not match
Sub Show_Form()
frmForm.Show
End Sub
Please share the line of code where error is showing. Thanks!
i have same error to the error highlight this line of code
Sub Show_Form()
frmForm.Show
End Sub
The error message is
Run-time error ‘-2147352571 (80020005))’:
Could not set the ColumnWidths property. Type mismatch.
Hi,
I think he means in the Module1 at Z124. I got the same Error
Hi,
Can you make the same example for entering the data in a table, instead of a defined range. I tried to convert the range in Database sheet to a table, but any new record added is added outside the table.
Please see the below post. Thanks!
https://thedatalabs.org/data-entry-form-with-excel-table-and-vlookup/
HI,
I want help
I want to know a function in excel which will allow me to understand which dates fall under which week.I am preparing a weekly tracker. Can u please help me
Do you have the list of week? Please share here so that I can suggest you the function. Thanks!
I tried to follow your steps with my own columns but I am receiving an “invalid use of property” message when I try to debt. Can you take look?
Private Sub list_Click()
Call reset
End Sub
Private Sub reset_Click()
Dim msgValue As VbMsgBoxResult
msgValue = MsgBox(“Do you want to reset the form?”, vbYesNo + vbInformation, “Confirmation”)
If msgValue = vbNo Then Exit Sub
Call reset
End Sub
Private Sub Submit_Click()
Dim msgValue As VbMsgBoxResult
msgValue = MsgBox(“Do you want to save the data?”, vbYesNo + vbInformation, “Confirmation”)
If msgValue = vbNo Then Exit Sub
Call Submit
Call reset
End Sub
—————————————————————————————–
Sub reset()
Dim iRow As Long
iRow = [Counta(Database!A:A)] ‘identify the last row
With ChicaForm
.txtID.Value = “”
.txtName.Value = “‘”
.Option1.Value = False
.Option2.Value = False
.txtAddress.Value = “”
.list.ColumnCount = 4
.list.ColumnHeads = True
.list.ColumnWidths = “20,60,20,20”
If iRow > 1 Then
.list.RowSource = ” Database!A2:D” & iRow
Else
.list.RowSource = “Database!A2:D2”
End If
End With
End Sub
Sub Sumbit()
Dim sh As Worksheet
Dim iRow As Long
Set sh = ThisWorkbook.Sheets(“Database”)
iRow = [Counta(Database!A:A] + 1
With sh
.Cells(iRow, 1) = iRow – 1
.Cells(iRow, 2) = ChicaForm.textName.Value
.Cells(iRow, 3) = ChicaForm.textAddress.Value
.Cells(iRow, 4) = ChicaForm.textCode.Value
.Cells(iRow, 5) = IIf(ChicaForm.Option1.Value = True, “adfadfad”, “12345”)
End With
End Sub
Sub Show_Form()
ChicaForm.Show
End Sub
Good day,
I just want to ask why I am getting “No Row Selected” whenever I am selecting details to Edit? Any probable mistake in the coding part?
By the way, your video tutorials are extremely helpful. Thank you very much
Hi,
wonderful and great job sir.
I have questions.
I have 3 sheet database lst1, lst2, lst3.
I want to make cmbA to choose from which database I want to search from.
Then after choosing from cmbA, cmbB list will base on cmbA option.
Then I will type from search value.
The search value will appear in lst1 or lst2 or lst3 base on cmbA option.
How can I do this?
Thanks in advance!
Hi, first of all thank you for this magnificent tutorial. Would like to know whether can we change the fonts or imply any conditional formatting that can change the colors of the rows in Database1? Thank you
Hi it was very much useful to me, Can u pls help me in how to generate a report from the excel of yours
Require your help in calendar part. if i select the date 12-jun-2012 it display 06-Dec-12
Thanks & regards,
A.K. Kannan
Please change the format while assigning the date to variable. Format should be “DD-MMM-YYYY”
I a trying to make the table accessed be from an external excel. Is this possible?
Hi,
I can get the delete button to work, but I’m getting ‘Run-time error ‘380’: Could not set the Value property. Invalid property value.’ on the Edit button. By the way thanks for the tutorials, it is exactly what I needed!
Hi, how to add 1 another option button and change selection from 2 options to 3 please?
I am having a problem with editing the combo boxes in my form. I get ‘Run time error ‘380’. Could not set the Value property. Invalid property value.’ when I select edit. If I comment out the combo box code in the edit button it will work but nothing will show for the combo box data to be able to edit. I’ve been through the tutorials multiple times thinking there was something I have missed but I can’t seem to find anything.
Please ignore my last 2 comments regarding errors, I have managed to work out the problem!
Hi, I am trying to change the code so that it inputs the data on the spreadsheet vertically rather than horizontally. can you help please, i am a bit stuck.
Dear Sir,
I find your tutorials very helpful. It has helped me do some things I never imagine I could do with excel.
I’m creating a data register and keep on getting ‘run-time error’ with the ‘edit’ button VBA code.
Below is the code. When I inactivate the codes with the apostrophe, the code well but of-course with out the possibility of editing the sections I’d like to edit.
Private Sub cmdEdit_PMR_Click()
If Selected_List = 0 Then
MsgBox “No Row is Selected.”, vbOKOnly + vbInformation, “Edit”
Exit Sub
End If
‘Code to update the value to respective controls
Dim sGender As String
Dim oOrigin As String
Dim rConsent As String
Me.TxtRowNumber_PMR.Value = Selected_List + 1
Me.TxtDate_PMR.Value = Me.LstDatabase_PMR.List(Me.LstDatabase_PMR.ListIndex, 1)
Me.TxtTitle_PMR.Value = Me.LstDatabase_PMR.List(Me.LstDatabase_PMR.ListIndex, 2)
Me.TxtFirstName_PMR.Value = Me.LstDatabase_PMR.List(Me.LstDatabase_PMR.ListIndex, 3)
Me.TxtMiddle_PMR.Value = Me.LstDatabase_PMR.List(Me.LstDatabase_PMR.ListIndex, 4)
Me.TxtSurname_PMR.Value = Me.LstDatabase_PMR.List(Me.LstDatabase_PMR.ListIndex, 5)
Me.TxtDOB_PMR.Value = Me.LstDatabase_PMR.List(Me.LstDatabase_PMR.ListIndex, 6)
sGender = Me.LstDatabase_PMR.List(Me.LstDatabase_PMR.ListIndex, 7)
If sGender = “Female” Then
Me.OptFemale_PMR.Value = True
Else
Me.OptMale_PMR.Value = True
End If
Me.CmbMaritalStatus_PMR.Value = Me.LstDatabase_PMR.List(Me.LstDatabase_PMR.ListIndex, 8)
Me.TxtOccupation_PMR.Value = Me.LstDatabase_PMR.List(Me.LstDatabase_PMR.ListIndex, 9)
Me.TxtCoB_PMR.Value = Me.LstDatabase_PMR.List(Me.LstDatabase_PMR.ListIndex, 10)
Me.TxtHomeAdd_PMR.Value = Me.LstDatabase_PMR.List(Me.LstDatabase_PMR.ListIndex, 11)
Me.TxtPostalAdd_PMR.Value = Me.LstDatabase_PMR.List(Me.LstDatabase_PMR.ListIndex, 12)
Me.TxtWorkPh_PMR.Value = Me.LstDatabase_PMR.List(Me.LstDatabase_PMR.ListIndex, 13)
Me.TxtMobilePh_PMR.Value = Me.LstDatabase_PMR.List(Me.LstDatabase_PMR.ListIndex, 14)
Me.TxtEmail_PMR.Value = Me.LstDatabase_PMR.List(Me.LstDatabase_PMR.ListIndex, 15)
Me.TxtERContName_PMR.Value = Me.LstDatabase_PMR.List(Me.LstDatabase_PMR.ListIndex, 16)
Me.TxtECRelation_PMR.Value = Me.LstDatabase_PMR.List(Me.LstDatabase_PMR.ListIndex, 17)
Me.TxtECPh_PMR.Value = Me.LstDatabase_PMR.List(Me.LstDatabase_PMR.ListIndex, 18)
oOrigin = Me.LstDatabase_PMR.List(Me.LstDatabase_PMR.ListIndex, 19)
If oOrigin = “Expat” Then
Me.OptExpat_PMR.Value = True
Else
Me.OptPNG_PMR.Value = True
End If
Me.CmbPNGRegion_PMR.Value = Me.LstDatabase_PMR.List(Me.LstDatabase_PMR.ListIndex, 20)
Me.TxtExpatCountry_PMR.Value = Me.LstDatabase_PMR.List(Me.LstDatabase_PMR.ListIndex, 21)
Me.TxtReligion_PMR.Value = Me.LstDatabase_PMR.List(Me.LstDatabase_PMR.ListIndex, 22)
Me.TxtAllergichx_PMR.Value = Me.LstDatabase_PMR.List(Me.LstDatabase_PMR.ListIndex, 23)
Me.TxtMedications_PMR.Value = Me.LstDatabase_PMR.List(Me.LstDatabase_PMR.ListIndex, 24)
‘rConsent = Me.LstDatabase_PMR.List(Me.LstDatabase_PMR.ListIndex, 25)
‘If rConsent = “Yes” Then
‘Me.OptConsentYes_PMR.Value = True
‘Else
‘Me.OptConsentNo_PMR.Value = True
‘End If
‘Me.TxtFileNo_PMR.Value = Me.LstDatabase_PMR.List(Me.LstDatabase_PMR.ListIndex, 26)
MsgBox “Please make the required changes and click the ‘save’ button to update.”, vbOKOnly + vbInformation, “Edit”
End Sub
I don’t know what else to do. Pls help.