Data Entry Form in MS Excel and VBA
MS Excel is a versatile application that helps in analyzing data, doing analysis, and developing Data Entry Forms with the help of VBA. This is very handy, as we don’t need to use a separate application to store data and create forms. We can leverage the integrated VBA to develop complex forms and use worksheets to store data.
In this post, we will discuss an automated data entry form developed using Excel and VBA. This is a simple form created to demonstrate how data can be transferred from a user form to a worksheet automatically. Instead of entering the data directly into the worksheet, users can enter the required information through the form and save it to the Excel sheet with a click of a button.
Using a data entry form helps in maintaining consistency and reduces the chances of manual data entry errors. It also provides a better interface for users who may not be comfortable working directly with worksheets. Since the data is stored in an Excel sheet, it can be easily analyzed, filtered, and used for reporting purposes.
The example discussed in this tutorial is intentionally kept simple so that the concepts are easy to understand. However, the same techniques and VBA code can be used to develop more complex forms with additional controls, validation checks, search functionality, and automated reporting features. You can also modify the code to transfer data to multiple worksheets and collate information from different sources into a single Excel workbook.
By the end of this tutorial, you will have a good understanding of how to create a basic data entry form in Excel and use VBA to automate the process of storing data in a worksheet.
Create Data Entry Form in MS Excel and VBA
Follow the below steps to create the workbook for the Data Entry Form:
1. Open the Excel application.
2. Create a new workbook.
3. Save the workbook as Data Entry Form.xlsm. Make sure to save it as a Macro-Enabled Workbook since we will be using VBA code in this project.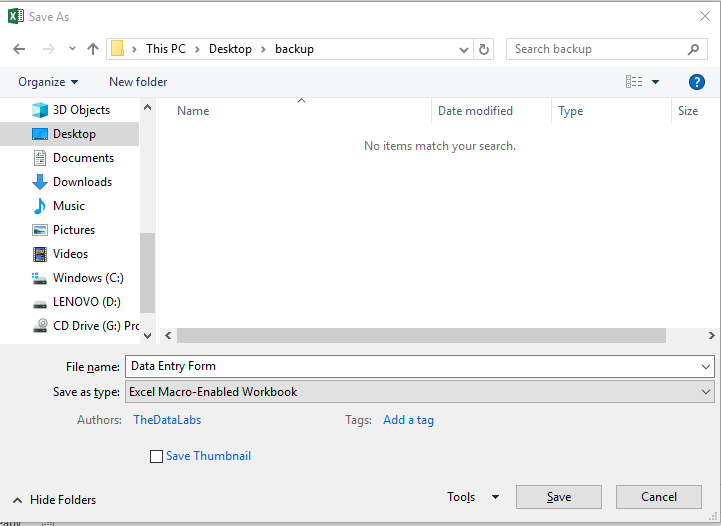
4. Rename Sheet1 to Form. This sheet will be used to create the Data Entry Form where users will enter the information.
5. Add another worksheet to the workbook and rename it to Data. This sheet will be used to store all the records entered through the form.
6. In the Data sheet, add the following column headings in the range A1: Serial No., Name, Gender, Qualification, City, State, Country
These columns will be used to store the data captured from the Data Entry Form. Each new record entered through the form will be saved in a new row below these headings.

7. Now let’s create the Data Entry Form using the ActiveX Controls available in the Developer tab under the Controls group.
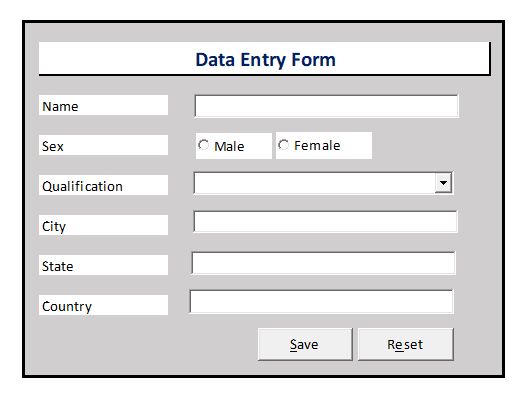
8. Add the following controls to the Form sheet:
Text Box for Name
Option Buttons for Sex
Combo Box for Qualification
Text Boxes for City, State, and Country
Command Button for Save
Command Button for Reset
9. After adding the required ActiveX Controls, assign appropriate labels to each control and create a heading for the form. Refer to the control names shown in the above snapshot while designing the form.
10. Press ALT + F11 to open the Visual Basic Editor (VBE) window.
11. In the Project Explorer, double-click on Sheet1 (Form) to open the code window for the worksheet.

12. Paste the below VBA code to validate the inputs entered by the user in the form. This code will ensure that all mandatory fields are entered before the data is saved.
Function ValidateForm() As Boolean

txtName.BackColor = vbWhite
cmbQualification.BackColor = vbWhite
txtCity.BackColor = vbWhite
txtState.BackColor = vbWhite
txtCountry.BackColor = vbWhite

ValidateForm = True

If Trim(txtName.Value) = "" Then

    MsgBox "Name can't be left blank.", vbOKOnly + vbInformation, "Name"
    txtName.BackColor = vbRed
    txtName.Activate
    ValidateForm = False
ElseIf optMale.Value = False And optFemale.Value = False Then

    MsgBox "Please select sex.", vbOKOnly + vbInformation, "Sex"
    ValidateForm = False

ElseIf cmbQualification.Text <> "10th" And cmbQualification.Text <> "10+2" And _
        cmbQualification.Text <> "Bachelor Degree" And cmbQualification.Text <> "Master Degree" And _
        cmbQualification.Text <> "PHD" Then
    MsgBox "Please select the correct qualification from drop down.", vbOKOnly + vbInformation, "Qualification"
    cmbQualification.BackColor = vbRed
    cmbQualification.Activate
    ValidateForm = False
ElseIf Trim(txtCity.Value) = "" Then
    MsgBox "City name can't be left blank.", vbOKOnly + vbInformation, "City name"
    txtCity.BackColor = vbRed
    txtCity.Activate
    ValidateForm = False

ElseIf Trim(txtState.Value) = "" Then
    MsgBox "State can't be left blank.", vbOKOnly + vbInformation, "State Name"
    txtState.BackColor = vbRed
    txtState.Activate
    ValidateForm = False
ElseIf Trim(txtCountry.Value) = "" Then
    MsgBox "Country can't be left blank.", vbOKOnly + vbInformation, "Country Name"
    txtCountry.BackColor = vbRed
    txtCountry.Activate
    ValidateForm = False
End If
End Function
13. Add the below VBA code to create a Reset procedure. This procedure will clear all the controls and restore the form to its default state.
Function Reset()

Application.ScreenUpdating = False

txtName.Value = ""
txtName.BackColor = vbWhite

optMale.Value = False
optFemale.Value = False

cmbQualification.Text = ""
cmbQualification.BackColor = vbWhite

txtCity.Value = ""
txtCity.BackColor = vbWhite

txtState.Value = ""
txtState.BackColor = vbWhite

txtCountry.Value = ""
txtCountry.BackColor = vbWhite

Application.ScreenUpdating = True
End Function
14. Add the below code in the Click event of cmdReset to call the Reset procedure whenever the Reset button is clicked.
Private Sub cmdReset_Click()
Dim i As Integer

i = MsgBox("Do you want to reset this form?", vbQuestion + vbYesNo + vbDefaultButton2, "Form Reset")

If i = vbYes Then

    Call Reset

End If
End Sub
15. Add the below code in the Click event of cmdSave to transfer the data entered in the Form sheet to the Data sheet. The code will also insert the data into the next available row in the Data sheet.
Private Sub cmdSave_Click()

Application.ScreenUpdating = False

Dim iRow As Long

iRow = Sheets("Data").Range("A1048576").End(xlUp).Row + 1

If ValidateForm = True Then

    With ThisWorkbook.Sheets("Data")

       .Range("A" & iRow).Value = iRow - 1
       .Range("B" & iRow).Value = txtName.Value
       .Range("C" & iRow).Value = IIf(optMale.Value = True, "Male", "Female")
       .Range("D" & iRow).Value = cmbQualification.Text
       .Range("E" & iRow).Value = txtCity.Value
       .Range("F" & iRow).Value = txtState.Value
       .Range("G" & iRow).Value = txtCountry.Value

    End With
    Call Reset
Else
    Application.ScreenUpdating = True
    Exit Sub
End If

    Application.ScreenUpdating = True
End Sub
16. Press CTRL + S to save the workbook and then close the VBA Editor window.
17. Return to Excel and turn off Design Mode from the Developer tab.
18. Start entering data in the controls available on the Form sheet and click the Save button to transfer the data to the Data sheet.
19. Verify that the entered data has been successfully added to the next available row in the Data sheet.
20. Click the Reset button to clear all the controls and prepare the form for a new entry.
he Data Entry Form is now ready to use. You can continue entering records through the form, and the data will be automatically transferred and stored in the Data sheet.
YouTube Tutorial
Please watch our YouTube tutorial on ‘How to make macro enabled Form in Excel sheet’
Download File
Please click on the below button to download the Automated Data Entry Form with VBA code.


Hi, i was looking the “Data Entry Form” macro and hove one question. when i click save at the end. will the macro save the input data in the “data sheet” automatically or i have to press save before i close the excel? if not can you send me a code to add so that i don’t have to click save.
Thanks for your help
good learning