Table of Contents
Introduction – Automated Data Entry Form in Google Sheets
In our daily work routine, there are often instances where we find ourselves tasked with entering data into databases or spreadsheet applications. Inputting data directly into the intended file can be challenging and susceptible to errors. However, by employing an Automated Data Entry Form to handle this task, we have the opportunity to expedite the data entry process and enhance accuracy significantly – up to 100%. This approach not only saves time but also ensures more reliable data input, making our professional lives more efficient and error-resistant.
How can you create an Automated Data Entry Form in Google Sheets and Apps Script?
Although Google provides a default data entry form in the form of a Google Form, for complex and large-scale data entry jobs, it is always preferable to develop an Automated Data Entry Form in Google Sheet to enhance the task’s user-friendliness and improve accuracy & speed.
Google Sheets has many advantages over the automated data entry forms in MS Excel, MS Access, and other applications installed on your local machine. It allows you to use the most advanced spreadsheet application without having to install it on your computer.
If you want to learn how to create Customer Order Form in Google Sheet and Apps Script then read this article. You will find the step-by-step YouTube tutorial too.
Customer Order Form in Google Sheet and Apps Script
Since Google Sheets is available on the cloud, you can easily access it from anywhere and at any time without any restrictions. You can also share and collaborate with colleagues, friends, and others. Furthermore, Google Apps Script enables you to add advanced features to existing applications and automate all repetitive tasks and data entry jobs.
This tutorial will teach you how to create a data entry form in Google Sheets using Apps Script. This form will cover the following features:
- Designing the User Interface
- Validating Inputs
- Transferring Data
- Search Function
- Edit Record
- Delete Record
- Reset UserForm
Step by Step Guide for Automated Data Entry Form in Google Sheet
Please follow the below steps to create a data entry form in Google Sheets and Apps Script:
Creating Google Sheets for Database, UserForm and Drop-down
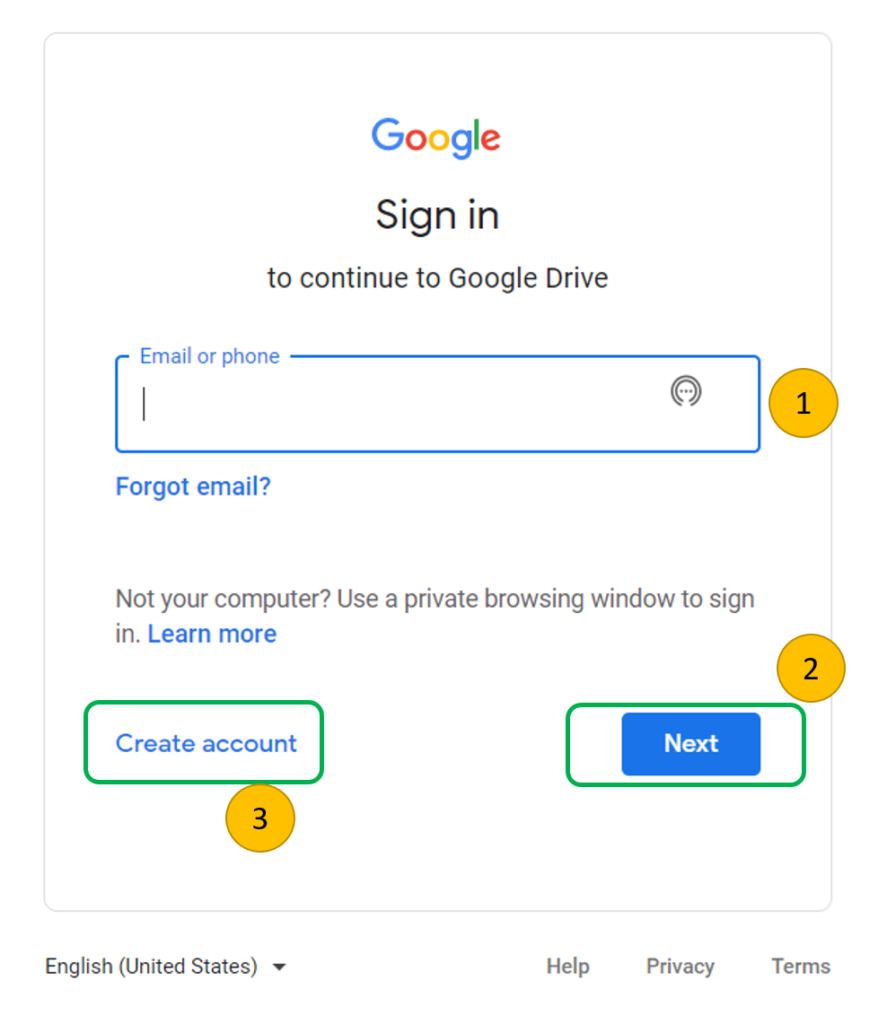
- Login to Google Drive with your existing Google ID (1) or create a new Google Account (3) and then login to Google Drive.
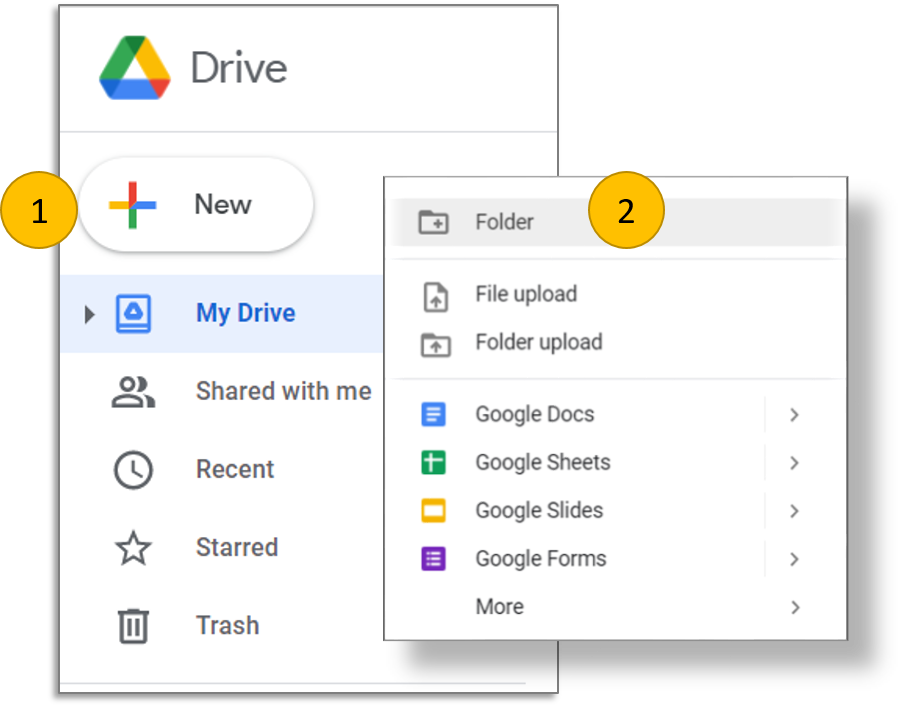
2. Click on New and then click on Folder to create a new folder for our project.
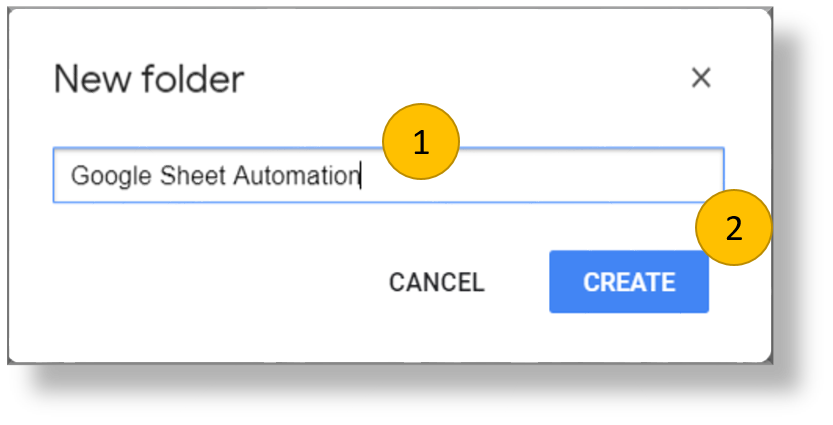
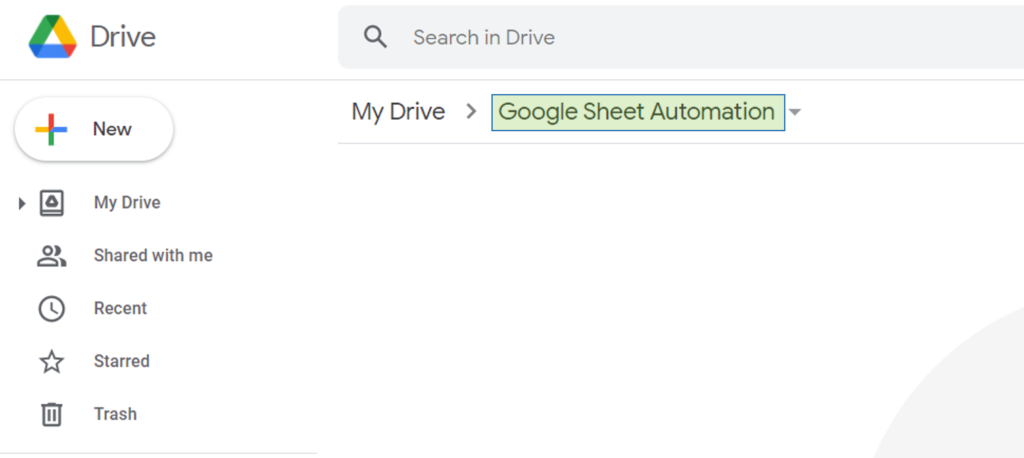
3. In new folder window, just enter ‘Google Sheet Automation‘ and then click on Okay.
4. Now open the Google Sheet Automation folder to create Google Sheet in it.
5. Right click in Google Sheet Automation folder and then select Google Sheets -> Blank spreadsheet from the pop-up menu.
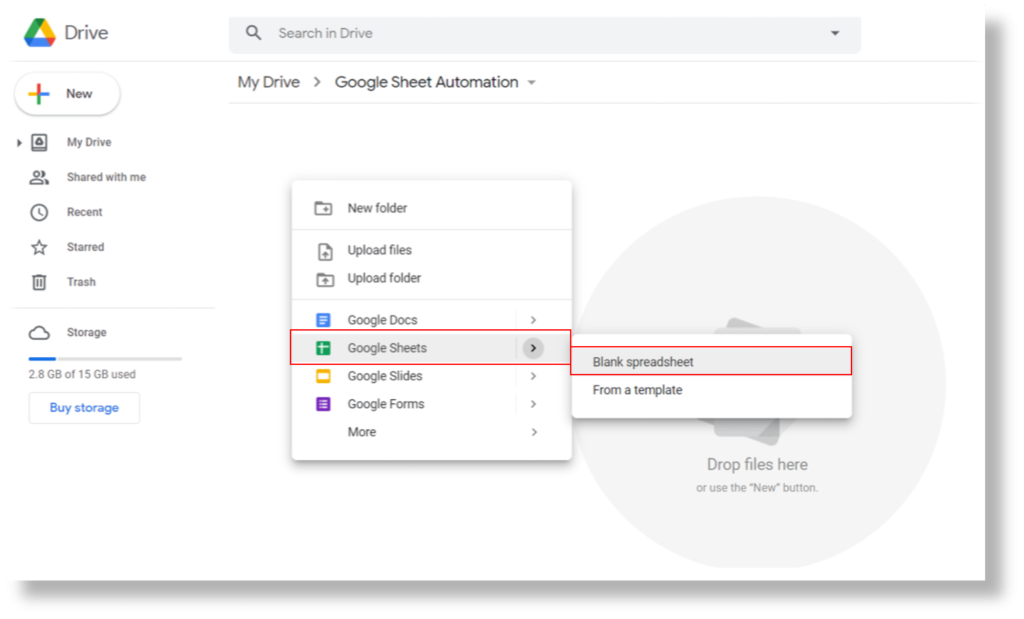
Once you will click on Blank spreadsheet, it will create and open blank spreadsheet in new tab of the browser. We will use the sheet for automated data entry form design.
6. Rename the spreadsheet with ‘Employee Data Entry Form’.
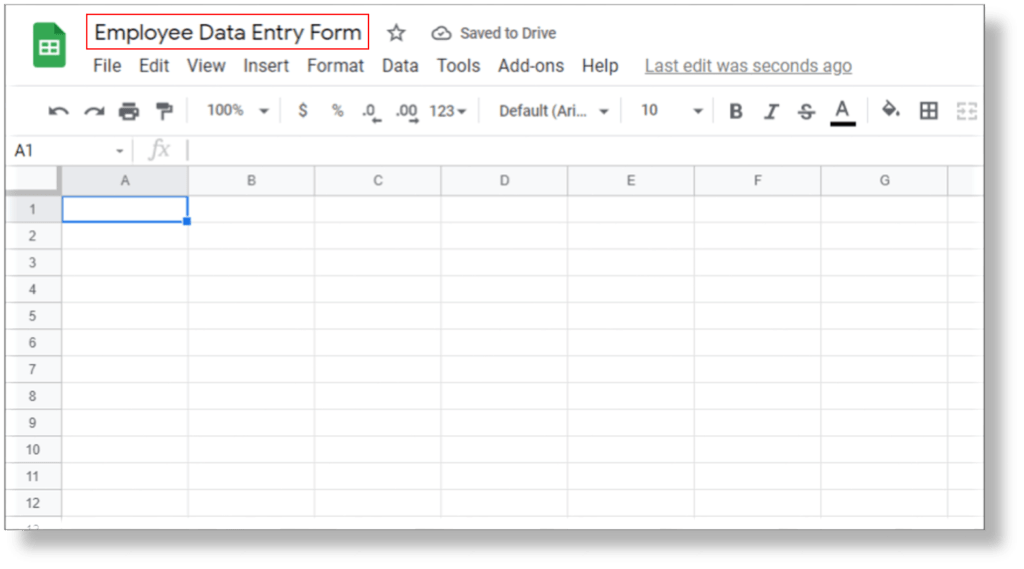
7. Create and rename three worksheets in the newly created spreadsheet as ‘User Form‘, ‘Database‘ and ‘Support Sheet‘ .

We will utilize ‘User Form’ sheet to create an automated data entry form, ‘Database’ sheet to store the data transferred from data entry form and ‘Support Sheet’ to hold the list of departments.
8. Let’s move to the Department sheet and create a list of department in Column A.

9. Let’s jump to the Database sheet and create the required column headers in row 1 starting from Column A to H e.g. Emp ID, Emp Name, Gender, Email ID, Department, Address, Submitted On and Submitted By.

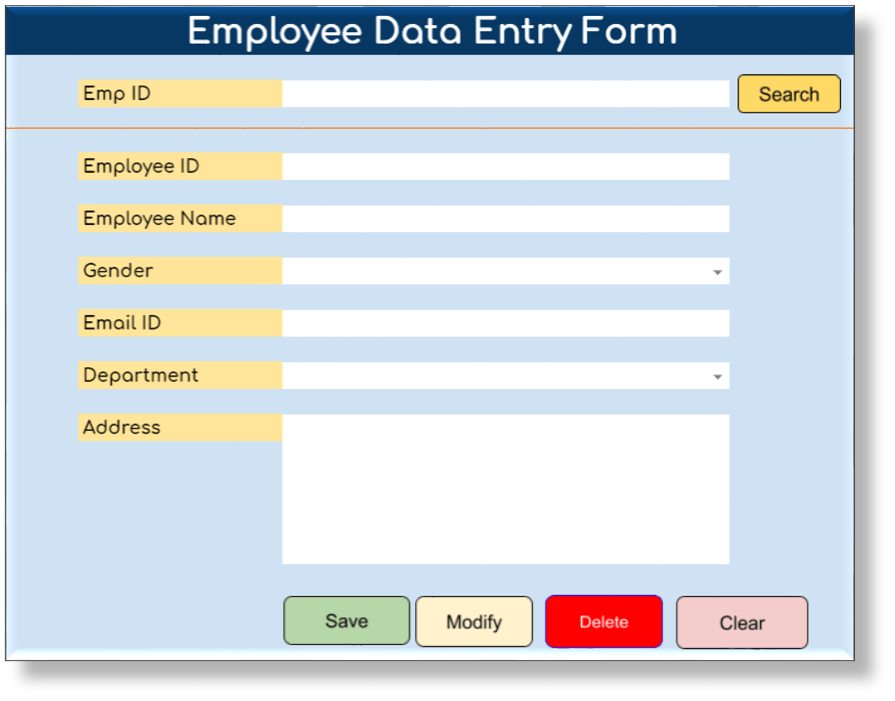
10. Let’s move to the ‘User Form’ sheet and start designing the Employee Data Entry Form with required labels, input fields and buttons.
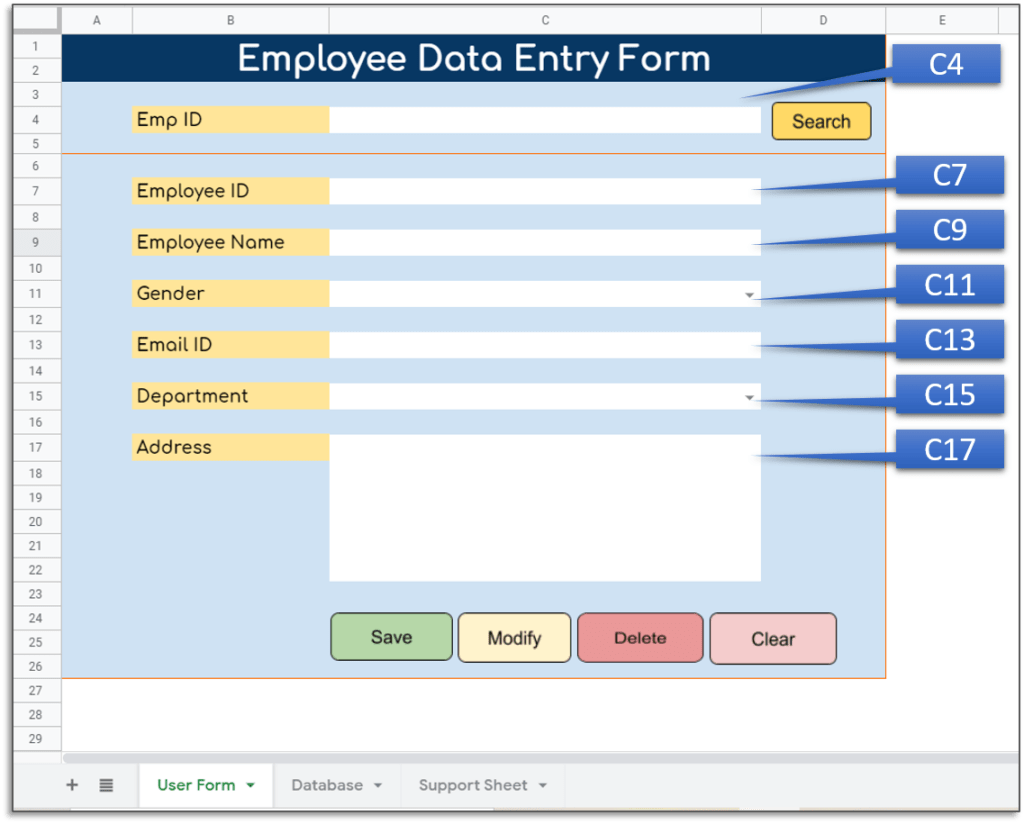
Here, we have one field to search the data and six input fields are for data entry job. Emp ID (C4) is input field to search the record for a particular employee with Emp ID.
Employee ID (cell C7), Employee Name (cell C9), Gender ( cell C11), Email ID (cell C13), Department (cell C15) and Address ( cell C17) are the main input fields which will be updated by user to transfer the data from this from the Database sheet. In these input fields, we will utilize Gender and Department as a drop-down.
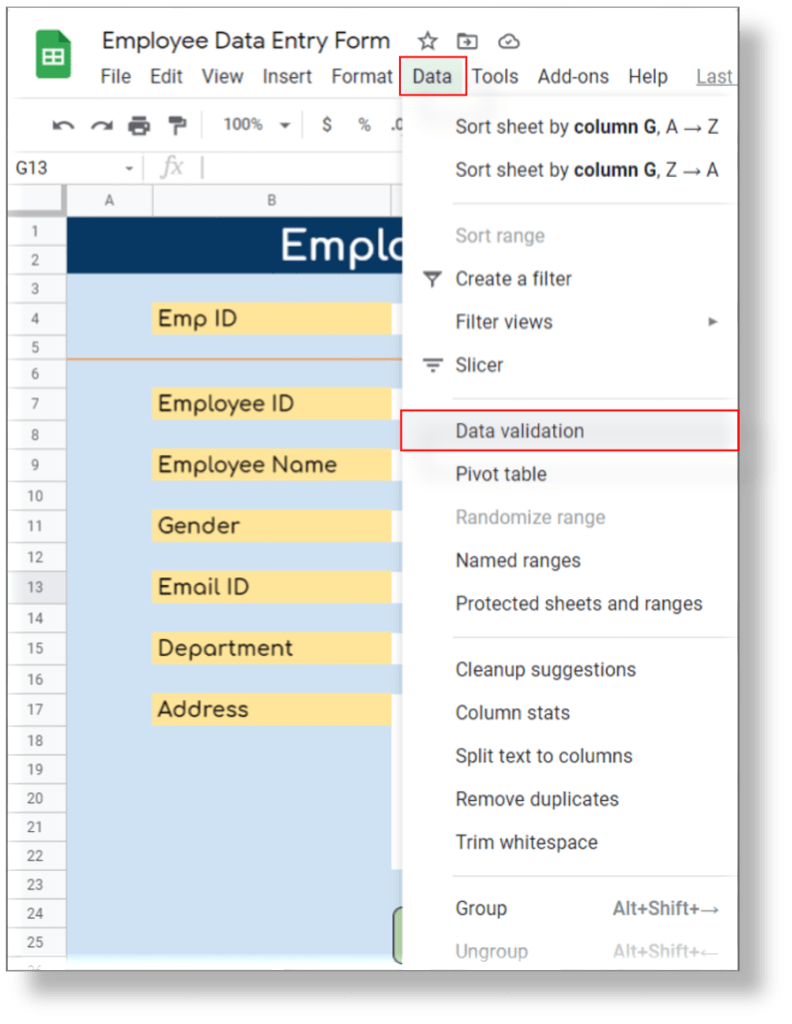
11. To create a drop-down for Gender, just click on Data menu and then select Data Validation.
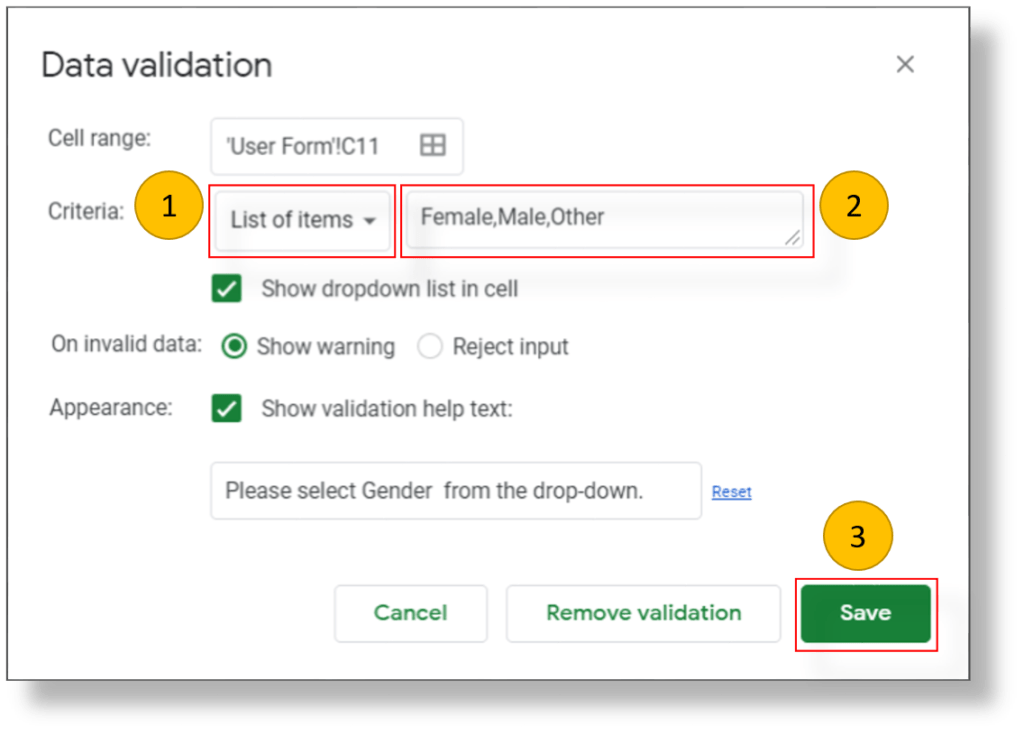
12. In Data Validation window, select ‘List of items’ from the drop-down of Criteria and enter ‘Female,Male,Other’ in text box. Tick the ‘Show dropdown list in cell’ and ‘Show validation help text:’. Enter the help text in given text box as ‘Please select Gender from the drop-down.’ Now click on Save to create the drop-down for Gender.
13. Repeat the same step to create the drop-down for Department. For Department drop-down, we will utilize the list available in Support Data sheet.
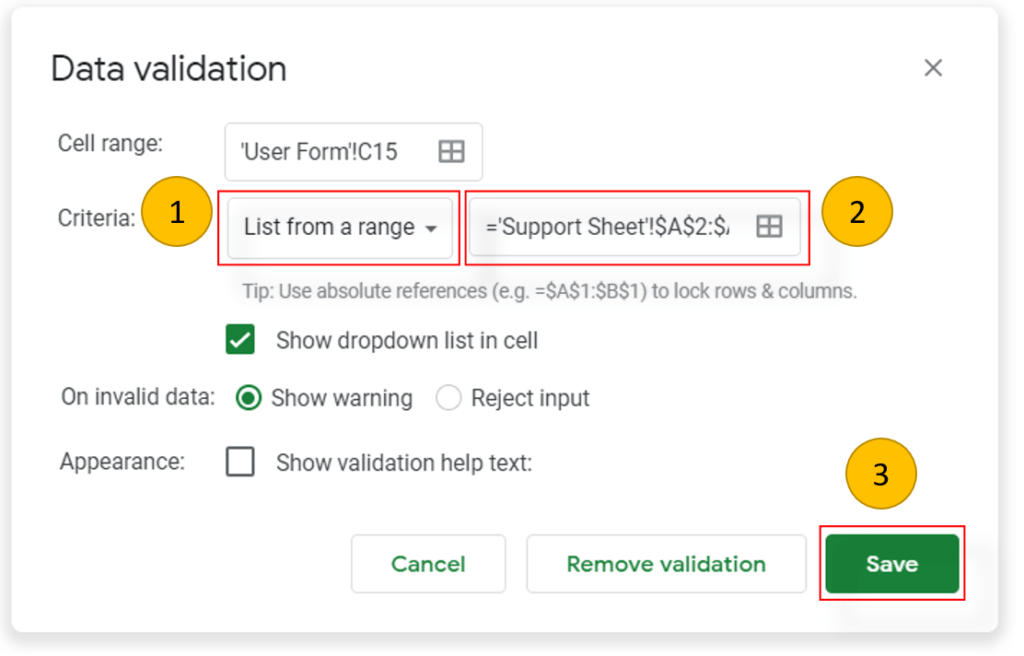
Select ‘List from a range’ from the drop-down of Criteria and give the reference of list items available in ‘Support Data’ sheet.
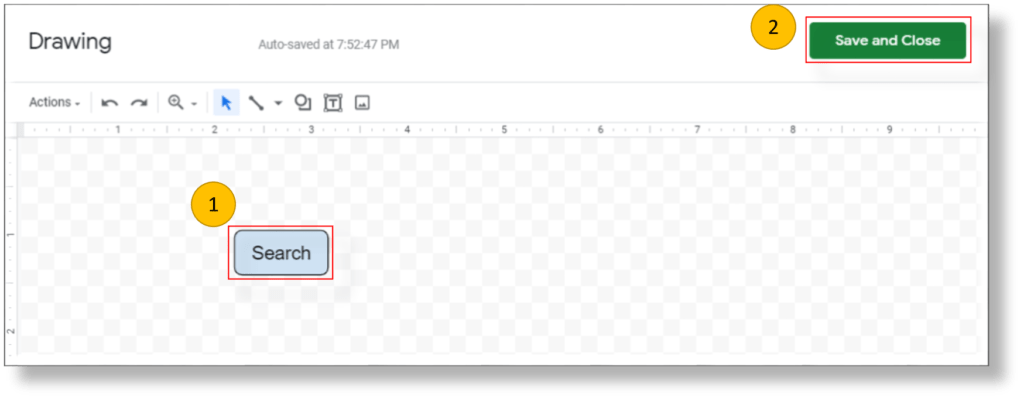
In this form, we have 5 different buttons e.g. Search, Save, Modify, Delete and Clear to perform the relevant actions as per the given name.
14. To create a button, just click on Insert menu and then click on Drawing.

15. In Drawing window, just draw a rounded rectangle and fill with desired color and give the caption as Search. After creating the button, click on Save and Close to insert the button on sheet.
16. Follow the steps 14 and 15 to create Save, Modify, Delete and Clear buttons.

Now, we have done with designing the form, creating drop-downs and inserting the required buttons. Let’s move to the code window.
Writing the App Script Code for Automated Data Entry Form in Google Sheet
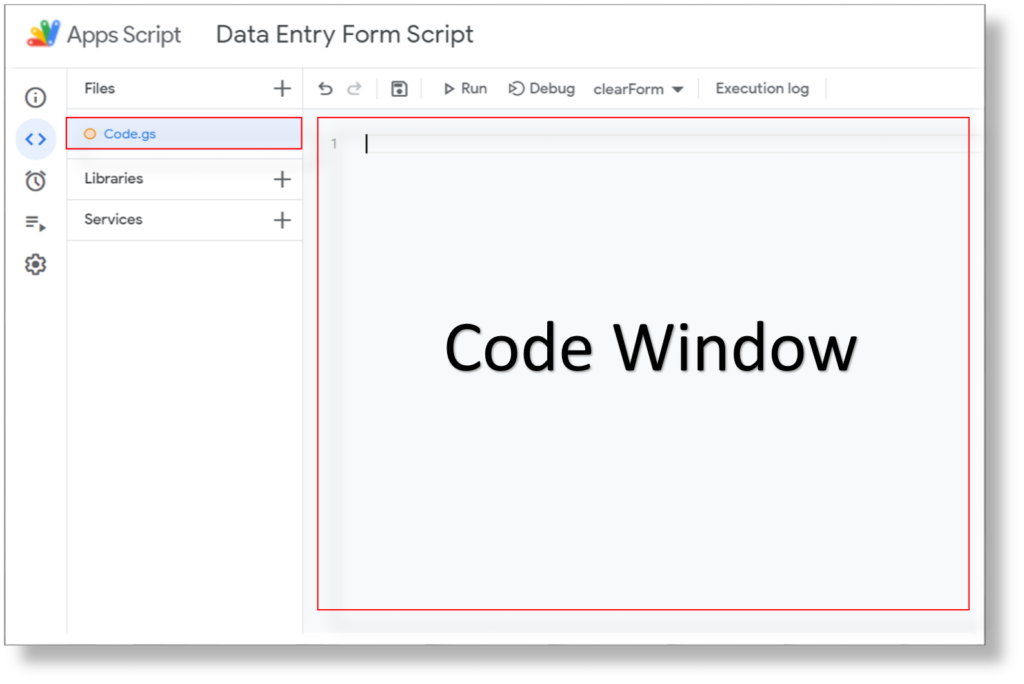
17. To open the Apps Script window, just click on Tools menu and then click on Script Editors.
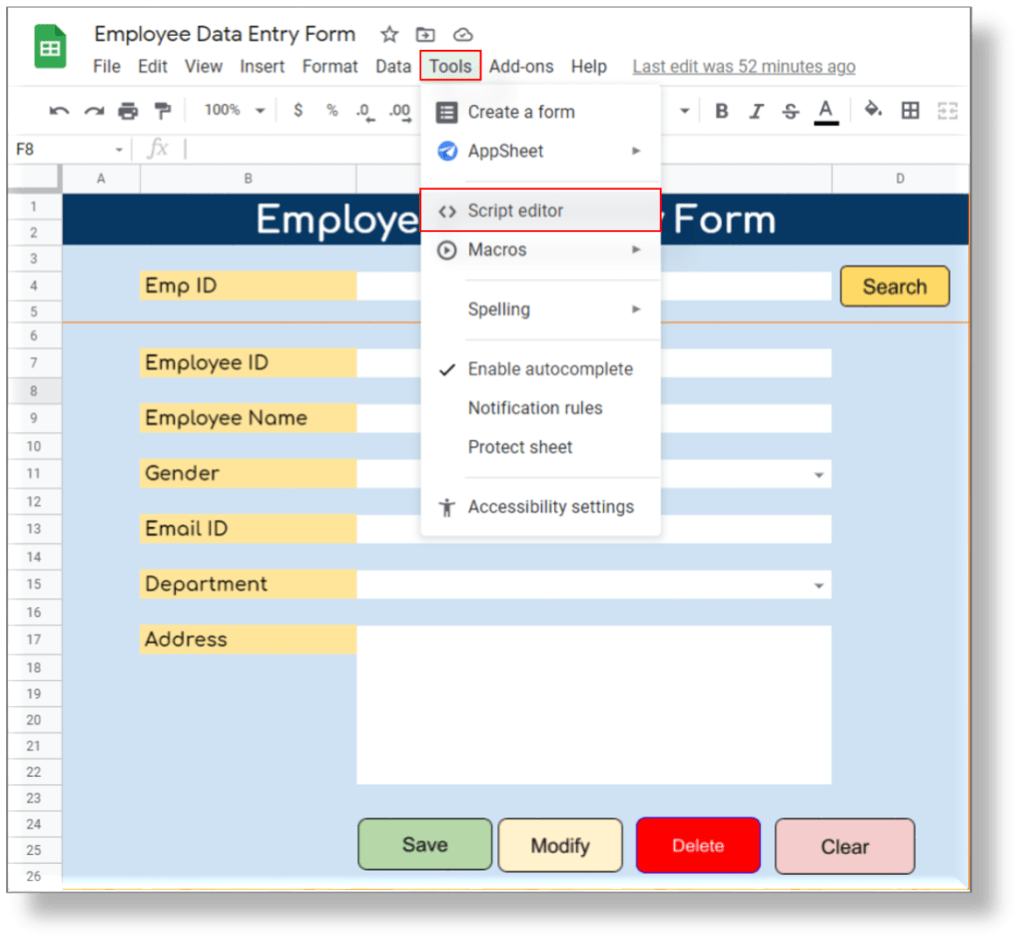
Once you click on Script editor in Tools menu, it will open the Apps Script window for Data Entry project.
18. Let’s write a function to clear the automated data entry form. We will assign this function on click event of Clear button available on User Form sheet.
// Function to Clear the User Form

function clearForm()
{
  var myGoogleSheet= SpreadsheetApp.getActiveSpreadsheet(); //declare a variable and set with active google sheet
  var shUserForm    = myGoogleSheet.getSheetByName("User Form"); //declare a variable and set with the User Form worksheet

  //to create the instance of the user-interface environment to use the alert features
  var ui = SpreadsheetApp.getUi();

  // Display a dialog box with a title, message, and "Yes" and "No" buttons. The user can also
  // close the dialog by clicking the close button in its title bar.
  var response = ui.alert("Reset Confirmation", 'Do you want to reset this form?',ui.ButtonSet.YES_NO);

 // Checking the user response and proceed with clearing the form if user selects Yes
 if (response == ui.Button.YES)
  {

  shUserForm.getRange("C4").clear(); //Search Field
  shUserForm.getRange("C7").clear();// Employeey ID
  shUserForm.getRange("C9").clear(); // Employee Name
  shUserForm.getRange("C11").clear(); // Gender
  shUserForm.getRange("C13").clear(); // Email ID
  shUserForm.getRange("C15").clear(); //Department
  shUserForm.getRange("C17").clear();//Address

 //Assigning white as default background color

 shUserForm.getRange("C4").setBackground('#FFFFFF');
 shUserForm.getRange("C7").setBackground('#FFFFFF');
 shUserForm.getRange("C9").setBackground('#FFFFFF');
 shUserForm.getRange("C11").setBackground('#FFFFFF');
 shUserForm.getRange("C13").setBackground('#FFFFFF');
 shUserForm.getRange("C15").setBackground('#FFFFFF');
 shUserForm.getRange("C17").setBackground('#FFFFFF');

  return true ;

  }
}
19. Create a function to validate the data entry made by users. We will utilize this function while transferring data from User form to Database sheet.
//Declare a function to validate the entry made by user in UserForm

function validateEntry(){

  var myGooglSheet= SpreadsheetApp.getActiveSpreadsheet(); //declare a variable and set with active google sheet
  var shUserForm    = myGooglSheet.getSheetByName("User Form"); //delcare a variable and set with the User Form worksheet

  //to create the instance of the user-interface environment to use the messagebox features
  var ui = SpreadsheetApp.getUi();

    //Assigning white as default background color

  shUserForm.getRange("C7").setBackground('#FFFFFF');
  shUserForm.getRange("C9").setBackground('#FFFFFF');
  shUserForm.getRange("C11").setBackground('#FFFFFF');
  shUserForm.getRange("C13").setBackground('#FFFFFF');
  shUserForm.getRange("C15").setBackground('#FFFFFF');
  shUserForm.getRange("C17").setBackground('#FFFFFF');

//Validating Employee ID
  if(shUserForm.getRange("C7").isBlank()==true){
    ui.alert("Please enter Employee ID.");
    shUserForm.getRange("C7").activate();
    shUserForm.getRange("C7").setBackground('#FF0000');
    return false;
  }

 //Validating Employee Name
  else if(shUserForm.getRange("C9").isBlank()==true){
    ui.alert("Please enter Employee Name.");
    shUserForm.getRange("C9").activate();
    shUserForm.getRange("C9").setBackground('#FF0000');
    return false;
  }
  //Validating Gender
  else if(shUserForm.getRange("C11").isBlank()==true){
    ui.alert("Please select Gender from the drop-down.");
    shUserForm.getRange("C11").activate();
    shUserForm.getRange("C11").setBackground('#FF0000');
    return false;
  }
  //Validating Email ID
  else if(shUserForm.getRange("C13").isBlank()==true){
    ui.alert("Please enter a valid Email ID.");
    shUserForm.getRange("C13").activate();
    shUserForm.getRange("C13").setBackground('#FF0000');
    return false;
  }
  //Validating Department
  else if(shUserForm.getRange("C15").isBlank()==true){
    ui.alert("Please select Department from the drop-down.");
    shUserForm.getRange("C15").activate();
    shUserForm.getRange("C15").setBackground('#FF0000');
    return false;
  }
  //Validating Address
  else if(shUserForm.getRange("C17").isBlank()==true){
    ui.alert("Please enter address.");
    shUserForm.getRange("C17").activate();
    shUserForm.getRange("C17").setBackground('#FF0000');
    return false;
  }

  return true;

}
20. Create a function to transfer the data from automated data entry form to Database sheet.
// Function to submit the data to Database sheet
function submitData() {

  var myGooglSheet= SpreadsheetApp.getActiveSpreadsheet(); //declare a variable and set with active google sheet

  var shUserForm= myGooglSheet.getSheetByName("User Form"); //delcare a variable and set with the User Form worksheet

  var datasheet = myGooglSheet.getSheetByName("Database"); ////delcare a variable and set with the Database worksheet

  //to create the instance of the user-interface environment to use the messagebox features
  var ui = SpreadsheetApp.getUi();

  // Display a dialog box with a title, message, and "Yes" and "No" buttons. The user can also
  // close the dialog by clicking the close button in its title bar.
  var response = ui.alert("Submit", 'Do you want to submit the data?',ui.ButtonSet.YES_NO);

  // Checking the user response and proceed with clearing the form if user selects Yes
  if (response == ui.Button.NO)
  {return;//exit from this function
  }

  //Validating the entry. If validation is true then proceed with transferring the data to Database sheet
 if (validateEntry()==true) {

    var blankRow=datasheet.getLastRow()+1; //identify the next blank row

    datasheet.getRange(blankRow, 1).setValue(shUserForm.getRange("C7").getValue()); //Employee ID
    datasheet.getRange(blankRow, 2).setValue(shUserForm.getRange("C9").getValue()); //Employee Name
    datasheet.getRange(blankRow, 3).setValue(shUserForm.getRange("C11").getValue()); //Gender
    datasheet.getRange(blankRow, 4).setValue(shUserForm.getRange("C13").getValue()); // Email ID
    datasheet.getRange(blankRow, 5).setValue(shUserForm.getRange("C15").getValue()); //Department
    datasheet.getRange(blankRow, 6).setValue(shUserForm.getRange("C17").getValue());// Address

    // date function to update the current date and time as submittted on
    datasheet.getRange(blankRow, 7).setValue(new Date()).setNumberFormat('yyyy-mm-dd h:mm'); //Submitted On

    //get the email address of the person running the script and update as Submitted By
    datasheet.getRange(blankRow, 8).setValue(Session.getActiveUser().getEmail()); //Submitted By

    ui.alert(' "New Data Saved - Emp #' + shUserForm.getRange("C7").getValue() +' "');

  //Clearnign the data from the Data Entry Form

    shUserForm.getRange("C7").clear();
    shUserForm.getRange("C9").clear();
    shUserForm.getRange("C11").clear();
    shUserForm.getRange("C13").clear();
    shUserForm.getRange("C15").clear();
    shUserForm.getRange("C17").clear();

 }
}
21. Write the below function to search a record basis the input provided by user in Cell C4 in User Form sheet.
//Function to Search the record

function searchRecord() {

  var myGooglSheet= SpreadsheetApp.getActiveSpreadsheet(); //declare a variable and set with active google sheet
  var shUserForm= myGooglSheet.getSheetByName("User Form"); //delcare a variable and set with the User Form worksheet
  var datasheet = myGooglSheet.getSheetByName("Database"); ////delcare a variable and set with the Database worksheet

  var str       = shUserForm.getRange("C4").getValue();
  var values    = datasheet.getDataRange().getValues(); //getting the entire values from the used range and assigning it to values variable
  var valuesFound=false; //variable to store boolean value

  for (var i = 0; i < values.length; i++)
    {
    var rowValue = values[i]; //declaraing a variable and storing the value

    //checking the first value of the record is equal to search item
    if (rowValue[0] == str) {

      shUserForm.getRange("C7").setValue(rowValue[0]) ;
      shUserForm.getRange("C9").setValue(rowValue[1]);
      shUserForm.getRange("C11").setValue(rowValue[2]);
      shUserForm.getRange("C13").setValue(rowValue[3]);
      shUserForm.getRange("C15").setValue(rowValue[4]);
      shUserForm.getRange("C17").setValue(rowValue[5]);
      return; //come out from the search function

      }
  }

if(valuesFound==false){
  //to create the instance of the user-interface environment to use the messagebox features
  var ui = SpreadsheetApp.getUi();
  ui.alert("No record found!");
 }

}
22. Create a function to delete the record for the employee id available in cell C4.
//Function to delete the record

function deleteRow() {

  var myGooglSheet= SpreadsheetApp.getActiveSpreadsheet(); //declare a variable and set with active google sheet
  var shUserForm= myGooglSheet.getSheetByName("User Form"); //delcare a variable and set with the User Form worksheet
  var datasheet = myGooglSheet.getSheetByName("Database"); ////delcare a variable and set with the Database worksheet

  //to create the instance of the user-interface environment to use the messagebox features
  var ui = SpreadsheetApp.getUi();

  // Display a dialog box with a title, message, and "Yes" and "No" buttons. The user can also
  // close the dialog by clicking the close button in its title bar.
  var response = ui.alert("Submit", 'Do you want to delete the record?',ui.ButtonSet.YES_NO);

 // Checking the user response and proceed with clearing the form if user selects Yes
 if (response == ui.Button.NO)
 {return;//exit from this function
 }

  var str       = shUserForm.getRange("C4").getValue();
  var values    = datasheet.getDataRange().getValues(); //getting the entire values from the used range and assigning it to values variable

  var valuesFound=false; //variable to store boolean value to validate whether values found or not

  for (var i = 0; i < values.length; i++)
    {
    var rowValue = values[i]; //declaraing a variable and storing the value

    //checking the first value of the record is equal to search item
    if (rowValue[0] == str) {

      var  iRow = i+1; //identify the row number
      datasheet.deleteRow(iRow) ; //deleting the row

      //message to confirm the action
      ui.alert(' "Record deleted for Emp #' + shUserForm.getRange("C4").getValue() +' "');

      //Clearing the user form
      shUserForm.getRange("C4").clear() ;
      shUserForm.getRange("C7").clear() ;
      shUserForm.getRange("C9").clear() ;
      shUserForm.getRange("C11").clear() ;
      shUserForm.getRange("C13").clear() ;
      shUserForm.getRange("C15").clear() ;
      shUserForm.getRange("C17").clear() ;

      valuesFound=true;
      return; //come out from the search function
      }
  }

if(valuesFound==false){
  //to create the instance of the user-interface environment to use the messagebox features
  var ui = SpreadsheetApp.getUi();
  ui.alert("No record found!");
 }

}
23. Write the below function to edit the existing data for employee id provided in cell C4.
//Function to edit the record

function editRecord() {

  var myGooglSheet= SpreadsheetApp.getActiveSpreadsheet(); //declare a variable and set with active google sheet
  var shUserForm= myGooglSheet.getSheetByName("User Form"); //delcare a variable and set with the User Form worksheet
  var datasheet = myGooglSheet.getSheetByName("Database"); ////delcare a variable and set with the Database worksheet

  //to create the instance of the user-interface environment to use the messagebox features
  var ui = SpreadsheetApp.getUi();

  // Display a dialog box with a title, message, and "Yes" and "No" buttons. The user can also
  // close the dialog by clicking the close button in its title bar.
  var response = ui.alert("Submit", 'Do you want to edit the data?',ui.ButtonSet.YES_NO);

 // Checking the user response and proceed with clearing the form if user selects Yes
 if (response == ui.Button.NO)
 {return;//exit from this function
 }

  var str       = shUserForm.getRange("C4").getValue();
  var values    = datasheet.getDataRange().getValues(); //getting the entire values from the used range and assigning it to values variable

  var valuesFound=false; //variable to store boolean value to validate whether values found or not

  for (var i = 0; i < values.length; i++)
    {
    var rowValue = values[i]; //declaraing a variable and storing the value

    //checking the first value of the record is equal to search item
    if (rowValue[0] == str) {

      var  iRow = i+1; //identify the row number

      datasheet.getRange(iRow, 1).setValue(shUserForm.getRange("C7").getValue()); //Employee ID
      datasheet.getRange(iRow, 2).setValue(shUserForm.getRange("C9").getValue()); //Employee Name
      datasheet.getRange(iRow, 3).setValue(shUserForm.getRange("C11").getValue()); //Gender
      datasheet.getRange(iRow, 4).setValue(shUserForm.getRange("C13").getValue()); // Email ID
      datasheet.getRange(iRow, 5).setValue(shUserForm.getRange("C15").getValue()); //Department
      datasheet.getRange(iRow, 6).setValue(shUserForm.getRange("C17").getValue());// Address

      // date function to update the current date and time as submittted on
      datasheet.getRange(iRow, 7).setValue(new Date()).setNumberFormat('yyyy-mm-dd h:mm'); //Submitted On

      //get the email address of the person running the script and update as Submitted By
      datasheet.getRange(iRow, 8).setValue(Session.getActiveUser().getEmail()); //Submitted By

      ui.alert(' "Data updated for - Emp #' + shUserForm.getRange("C7").getValue() +' "');

    //Clearnign the data from the Data Entry Form

      shUserForm.getRange("C4").clear();
      shUserForm.getRange("C7").clear();
      shUserForm.getRange("C9").clear();
      shUserForm.getRange("C11").clear();
      shUserForm.getRange("C13").clear();
      shUserForm.getRange("C15").clear();
      shUserForm.getRange("C17").clear();

      valuesFound=true;
      return; //come out from the search function
      }
  }

if(valuesFound==false){
  //to create the instance of the user-interface environment to use the messagebox features
  var ui = SpreadsheetApp.getUi();
  ui.alert("No record found!");
 }

}
Now, we have done with writing the functions which are required to Reset the form, Validate the entries made by users, transfer the data from User form to Database sheet, edit and delete the existing records. Let’s assign all these function to the respective buttons available in user form sheet.
24. Let’s right click on Search button then click on ellipsis (triple dots) available on the right side of button and then click on ‘Assign script’
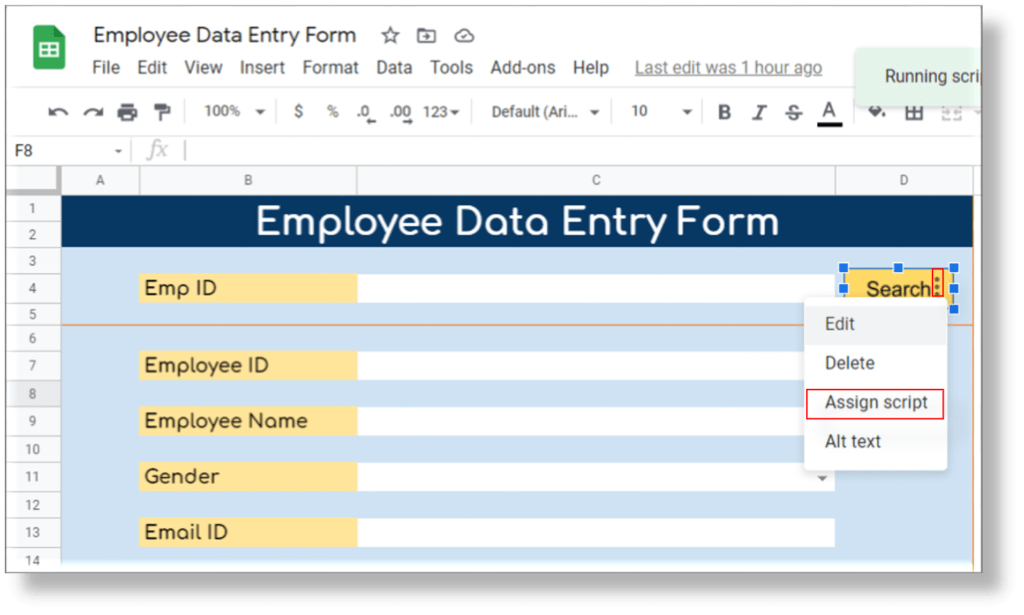
25. In ‘Assign script’ window, just enter the function name and then click on OK button.

26. Follow the steps 24 and 26 to assign the Apps Script functions (e.g. submitData, editRecord, deleteRow and clearForm) to the respective buttons (e.g. Save, Modify, Delete and Clear).
So, we have done with developing an automated data entry form in Google Sheet with the help of Apps Script.
Complete YouTube Tutorial for Automated Data Entry Form in Google Sheet
Please watch the first part of the Automated Data Entry Form in Google Sheets tutorial.
Please watch the second part of the Automated Data Entry Form in Google Sheets tutorial (Search Function).
Please watch the third part of the Automated Data Entry Form in Google Sheets tutorial (Edit Function).
Please watch the fourth part of the Automated Data Entry Form in Google Sheets tutorial (Reset and Delete Functions).
Google Sheets Links for Automated Data Entry Form
You can follow the below links to open the Automated Data Entry Form in Google Sheets and see all the User Interface, Google App Script codes.
Automated Data Entry Form in Google Sheets – Link with Edit Feature
Automated Data Entry Form in Google Sheets – Link with View Feature
Download the Google Apps Script code.
Click on below button to download the Apps Script Code for ‘Automated Data Entry Form in Google Sheets’.

If you want to learn how to create Customer Order Form in Google Sheet and Apps Script then read this article. You will find the step-by-step YouTube tutorial too.
Customer Order Form in Google Sheet and Apps Script
Please share your feedback and question in comment section related with Automated Data Entry Form in Google Sheets. Thanks!


Hi there,
I am getting the error below.
Message details
Exception: The parameters (String) don’t match the method signature for SpreadsheetApp.Spreadsheet.getSheetName.
Hi, when trying to create these functions Google Sheets is showing an error in the last three (deleteRow, editRecord, searchRecord) that’s preventing me from saving them. Can I get advice on how to adjust these to work?
Very good. Thanks
Hi, I tried to create this form exactly as per your guidelines, but it shows a syntax error. Is it possible to get the file?