How to create an Customer Order Form in Google Sheet and Apps Script?
In this post, we will learn how to develop Customer Order Form with conditional data transfer. With the help of this form, you can take order form customer and transfer the data on product sheet.
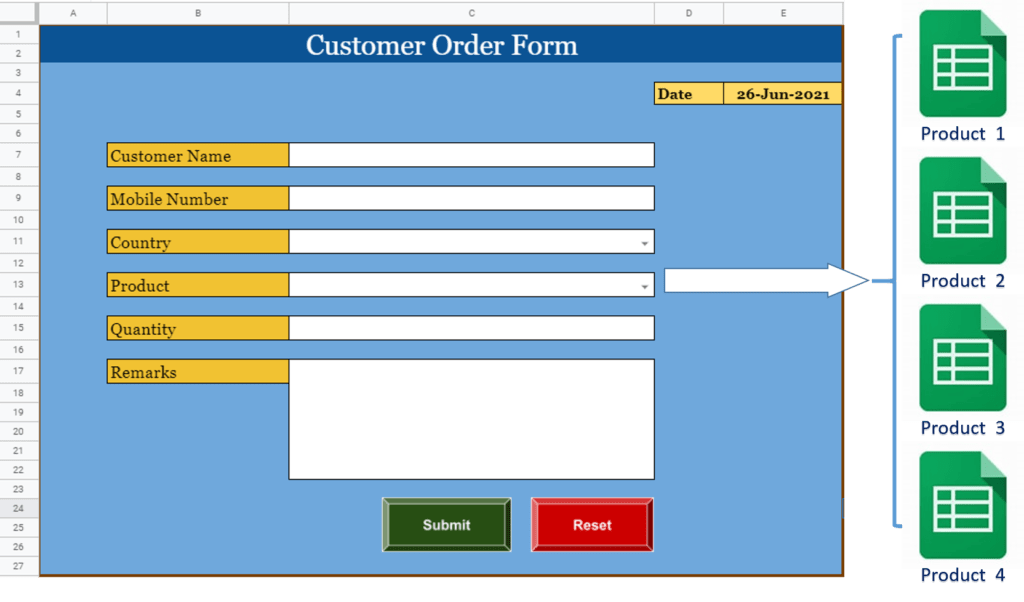
Suppose, you have 5 products and you are getting order for Product 1 then data would be transferred to Product 1 sheet only. Same goes for other products as well.
As Google Sheet is available on cloud, you can run this form from any platform without any compatibility issues.
Please follow the below steps to develop the Customer Order Form in Google Sheet and Apps Script.
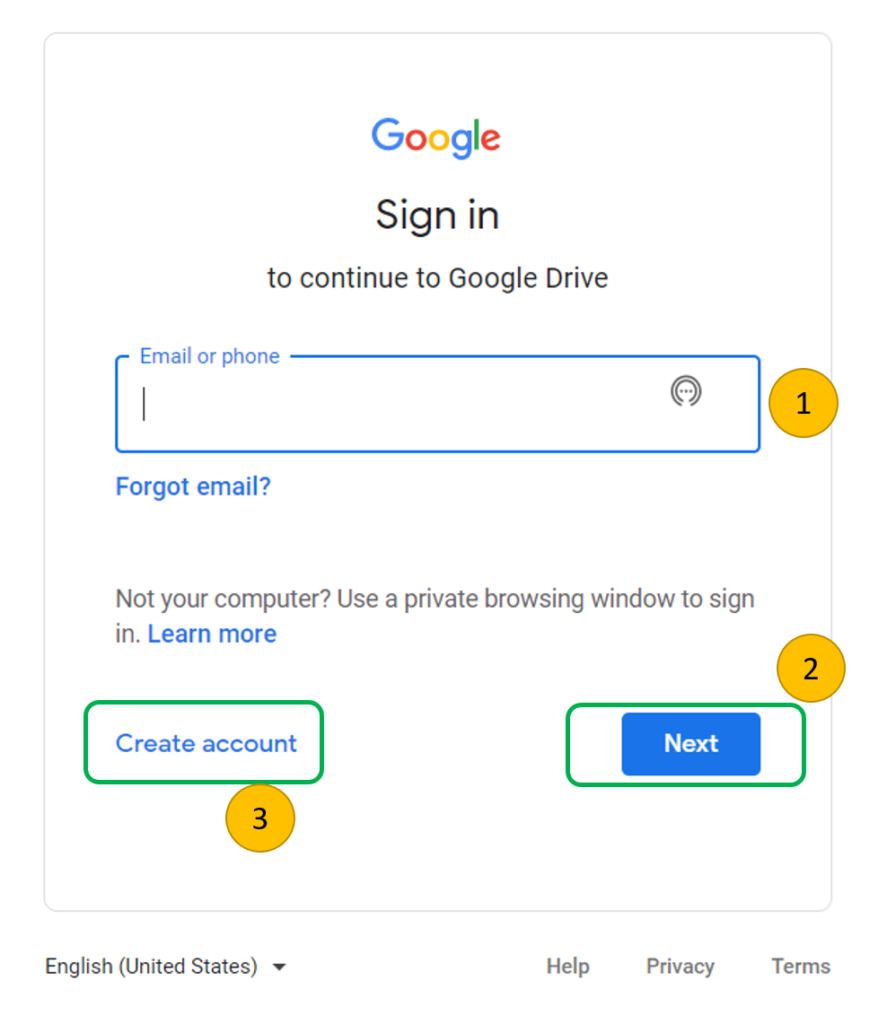
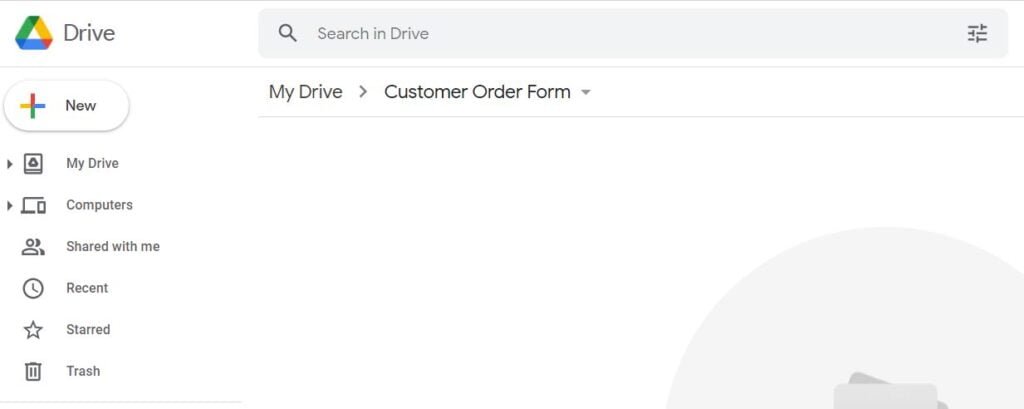
- Login to Google Drive with your existing Google ID (1) or create a new Google Account (3) and then login to Google Drive.
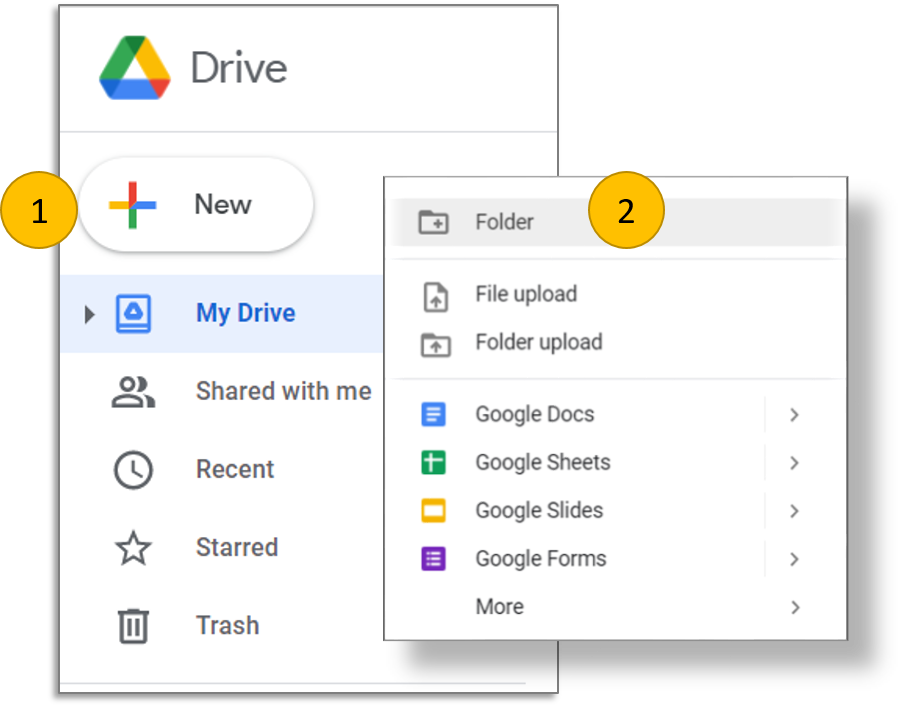
2. Click on New and then click on Folder to create a new folder for our project.
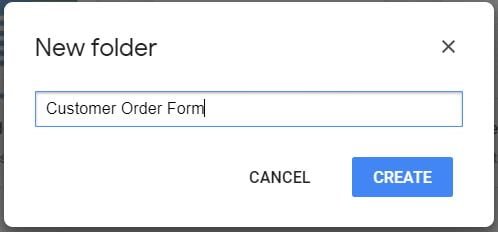
3. In new folder window, just enter ‘Customer Order Form‘ and then click on Okay.
4. Now open the Customer Order Form folder to create Google Sheet in it.
5. Right click in Customer Order Form folder and then select Google Sheets -> Blank spreadsheet from the pop-up menu.
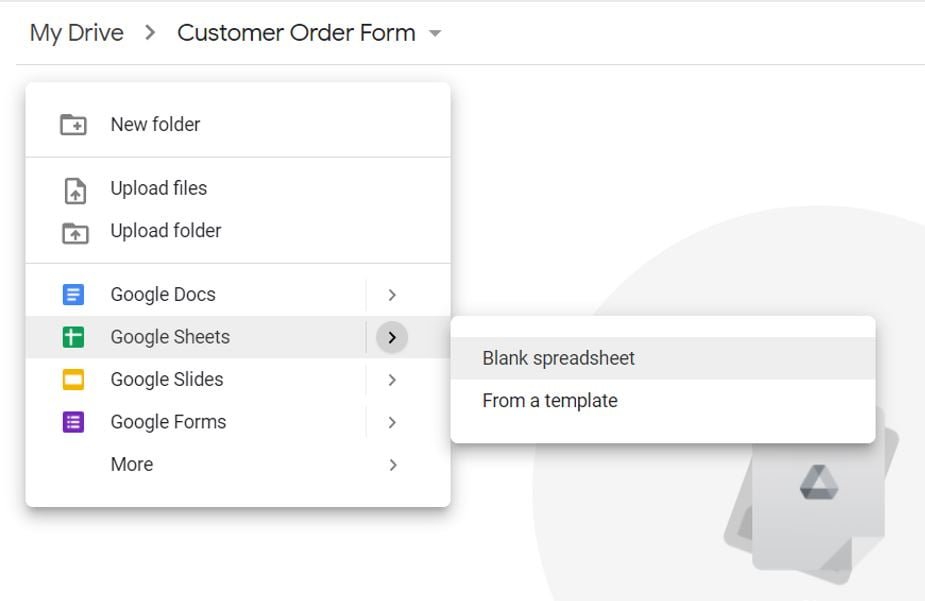
Once you will click on Blank spreadsheet, it will create and open blank spreadsheet in new tab of the browser.

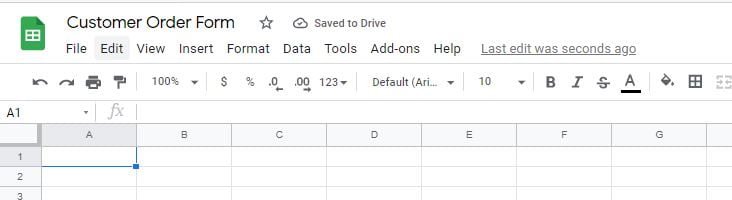
6. Rename the spreadsheet with ‘Customer Order Form’.
7. Create and rename five worksheets in the newly created spreadsheet as ‘Form‘, ‘Mobile‘, ‘Tablet‘, ‘Laptop‘, and ‘TV‘.

We will utilize ‘Form’ sheet to create a data entry form and ‘Mobile’, “Tablet”, “Laptop” and “TV” sheets to store the data transferred from data entry form.
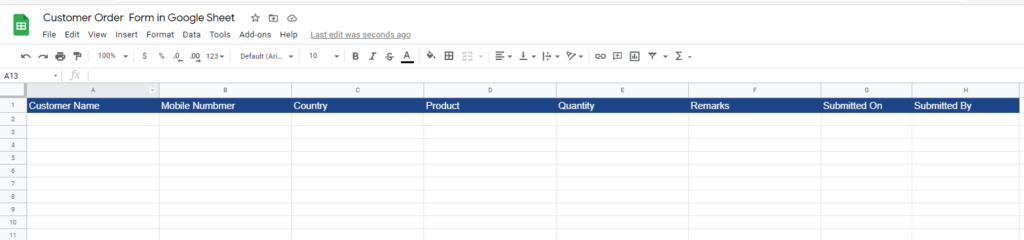
8. Let’s move to the Mobile sheet and create the required column headers in row 1 starting from Column A to H e.g. Customer Name, Mobile Number, Country, Product, Quantity, Remarks, Submitted On and Submitted By.
9. Create the same column headers in ‘Tablet‘, ‘Laptop‘, and ‘TV‘ sheets.
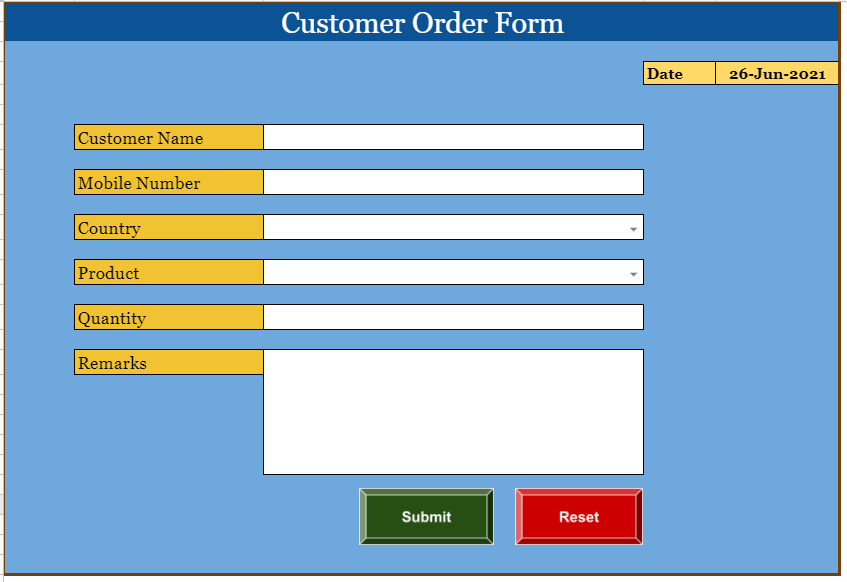
10. Let’s move to the ‘Form’ sheet and start designing the Customer Order Form with required labels, input fields and buttons.
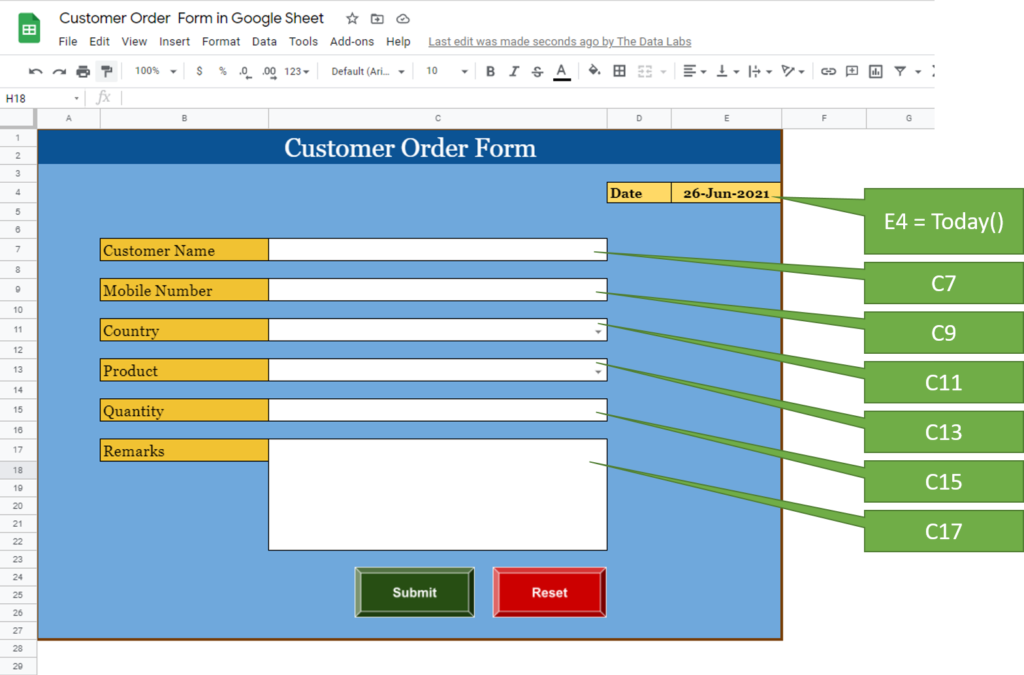
Here, we have today date in cell E4, Customer Name (cell C7), Mobile Number (cell C9), Country ( cell C11), Product (cell C13), Quantity (cell C15) and Remarks ( cell C17).
These are the main input fields which will be updated by user to transfer the data from this from the respective Product sheet. In these input fields, we will utilize Country and Product as a drop-down.
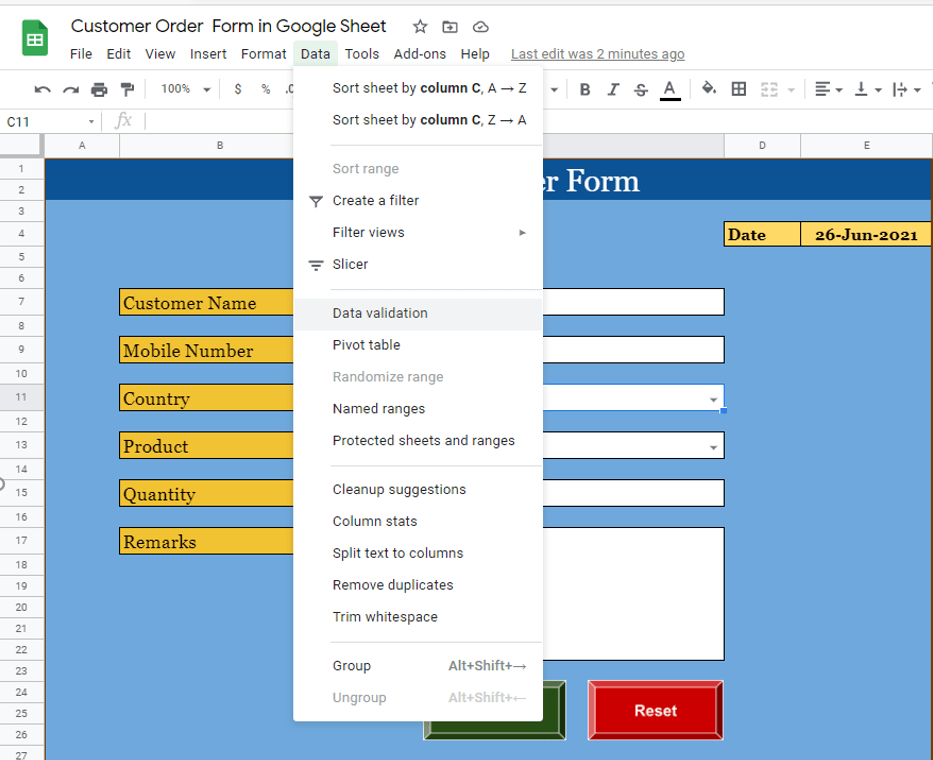
11. To create a drop-down for Country, just click on Data menu and then select Data Validation.
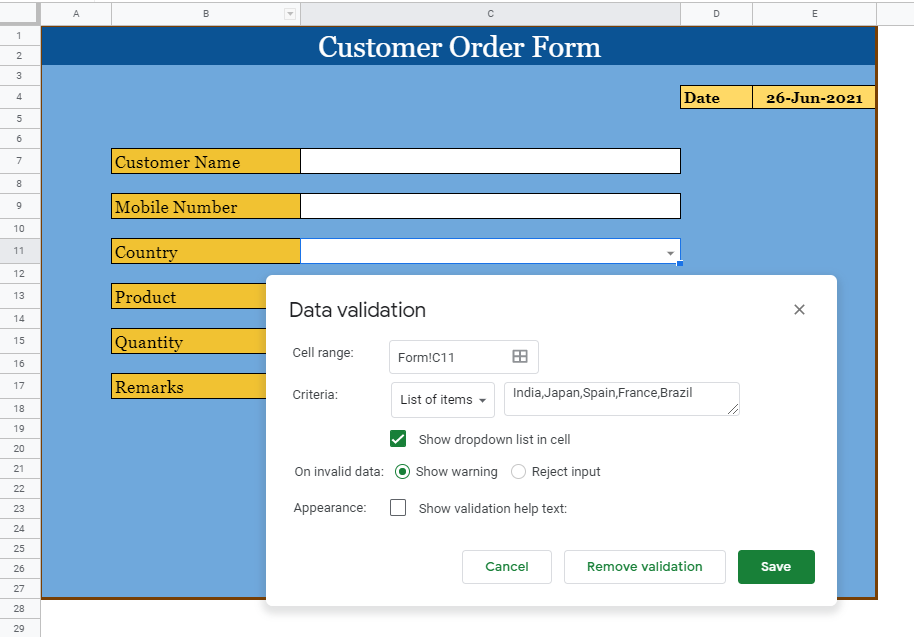
12. In Data Validation window, select ‘List of items’ from the drop-down of Criteria and enter India,Japan,Spain,France,Brazil in text box.
Tick the ‘Show dropdown list in cell’ and ‘Show validation help text:’. Enter the help text in given text box as ‘Please select Country from the drop-down.’ Now click on Save to create the drop-down for Country.
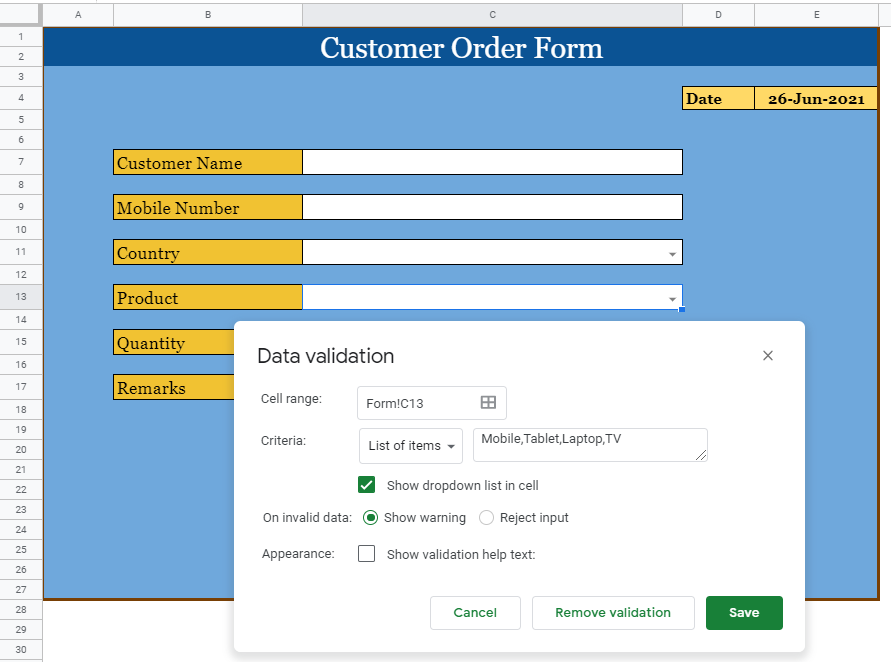
13. Repeat the step 11 to create the drop-down for Product. In Data Validation window, select ‘List of items’ from the drop-down of Criteria and enter Mobile,Tablet,Laptop,TV in text box.
Tick the ‘Show dropdown list in cell’ and ‘Show validation help text:’. Enter the help text in given text box as ‘Please select Product from the drop-down.’ Now click on Save to create the drop-down for Product.
14. To create a button, just click on Insert menu and then click on Drawing.
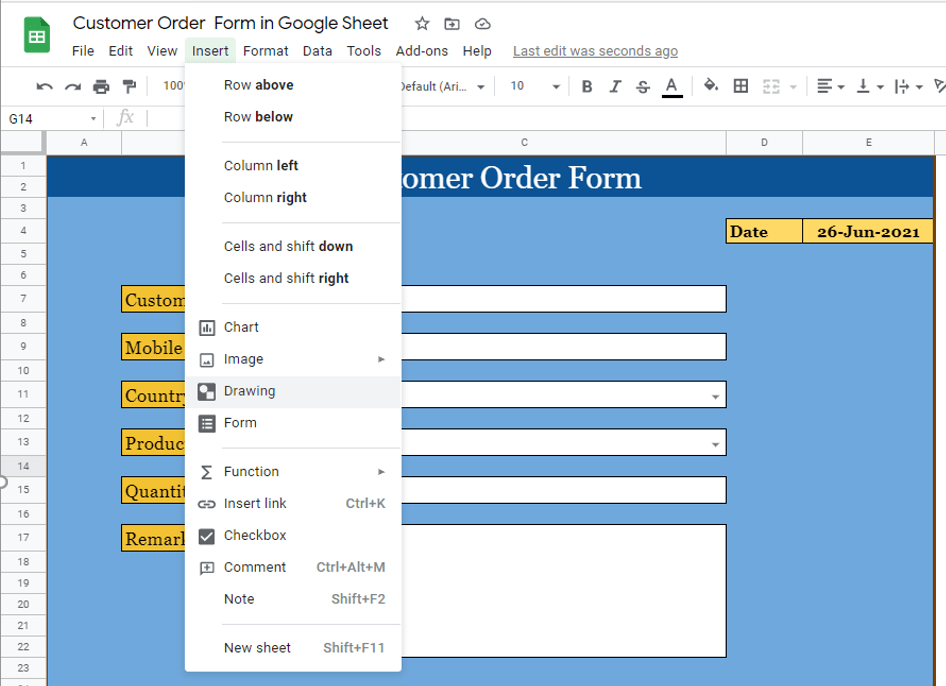
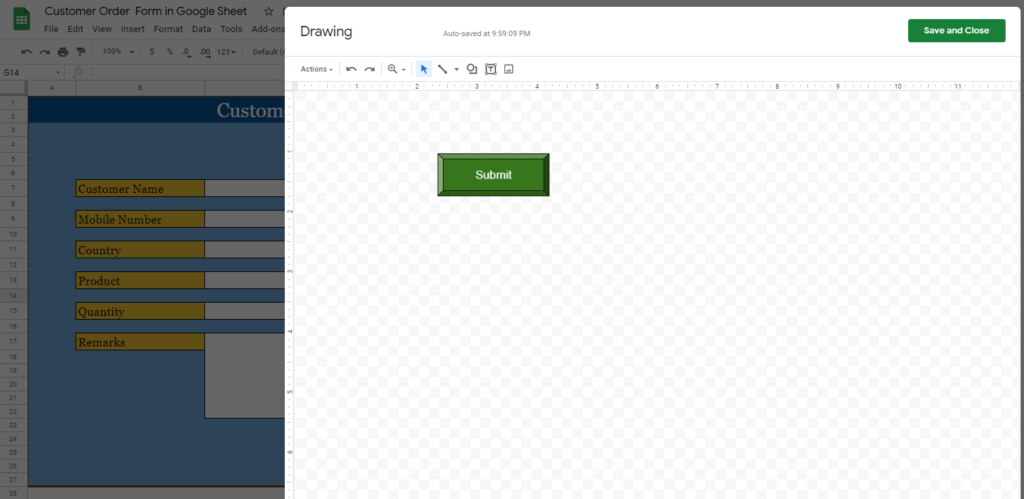
15. In Drawing window, just draw a 3D rectangle and fill with desired color and give the caption as Submit. After creating the button, click on Save and Close to insert the button on sheet.
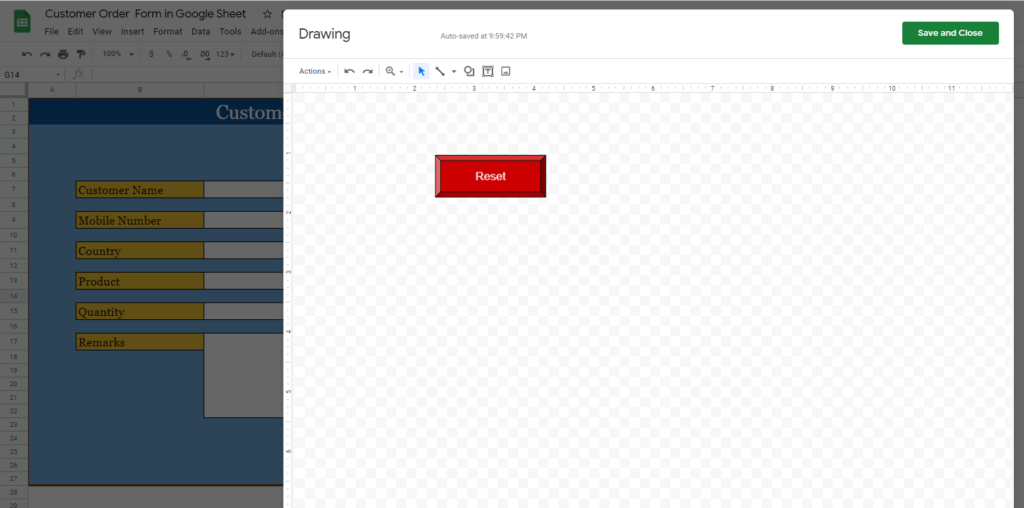
16. Follow the step 14 to open the Drawing window.
In Drawing window, just draw a 3D rectangle and fill with desired color and give the caption as Reset. After creating the button, click on Save and Close to insert the button on sheet.
Now, we have done with designing the form, creating drop-downs and inserting the required buttons.
Let’s move to the code window.
17. To open the Apps Script window, just click on Tools menu and then click on Script Editors.
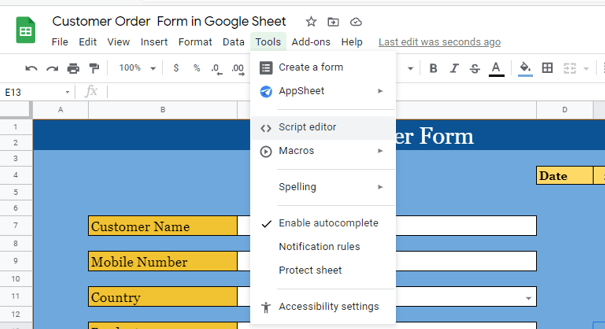
Once you click on Script editor in Tools menu, it will open the Apps Script window for Customer Order Form project.
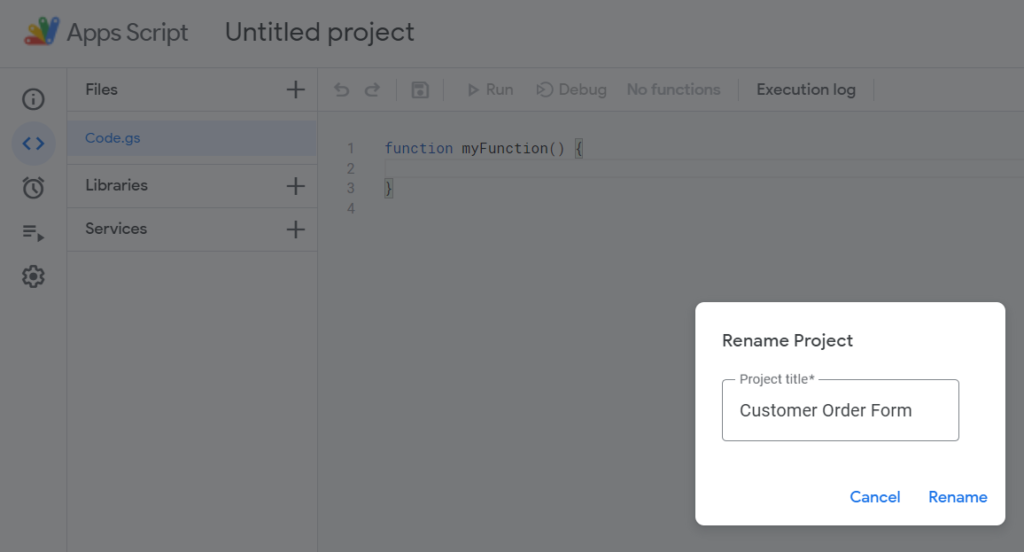
18. Click on ‘Untitled project’ to rename it to ‘Customer Order Form’.
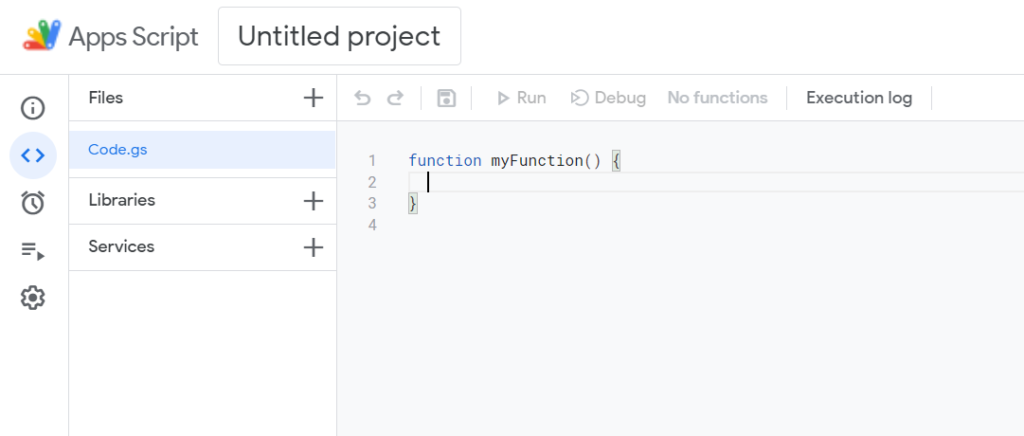
19. Remove myFunction from the Code.gs window and write a function to transfer the data from Form to Products sheet on selection. We will assign this function on click event of Submit button available on Form sheet.
//Function to submit the data to respective product sheet

function submitData(){

  //declare a variable and set the reference of active google sheet

  var myGoogleSheet=SpreadsheetApp.getActiveSpreadsheet();

  var shUserForm=myGoogleSheet.getSheetByName("Form");

  var shProduct=shUserForm.getRange("C13").getValue()

  var datasheet=myGoogleSheet.getSheetByName(shProduct);

  //to create the instance of the user-interface environment to use the alert features

  var ui=SpreadsheetApp.getUi();

  //Checking Product Name selected or not
  if(shProduct==""){

    ui.alert("Product Name is blank.")
    return;//to exit from this function
  }

  var response=ui.alert("Submit", "Do you want to submit the data?", ui.ButtonSet.YES_NO);

  //checking the user response

 if(response==ui.Button.NO){

   return;//to exit from this function

 }

    var blankRow=datasheet.getLastRow()+1; //identify the next blank row

  //code to update the data in database sheet

  datasheet.getRange(blankRow,1).setValue(shUserForm.getRange("C7").getValue());//Customer Name

  datasheet.getRange(blankRow,2).setValue(shUserForm.getRange("C9").getValue());//Mobile Number

  datasheet.getRange(blankRow,3).setValue(shUserForm.getRange("C11").getValue());//Country

  datasheet.getRange(blankRow,4).setValue(shUserForm.getRange("C13").getValue());//Product

  datasheet.getRange(blankRow,5).setValue(shUserForm.getRange("C15").getValue());//Quantity

  datasheet.getRange(blankRow,6).setValue(shUserForm.getRange("C17").getValue());//Remarks

  //Code to update the date and time  - Submitted On

  datasheet.getRange(blankRow,7).setValue(Session.getActiveUser().getEmail());

  // Submitted By

 datasheet.getRange(blankRow,8).setValue(new Date()).setNumberFormat('yyyy-mm-dd h:mm');

  //removing data from Product, Quantity and Remarks so that you can take other order, if any

  shUserForm.getRange("C13").clearContent();
  shUserForm.getRange("C15").clearContent();
  shUserForm.getRange("C17").clearContent();

  ui.alert('New order submitted.');

 }
20. Create a function to reset the form. We will utilize this function on click event of Reset button available on Form sheet.
//Function to reset the form

function resetForm(){

  //declare a variable and set the reference of active google sheet

  var myGoogleSheet=SpreadsheetApp.getActiveSpreadsheet();

  var shUserForm=myGoogleSheet.getSheetByName("Form");

  //to create the instance of the user-interface environment to use the alert features

  var ui=SpreadsheetApp.getUi();

  var response=ui.alert("Reset", "Do you want to reset the oder form?", ui.ButtonSet.YES_NO);

  //checking the user response

 if(response==ui.Button.NO){

   return;//to exit from this function

 }

   //removing data from Product, Quantity and Remarks so that you can take other order, if any

  shUserForm.getRange("C7").clearContent();//Customer Name
  shUserForm.getRange("C9").clearContent();//Mobile Number
  shUserForm.getRange("C11").clearContent();//Country
  shUserForm.getRange("C13").clearContent();//Product
  shUserForm.getRange("C15").clearContent();//Quantity
  shUserForm.getRange("C17").clearContent();//Remarks

  ui.alert('Done!');

 }
Now, we have done with writing the functions which are required to Reset the form and transfer the data from Form to Product sheets. Let’s assign all these function to the respective buttons available in Form sheet.
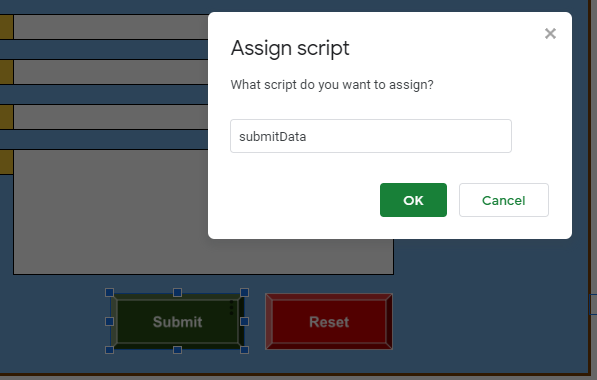
21. Let’s right click on Submit button available on Form sheet and then click on ellipsis (triple dots) available on the right side of button and then click on ‘Assign script’.
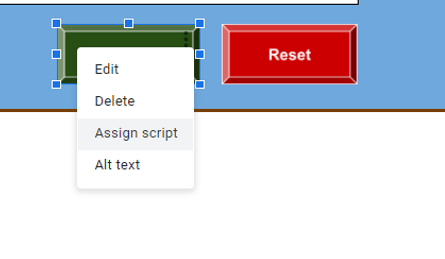
22. In ‘Assign script’ window, just enter the function name and then click on OK button.
23. Repeat the step 21 and 22 to assign resetForm function on Reset button.
So, we are done with developing an automated Customer Order Form in Google Sheet and Apps Script to transfer the data conditionally.
Please watch the YouTube tutorial to develop this automated from from scratch.
You can follow the below like to open the User form and see the coding.
https://docs.google.com/spreadsheets/d/1YYxGn6KShpT_vfg7UgLVboqIob_ims6zVLzBzAyPtOc/edit?usp=sharing
Download the Google Apps Script code.

Please share your feedback and question in comment section. Thanks!

