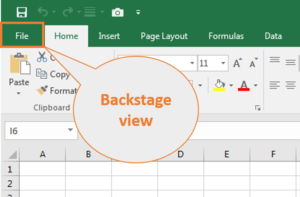
What and where is Backstage view
You can access the Backstage view post clicking on File tab.
The Office Backstage view is where you manage your files and the data about them — opening, creating, saving, sharing, printing, inspecting for hidden metadata or personal information, and setting options. It short, it contains all the functionalities and settings that you want to apply to a file that you can’t do in a file.

In Office 2007, Microsoft replaced the Menu and Toolbars with Ribbons. Post publishing the new UI in Excel 2007, File menu was replaced by Microsoft Office Button . This was a great little feature that made Office easier to use. You just need to put your mouse in the upper left corner and get to the commands available in File Menu. Unfortunately, because this design was unconventional and different from the rest of the Ribbon UI Office Team added, it was hard for some users to find the Office Button the first time. Many who saw the Office Button believed it to be a branding decoration, rather than a functional button.
In Office 2010, Microsoft took customers feedback positively and replaced the Microsoft Office Button with ‘File’ in tab i.e. Backstage view.
Functionalities available in Backstage view
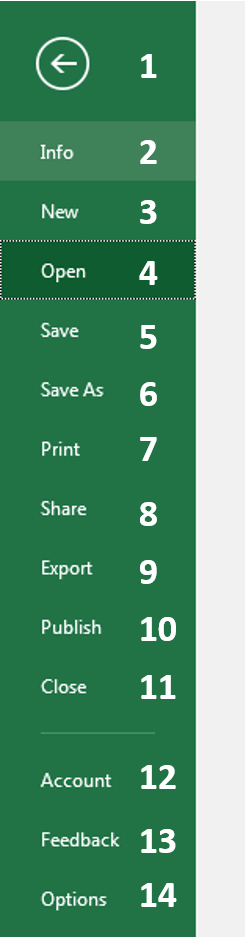
- Arrow: You can click on this arrow to close Backstage view and return to Excel.
- Info: It contains information about the current open workbook.
- New: You can create a new blank workbook or choose from available templates.
- Open: You can open recent workbook as well as workbooks available on your computer, shared drive and OneDrive.
- Save: Click on Save to save your unsaved workbook.
- Save As: Click on Save As to save your workbook with different name.
- Print: You can change the print settings, see the print preview of your workbook and print the workbook.
- Share: You can invite people to view and collaborate on your workbook. You can also share the workbook through email as attachment.
- Export: Click here to export your workbook in another format, such as PDF/XPS or Excel 1997 – 2003.
- Publish: You can publish your workbook to Power BI, Microsoft cloud-sharing service for Excel workbooks.
- Close: Click here to the current open workbook.
- Account: From the Account pane, you can access your Microsoft account information, modify your theme and background and sign out of your account.
- Feedback: Click here to provide your positive and negative feedback to Microsoft Team. You can also share your suggestion to them.
- Options: Through Options, you can access various Excel Options, Settings, and Language preferences.
Excel Options – Backstage view
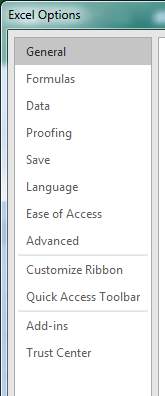
Formulas: From here, you can change options related to formula calculation, performance and error handling.Data: Here, you can access options related to data import and data analysis.
Proofing: This will help you in changing the options related to Spell-check, Custom Dictionaries and AutoCorrect.
Save: The default method for saving, Auto Recovery settings, legacy colors, and web server options.
Language: Set the Office Languages preferences here. Choose the editing language, ToolTip language, and Help language.
Ease of Access: You can make Excel more accessible with the help of ‘Ease of Access’. You can choose the options related to Feedback, Application display and Document display.
Advanced: All options that Microsoft considers profound, spread among 14 headings e.g. ‘Editing’, ‘Cut, Copy and Paste’, ‘Pen’, ‘Image Size and Quality’, ‘Print’, ‘Chart’, ‘Display’, ‘Display options for this workbook’, ‘Display options for this worksheet’, ‘Formulas, When Calculating this workbook’, ‘General’, ‘Lotus Compatibility’ and ‘Lotus Compatibility Settings for’.
Customize Ribbon: You can customize the Ribbon with the help of commands available in Excel. Just select the required commands and add to a specific tab or create a new tab to add.
Quick Access Toolbar: Customize the Quick Access Toolbar. Just select the available commands and add to Quick Access Toolbar.
Add-ins: You can view and manage entire available and installed add-ins. New add-ins can be installed from the button at the bottom of this category.
Trust Center: It helps you to keep your documents save and your computer secure and healthy. You can visit Office.com to know about protecting your privacy and security. Also, you can also access ‘Trust Center Setting’ and choose the available options from 12 different categories.


