Table of Contents
Why do we need to develop Multi-user Data Entry Form in Excel?
If you are looking for Excel based Data Entry form with multi-users functionalities then this post is going to be very helpful for you. In this post, we will discuss User Interface (UI) design and VBA coding to develop the Multi-user Data Entry Form.
Microsoft Excel is one of the most utilized tool in any company. Due to availability and dynamic features of Excel, we can use this tool to automate any complex data entry operation. There is no need to hire programmers and install a separate language. MS Excel has an inbuilt integrated development environment (IDE). Visual Basic for Applications (VBA) is the programming language for Microsoft Office and its associated applications e.g. Excel, Word, Power Point etc. We can leverage the power of VBA language and develop the multi-user data entry form without any additional cost.
In this Multi-User Data Entry form, we have two separate Excel files. One is fulfilling the purpose of Database and other is for Data Entry Form to transfer the data to database workbook.
To use this tool, you just need to keep the parent folder at any shared location and ask your team and users to open the Data Entry Form and start submitting the data. Excel VBA code will handle all the required functionalities e.g. accessing database, validating entry, transferring inputs etc.
Creating Multi-user Data Entry Form in Excel
Follow the below steps to create this Automated Data Entry form in Excel.
- Create a folder named ‘Multi-user Data Entry Form’ at the shared drive.
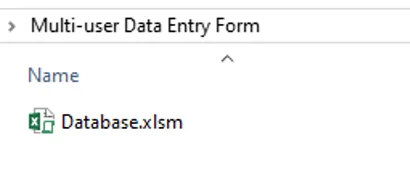
2. Create a new Workbook and save the file with the name ‘Database.xlsm” in ‘Multi-user Data Entry Form folder’.
3. Rename the ‘Sheet1’ to ‘Database’ and add the below mentioned column headers and format the the headers accordingly in ‘Database.xlsm’ file.

4. Create a new Workbook and save the file with the name ‘Multiuser Data Entry Form in Excel.xlsm’ in ‘Database’ folder.
5. Rename the ‘Sheet1’ to ‘Home’. Remove the Gridlines ( View – Gridlines) and add a rounded rectangle and fill the color with Blue and enter the text ‘Data Entry Form’. Please see the below image.

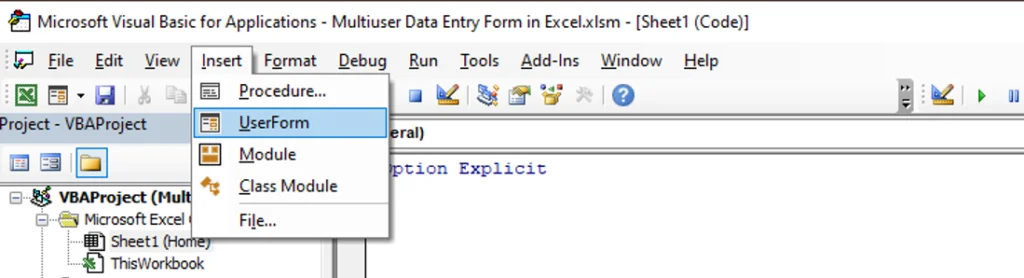
6. Now go to Develop Tab and click on Visual Basic to visit Visual Basic Application window.

7. In Visual Basic for Application window, click on Insert menu and then select ‘UserForm’.
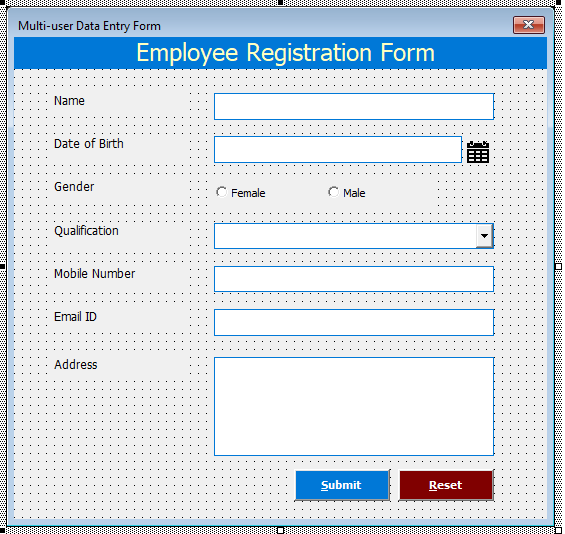
8. Set the properties of the userform and add required controls. Add label, texboxes, image control, option button, combobox and command button as per below image.
Labels: Employee Registration Form (Top headers), Name, Date of Birth, Gender, Qualification, Mobile Number, Email ID, Address
TextBox: Name – txtName; Date of Birth – txtDOB; Mobile Number – txtMobile; Email-txtEmail; Address:txtAddress
Image: Calendar- imgCalendar
Option Buttons: Gender – Female – optFemale; Male-optMale
Combobox: Qualification- cmbQualification
Command Buttons: Submit- cmdSubmit; Reset-cmdReset
9. Set the Tab order for each and every cotnrols.
10. Import the custom calendar from the support file. Link has been provided at the bottom of the page.
11. Insert a module and rename it to ‘mdDataEntry’.

12. In Module code window, start writing the code to handle Reset, Validate Email, Validate Fields, Transfer Data and Call Form.
Code to Reset the Form
Sub Reset_Form()

    With frmDataEntry

        .txtName.Text = ""
        .txtName.BackColor = vbWhite

        .txtDOB.Text = ""
        .txtDOB.BackColor = vbWhite

        .optFemale.Value = False
        .optMale.Value = False

        .txtMobile.Value = ""
        .txtMobile.BackColor = vbWhite

        .txtEmail.Value = ""
        .txtEmail.BackColor = vbWhite

        .txtAddress.Value = ""
        .txtAddress.BackColor = vbWhite

        .cmbQualification.Clear
        .cmbQualification.BackColor = vbWhite

        .cmbQualification.AddItem "10+2"
        .cmbQualification.AddItem "Bachelor Degree"
        .cmbQualification.AddItem "Master Degree"
        .cmbQualification.AddItem "PHD"

        .cmbQualification.Value = ""

    End With


End Sub
Code to Validate Email ID
Function ValidEmail(email As String) As Boolean
 Dim oRegEx As Object
 Set oRegEx = CreateObject("VBScript.RegExp")
 With oRegEx
    .Pattern = "^[\w-\.]{1,}\@([\da-zA-Z-]{1,}\.){1,}[\da-zA-Z-]{2,3}$"
    ValidEmail = .Test(email)
 End With
 Set oRegEx = Nothing
End Function
Code to Validate Data Entry by User
Function ValidEntry() As Boolean
ValidEntry = True

With frmDataEntry

    'Default Color
    .txtName.BackColor = vbWhite
    .txtDOB.Text = vbWhite
    .txtMobile.BackColor = vbWhite
    .txtEmail.BackColor = vbWhite
    .txtAddress.BackColor = vbWhite
    .cmbQualification.BackColor = vbWhite

    'Validating Name

    If Trim(.txtName.Value) = "" Then
        MsgBox "Name is blank. Please enter a correct name.", vbOKOnly + vbInformation, "Invalid Entry"
        .txtName.BackColor = vbRed
        ValidEntry = False
        Exit Function
    End If

    'Validating DOB

    If Trim(.txtDOB.Value) = "" Then
        MsgBox "DOB is blank. Please enter DOB.", vbOKOnly + vbInformation, "Invalid Entry"
        .txtDOB.BackColor = vbRed
        ValidEntry = False
        Exit Function
    End If


    'Validating DOB

    If .optFemale.Value = False And .optMale.Value = False Then
        MsgBox "Please select gender.", vbOKOnly + vbInformation, "Invalid Entry"
        ValidEntry = False
        Exit Function
    End If

    'Validating Qualification

    If Trim(.cmbQualification.Value) = "" Then
        MsgBox "Please select the Qualification from drop-down.", vbOKOnly + vbInformation, "Invalid Entry"
        .cmbQualification.BackColor = vbRed
        ValidEntry = False
        Exit Function
    End If

    'Validating Mobile Number

    If Trim(.txtMobile.Value) = "" Or Len(.txtMobile.Value) < 10 Or Not IsNumeric(.txtMobile.Value) Then
        MsgBox "Please enter a valid mobile number.", vbOKOnly + vbInformation, "Invalid Entry"
        .txtMobile.BackColor = vbRed
        ValidEntry = False
        Exit Function
    End If

    'Validating Email

    If ValidEmail(Trim(.txtEmail.Value)) = False Then
        MsgBox "Please enter a valid email address.", vbOKOnly + vbInformation, "Invalid Entry"
        .txtEmail.BackColor = vbRed
        ValidEntry = False
        Exit Function
    End If

    'Validating Address

    If Trim(.txtAddress.Value) = "" Then
        MsgBox "Address is blank. Please enter a valid address.", vbOKOnly + vbInformation, "Invalid Entry"
        .txtAddress.BackColor = vbRed
        ValidEntry = False
        Exit Function
    End If

End With
End Function
Code to Transfer the Data from Form to Database
Sub Submit_Data()
Application.ScreenUpdating = False

Dim App As New Excel.Application
Dim wBook As Excel.Workbook

Dim FileName As String

Dim iRow As Long

FileName = ThisWorkbook.Path & "\Database.xlsm"

'Check File Exist or Not

If Dir(FileName) = "" Then

    MsgBox "Database File is missing. Unable to proceed.", vbOKOnly + vbCritical, "Error"
    Exit Sub

End If

Set wBook = App.Workbooks.Open(FileName)

App.Visible = False

If wBook.ReadOnly = True Then
    MsgBox "Database is in use. Please try after sometimes.", vbOKOnly + vbCritical, "Database Busy"
    Exit Sub
End If

'Transfer the Data

With wBook.Sheets("Database")

    iRow = .Range("A" & Application.Rows.Count).End(xlUp).Row + 1

    .Range("A" & iRow).Value = iRow - 1

    .Range("B" & iRow).Value = frmDataEntry.txtName.Value   'Name

    .Range("C" & iRow).Value = frmDataEntry.txtDOB.Value   'DOB

    .Range("D" & iRow).Value = IIf(frmDataEntry.optFemale.Value = True, "Female", "Male") 'Gender

    .Range("E" & iRow).Value = frmDataEntry.cmbQualification.Value   'Qualification

    .Range("F" & iRow).Value = frmDataEntry.txtMobile.Value   'Mobile Number

    .Range("G" & iRow).Value = frmDataEntry.txtEmail.Value   'Email

    .Range("H" & iRow).Value = frmDataEntry.txtAddress.Value   'Address

    .Range("I" & iRow).Value = Application.UserName   'Submitted By

    .Range("J" & iRow).Value = Format([Now()], "DD-MMM-YYYY HH:MM:SS")  'Submitted On


End With

wBook.Close Savechanges:=True

App.Quit

Set App = Nothing

'Reset the form

Call Reset_Form

Application.ScreenUpdating = True

MsgBox "Data submitted successfully!"
End Sub
Code to show the UserForm
Sub Show_Form()
    frmDataEntry.Show
End Sub
13. Let’s write the coding on Form Initialization, Command Button events and Image click events.
Code on Form Initializtion
Private Sub UserForm_Initialize()
    Call Reset_Form
End Sub
Code on click events for Calendar image
Private Sub imgCalendar_Click()
Application.ScreenUpdating = False

Dim sDate As String

On Error Resume Next

sDate = MyCalendar.DatePicker(Me.txtDOB)

Me.txtDOB.Value = Format(sDate, "DD-MMM-YYYY")

On Error GoTo 0

Application.ScreenUpdating = True
End Sub
Code for click events on Submit and Reset buttons
Private Sub cmdSubmit_Click()
Dim i As VbMsgBoxResult

i = MsgBox("Do you want to submit the data?", vbYesNo + vbQuestion, "Submit Data")

If i = vbNo Then Exit Sub

If ValidEntry Then

    Call Submit_Data

End If
End Sub
Private Sub cmdReset_Click()
Dim i As VbMsgBoxResult
i = MsgBox("Do you want to reset the form?", vbYesNo + vbQuestion, "Reset")
If i = vbNo Then Exit Sub
Call Reset_Form
End Sub14. Move to Excel window and assign the macro on ‘Data Entry Form’ button available on Home sheet.
Right click on Button, select ‘Assign Macro’ and select ‘Show_Form’ as macro name and click on ‘OK’.
Now, Multi-User Data Entry form is ready. You can ask your team members to start using this tool to submit the data in shared environment.
YouTube Video – Multi-user Data Entry Form in Excel
Please watch our YouTube tutorial to learn how to create Multi-user Data Entry form in Excel (step by step).
Download Multi-user Data Entry Form in Excel
Download the Support and Entire Project Files along with VBA Code and 🤝 support our website.
Please visit the below mentioned pages to learn more about Data Entry Forms and Automated Tools in Excel. Thanks!
Employee Activities Tracker in Excel


I followed all steps and was able to transfer the data from the user form to the database. Two problems though and I haven’t found a solution. Had someone familiar with vba code look over my code and didn’t find errors.
1. The date transfers and replicates 1000 times.
2. Entering info on second employee upon transfer overlaps the already submitted data and again replicates 1000 times.
What am I doing wrong? Thank you.