Progress Bar in Excel and VBA
In this post, we are going to learn how to display a progress bar with a UserForm in Excel and VBA.
A progress bar is a simple visual indicator that shows the status of long-running tasks.
It helps users understand that the process is active and how much work is completed.
By using a UserForm, we can design and control this progress bar directly through VBA code.
Role of Progress Bar in Excel and VBA
If you have a VBA-based automated Tracker, Dashboard, or Application that takes a long time to finish the activity then an indication of progress is mandatory otherwise, the user will not be able to understand whether any task is being performed or the system is not responding.
With the help of the progress bar, user can follow the progress of a lengthy operation and get information about the ongoing process and get the completion % of tasks.
So, considering the usability of the progress bar, we must include it in complex automation or time taking VBA based jobs where we need to show the progress of a task.
Demo of Progress Bar in Excel and VBA

As progress bar is to show the completion % of a task, I have added a button on home page so that whenever user will click on it, it will insert 100 new worksheets, rename all the worksheets and add 10 different columns headers in the first row of every sheet.
In preforming all these activities, it will take time some time hence we can show the completion% with the help of progress bar for the demo purpose.
So, this is just an example to show the progress bar. You can utilize the same logic in your actual project.
Creating the User Form for Progress Bar in Excel and VBA
- Open a new workbook in Excel.
- Save the file with the name “Progress bar” with macro enabled extension.
- Rename the Sheet1 to ‘Home’ and insert a rounded rectangle with caption ‘Insert Worksheets’.
- Move to the Visual Basic Application window. To do that, just click on Developer Tab and then click on VBA button available in Code group. Alternatively, you can press ALT + F11 as shortcut key.
- On the Insert menu, click UserForm.
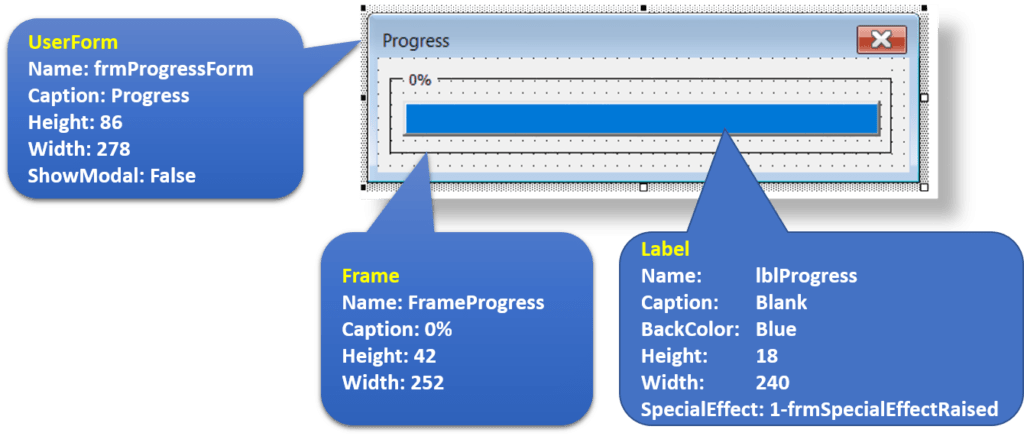
- Change the following properties of UserForm:
Name: frmProgressForm | Caption: Progress | Height: 86 | Width: 278 | ShowModal: False - Insert a Frame control on UserForm.
- Change the following properties of the Frame control to the following values:
Name: FrameProgress | Caption : 0% | Height : 42 | Width : 252 - Insert a Label control on UserForm in Frame.
- Change the following properties of the Label control to the following values:
Name: lblProgress | Caption : NULL | BackColor: Blue | Height : 18 | Width : 240 | SpecialEffect:1-frmSpecialEffectRaised
Now, we have done with designing the form and progress bar.
Writing VBA Code for Progress Bar in Excel
Let’s inset a module to write the code. To insert a module, click on Insert menu and then click on module.
Let’s move to code window of module.
Here, we need write a sub procedure to insert 100 new worksheets in the workbook and rename all the sheets with naming pattern ‘Custom Sheet 1…2…3…” and then create 10 column headers in all the newly inserted sheets.
While performing all the operations, we will calculate the completion % and then increase the width of label to show the progress of task.
Sub ProcessActivity()

    Dim iStart As Integer ‘variable to initialize the for loop
    Dim iTotalSheet As Integer ‘Number of sheets required to insert
    Dim pctDone As Single ‘to hold the completion%
    Dim iLabelWidth As Integer ‘To store the width of label

    'Initialize variables
    iTotalSheet = 100

    iLabelWidth = 240 'Width of label

    'Loop to insert worksheets and add column headers

    For iStart = 1 To iTotalSheet

        Sheets.Add(After:=Sheets(Sheets.Count)).Name = "Custom Sheet " & iStart

        Sheets(Sheets.Count).Range("A1").Value = "Column 1"
        Sheets(Sheets.Count).Range("B1").Value = "Column 2"
        Sheets(Sheets.Count).Range("C1").Value = "Column 3"
        Sheets(Sheets.Count).Range("D1").Value = "Column 4"
        Sheets(Sheets.Count).Range("E1").Value = "Column 5"
        Sheets(Sheets.Count).Range("F1").Value = "Column 6"
        Sheets(Sheets.Count).Range("G1").Value = "Column 7"
        Sheets(Sheets.Count).Range("H1").Value = "Column 8"
        Sheets(Sheets.Count).Range("I1").Value = "Column 9"
        Sheets(Sheets.Count).Range("J1").Value = "Column 10"

        'calculate the percentage compeleted and assign it to pctDone variable
        pctDone = iStart / iTotalSheet

        'Code to increase the width of labels and update the frame caption according to the task completion%
        With frmProgressForm

            .lblProgress.Width = pctDone * iLabelWidth
            .FrameProgress.Caption = Format(pctDone, "0%")

        End With

        DoEvents 'The DoEvents allows the UserForm to update

    Next iStart

    Unload frmProgressForm
 'Closing the form

End Sub
Let us write a sub procedure to show the form. We will utilize this while assigning macro on the button available on Home worksheet.
Sub Show_Form()

    frmProgressForm.Show


End Sub
Now, let’s move the form code widow and call the ‘ProcessActivity’ procedure on form activate event.
Private Sub UserForm_Activate()

    'Set the width of the progress bar label to 0
    Me.lblProgress.Width = 0

    'Call the procedure to insert worksheets and create column headers
    Call ProcessActivity

End Sub
Now, we have done with designing and coding the progress bar UserForm. Let us move to Excel window and assign the macro on the button.
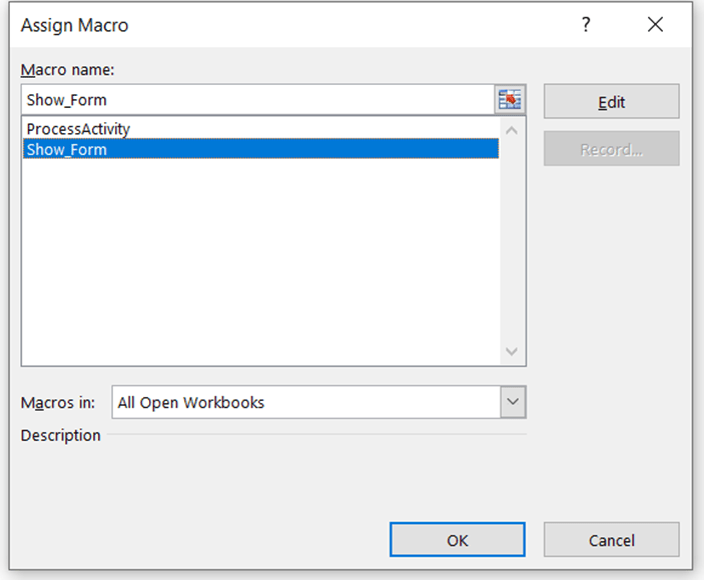
To assign the macro, let us right click on the button and then click on ‘Assign Macro…’ Select the ‘Show_Form’ from the Macro name and then click on Okay.
Now, we have done with macro assignment. You can click on Button to insert sheets and show the progress bar.
Watch YouTube Tutorial
Please watch step by step YouTube tutorial to develop Progress Bar in Excel and VBA.
Download sample file of Progress Bar in Excel
Click on below button to download the practice file along with VBA code.