Table of Contents
Time and Motion Tracker in Excel
Time and Motion study is a method of listing down all the activities/transaction with Start and End Time. In this process, we record times for every transaction. Time & Motion helps us in identify the steps which is taking a lot of time. Once, we will find out the time taking steps then we can start working on automation or elimination of those steps, if possible.
In this article, we will discuss how to develop a Time & Motion Tracker in Excel with the help of VBA code. The good thing with this tracker is, it is easy to develop and we need minimum VBA codes which can be done without having advanced knowledge of Excel and VBA.
So, without any further delay, let us start preparing this Time and Motion Tracker in Excel from scratch.
Steps to develop Time and Motion Tracker
Step 1. Open the Excel Application and create a Blank workbook.
Step 2. Save the file with the name ‘Time & Motion Tracker’ having ‘.XLSM’ extension.
Step 3. Rename the Sheet1 to ‘T&M. Create the Caption, Table and Command buttons as mentioned in below image.

Step 4. As T&M sheet is ready with required Caption, Command Buttons (Start & End) and Table, let us move to VBA window. To do, just move to Developer Table and the click on Visual Basic in Code group (as mentioned in below image).

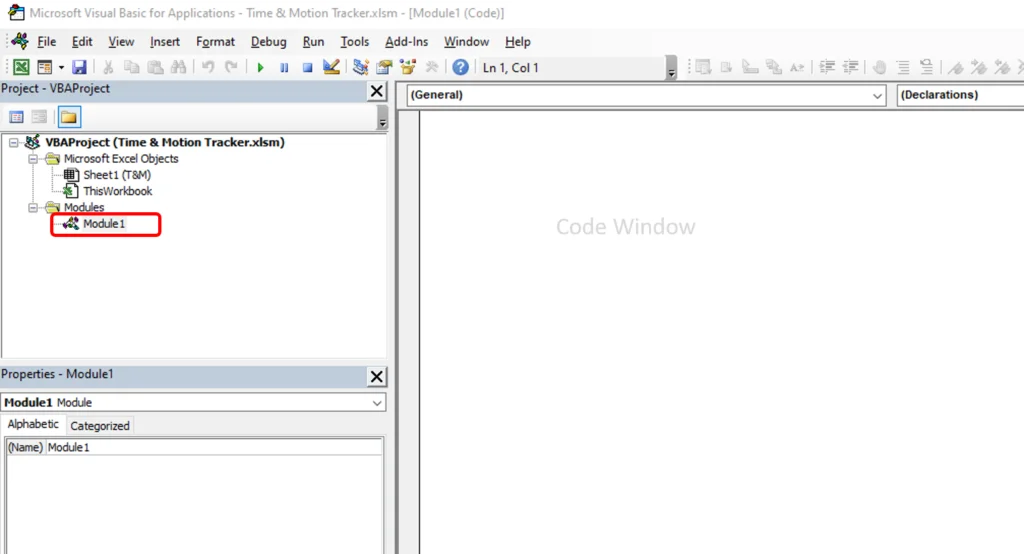
Step 5. Now, we are in Visual Basic Window. Let us insert a New Module to write the code. To Insert a module, click on Insert Menu then click on Module (as mentioned in below image).

Step 6. Now, we have inserted a blank Module1. Let’s double click on Module1 to view the code window.
Step 7. We need to write the Sub Procedures to Initialize Date & Employee Name, Start Time and End Time. Please copy and paste the below Procedures in Code Window of Module1.
Sub Procedure to initialize Date and Employee Name for next record or at the time of opening the workbook.
Sub Intialize()

Dim iRow As Long

iRow = Sheets("T&M").Range("H" & Application.Rows.Count).End(xlUp).Row + 1

'Code to Validate

If Sheets("T&M").Range("F" & iRow).Value = "" Then

    Sheets("T&M").Range("B" & iRow).Value = Format([Today()], "DD-MMM-YYYY")
    Sheets("T&M").Range("C" & iRow).Value = Application.UserName

End If
End Sub
Code to capture Start Time for a particular task.
Sub Start_Time()

Dim iRow As Long

iRow = Sheets("T&M").Range("H" & Application.Rows.Count).End(xlUp).Row + 1

'Code to Validate

If Sheets("T&M").Range("D" & iRow).Value = "" Then

    MsgBox "Please select the Task Name from the drop down.", vbOKOnly + vbInformation, "Task Name Blank"
    Sheets("T&M").Range("D" & iRow).Select
    Exit Sub

ElseIf Sheets("T&M").Range("F" & iRow).Value <> "" Then

    MsgBox "Start Time is aleady captured for the selected Task."
    Exit Sub
Else

    Sheets("T&M").Range("F" & iRow).Value = [Now()]

    Sheets("T&M").Range("F" & iRow).NumberFormat = "hh:mm:ss AM/PM"

End If
End Sub
Code to capture End Time, Total Time and Initialize next record with Date and Employee Name.
Sub End_Time()

Dim iRow As Long

iRow = Sheets("T&M").Range("H" & Application.Rows.Count).End(xlUp).Row + 1


'Code to Validate

If Sheets("T&M").Range("F" & iRow).Value = "" Then

    MsgBox "Start Time has not been captured for this task."
    Exit Sub
Else

    Sheets("T&M").Range("G" & iRow).Value = [Now()]

    Sheets("T&M").Range("G" & iRow).NumberFormat = "hh:mm:ss AM/PM"

    Sheets("T&M").Range("H" & iRow).Value = Sheets("T&M").Range("G" & iRow).Value - Sheets("T&M").Range("F" & iRow).Value

    Sheets("T&M").Range("H" & iRow).NumberFormat = "hh:mm:ss"

End If

'Fill the Date and Name in next row
Call Intialize

End Sub
Step 8. Let’s call the ‘Sub Intialize()’ on Workbook Open events so that user will find the filled data in Date and Employee Name column. To do that, just double click on ‘ThisWorkbook’ available in Project Explorer and move to Code window. Copy and paste the below code (as mentioned in image mentioned after code).
Private Sub Workbook_Open()
 'Fill the Date and Name in next blank row
 Call Intialize
End Sub
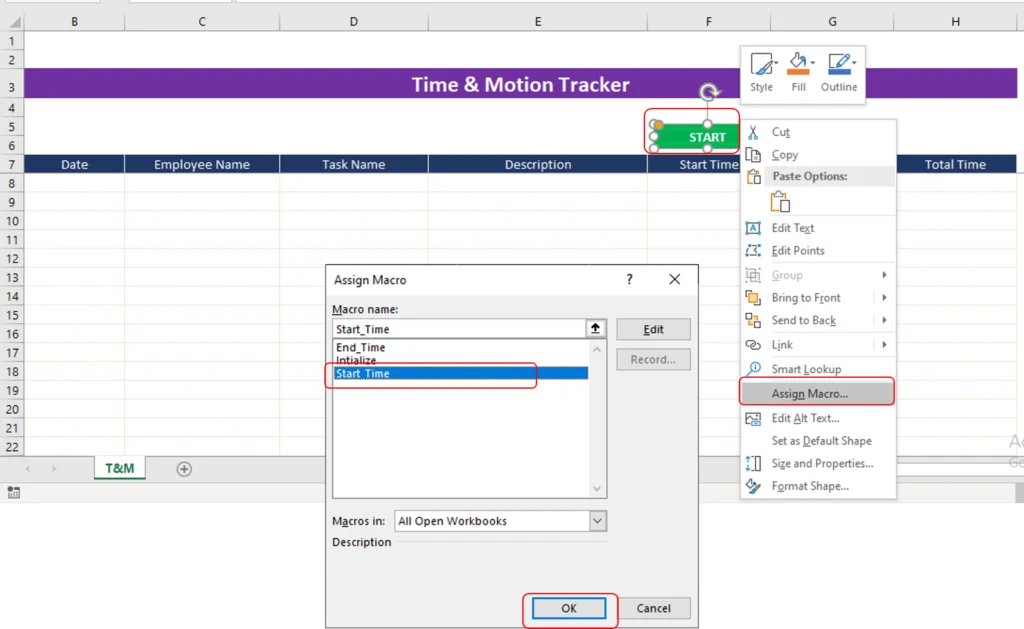
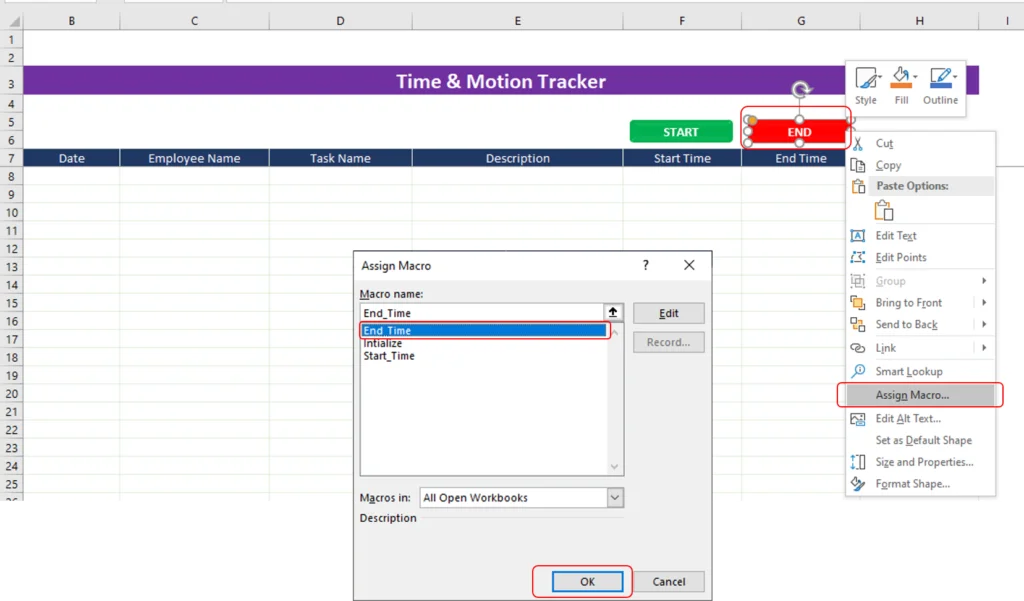
Step 9. Let us move to Excel window and assign the macro on START and END button.
Assign Macro on Start Button : Right Click on Start Button then click on Assign Macro… In Assign Macro window, please select the Macro Name ‘Start_Time’ and then click on OK (please see the below image).
Assign Macro on End Button : Right Click on End Button then click on Assign Macro… In Assign Macro window, please select the Macro Name ‘End_Time’ and then click on OK (please see the below image).
Now, you have done with all required steps for Time and Motion Tracker in Excel. You can start utilizing this tool.
Download Time and Motion Tracker
Please click on below button to buy the Excel file used in this tutorial. This is handy tool hence you can use it after downloading.