This article is primarily focused on developing an Automated Student’s Registration applications using the Visual Basic for Applications (VBA) programming language. With Excel VBA you can create a user form to to automate the data entry task using what is called a macro.
Student’s registration form is just taken as example to develop the data entry form. Once you complete this article, you will be able to develop a data entry application with all required features.
In this article, you will learn:
- Create Home, Database and Support Sheet
- User Interface for Data Entry
- Import Custom Calendar and Icons
- Design Form and assign properties to all controls
- Code to Reset and Initialize the User Form
- Function to Validate Email ID and Other Inputs done by User
- Sub Procedure to Create a folder
- Procedure to upload the Passport Size Photo and Consolidate the pictures in folder
- Assign the path of uploaded pictures to Image Control
- Sub Procedure to Submit or Transfer the Data from user-form to database sheet
- Sub Procedure to Edit and Delete the existing records
- Assign the Macro to run the form
So in this article, a lot to know and a lot to cover. Please read this article carefully and follow the instructions to develop the Data Entry Form with Image.
Step 1 – Creating Excel File
- Open the Excel Application
- Create a New Blank Workbook
- Save the Excel file with the Name ‘Student Registration Form.xlsm’
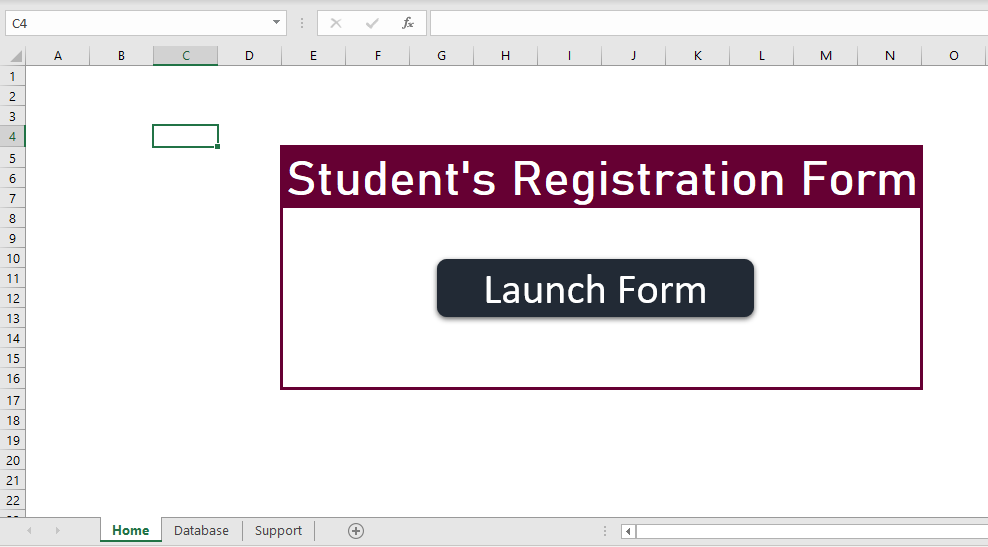
Step 2 – Creating Home Sheet
- Add three new worksheets in this file
- Rename the first sheet to ‘Home’
- Format the sheets and add a Rounded Rectangle with caption as per below image
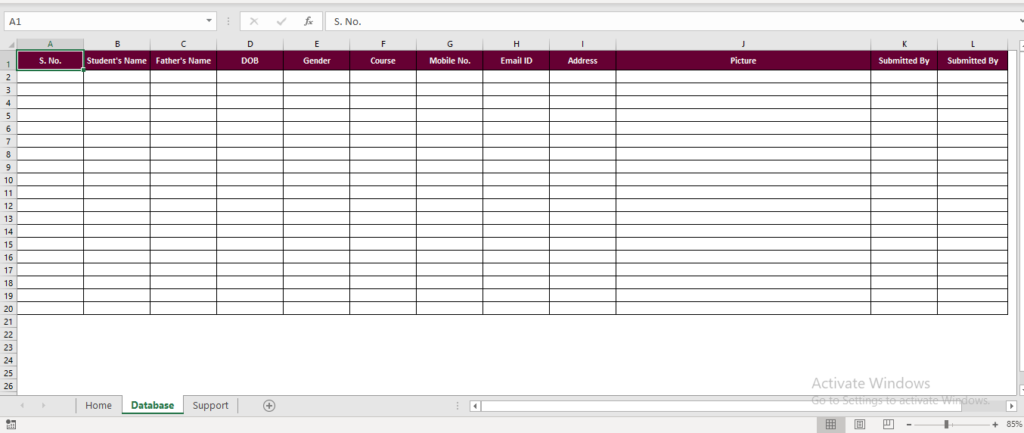
Step 3 – Creating Database Sheet and Columns
- Rename the second worksheets to ‘Database’
- Add the required columns in ‘Database’ worksheet
- Do the required formatting as per below image
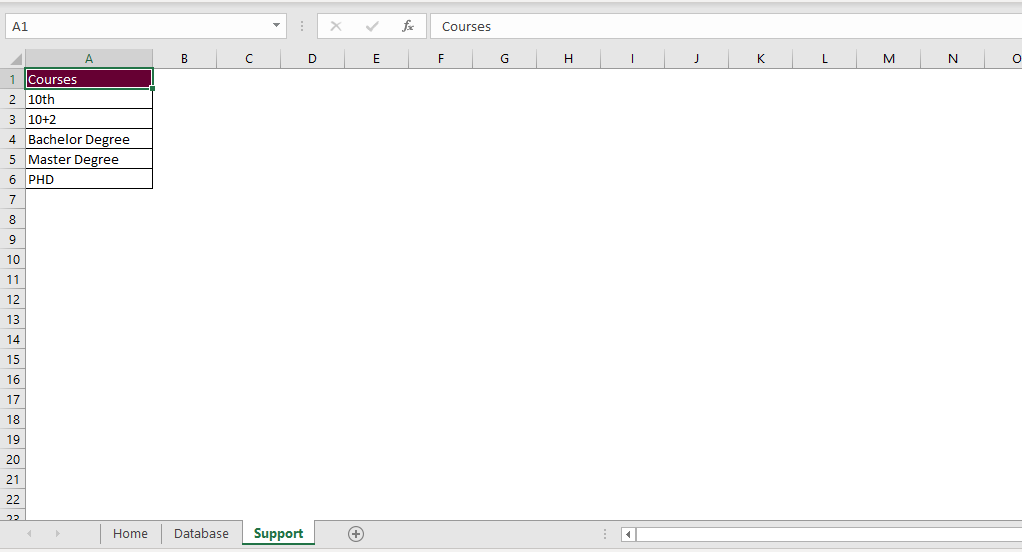
Step 4 – Creating Support Sheet
- Rename the third worksheets to ‘Support’
- Add the Course details in Column A with column header ‘Courses’
- Apply the formatting as per below image
Step 5 – Design the Data Entry Form in Visual Basic Environment window
- Insert a UserForm
- Design the Data Entry form as per below image
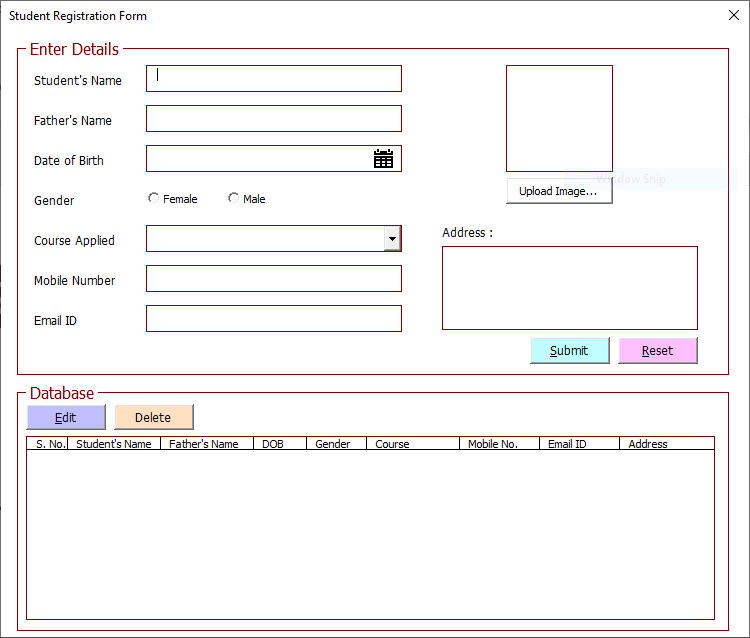
3. Place all the Frames, Controls as per above image. Make sure we have utilized two hidden text-boxes to store row number and image path. Please create both the text box anywhere in the form. Details have been given in below mentioned properties.
Once you create controls with hidden text-boxes, set the Properties of Form and Controls as per below mentioned details.
UserForm Properties
Name: frmDataEntry
BackColor: &H00FFFFFF&
Caption : Student Registration Form
Height: 484
Width: 573
Frame1 – Frame1 and other controls properties
Name: Frame1
BackColor: &H8000000E&
BorderColor: &H00000080&
BorderStyle: 1-frmBorderStyleSingle
Caption: Enter Details
Font: Tahoma, Regular, 12
ForeColor: &H00000080&
Height: 252
Width: 534
Controls in Frame1
Label Caption: Student’s Name
Control Type: TextBox
Name: txtStudentName
BackColor: &H80000005&
BorderColor: &H00000080&
BorderStyle: 1-frmBorderStyleSingle
Font: Tahoma, Regular, 8
ForeColor: &H80000008&
Height: 20
Width: 192
TabIndex: 0
Label Caption: Father’s Name
Control Type: TextBox
Name: txtFatherName
BackColor: &H80000005&
BorderColor: &H00000080&
BorderStyle: 1-frmBorderStyleSingle
Font: Tahoma, Regular, 8
ForeColor: &H80000008&
Height: 20
Width: 192
TabIndex: 1
Label Caption: Date Of Birth
Control Type: TextBox
Name: txtDOB
BackColor: &H80000005&
BorderColor: &H00000080&
BorderStyle: 1-frmBorderStyleSingle
Font: Tahoma, Regular, 8
ForeColor: &H80000008&
Height: 20
Locked:True
Width: 192
TabIndex: 2
Icon for Calendar in Date of Birth Text Box
Control Type: Image
Name: imgCalendar
BackStyle: 0-frmBackStyleTransparent
BorderStyle: 0-frmBorderNone
Height: 20
PictureAlignment: 2-frmPictureAlignmentCenter
PictureSizeMode: 1-frmPictureSizeModeStretch
SpecialEffect: 0-frmSpecialEffectFlat
Width: 20
Label Caption: Gender
1. Control Type: Option Button
Name: optFemale
Caption: Female
Value:False
TabIndex: 3
2. Control Type: Option Button
Name: optMale
Caption: Male
Value:False
TabIndex: 4
Label Caption: Course Applied
Control Type: ComboBox
Name: cmbCourse
BackColor: &H80000005&
BorderColor: &H00000080&
BorderStyle: 1-frmBorderStyleSingle
Font: Tahoma, Regular, 8
ForeColor: &H80000008&
Height: 20
Width: 192
TabIndex: 5
Label Caption: Mobile Number
Control Type: TextBox
Name: txtMobile
BackColor: &H80000005&
BorderColor: &H00000080&
BorderStyle: 1-frmBorderStyleSingle
Font: Tahoma, Regular, 8
ForeColor: &H80000008&
Height: 20
Width: 192
TabIndex: 6
Label Caption: Email ID
Control Type: TextBox
Name: txtEmail
BackColor: &H80000005&
BorderColor: &H00000080&
BorderStyle: 1-frmBorderStyleSingle
Font: Tahoma, Regular, 8
ForeColor: &H80000008&
Height: 20
Width: 192
TabIndex: 7
Hidden TextBox (to store row number – for internal purpose only)
Control Type: TextBox
Name: txtRowNumber
Visible: False
Image Control
Control Type: Image
Name: imgStudent
BackColor: &H80000005&
BorderColor: &H00000080&
BorderStyle: 1-frmBorderStyleSingle
Height: 80
PictureAlignment: 2-frmPictureAlignmentCenter
PictureSizeMode: 1-frmPictureSizeModeStretch
SpecialEffect: 0-frmSpecialEffectFlat
Width: 80
Hidden TextBox (to store image path – for internal purpose only)
Control Type: TextBox
Name: txtImagePath
Visible: False
Command Button – To browse and upload the image
Control Type: CommandButton
Name: cmdLoadImage
BackColor: &H80000005&
Caption: Upload Image…
Font: Tahoma, Regular, 8
TabIndex: 9
Label Caption: Address :
Control Type: TextBox
Name: txtAddress
BackColor: &H80000005&
BorderColor: &H00000080&
BorderStyle: 1-frmBorderStyleSingle
Font: Tahoma, Regular, 8
ForeColor: &H80000008&
Height: 63
MultiLine: True
ScrollBars: 2-frmScrollBarsVertical
TabIndex: 10
Width: 192
Command Button – Submit and Reset
Control Type: CommandButton
Name: cmdSubmit
Accelerator: s
BackColor: &H80000005&
Caption: Submit
Font: Tahoma, Regular, 9
Height: 20
TabIndex: 11
Width:60
Control Type: CommandButton
Name: cmdReset
Accelerator: r
BackColor: &H00FFC0FF&
Caption: Reset
Font: Tahoma, Regular, 9
Height: 20
TabIndex: 12
Width:60
Frame2 – Frame2 and other controls properties
Name: Frame2
BackColor: &H8000000E&
BorderColor: &H00000080&
BorderStyle: 1-frmBorderStyleSingle
Caption: Database
Font: Tahoma, Regular, 12
ForeColor: &H00000080&
Height: 186
Width: 534
Command Button – Edit and Delete
Control Type: CommandButton
Name: cmdEdit
Accelerator: e
BackColor: &H00FFC0C0&
Caption: Edit
Font: Tahoma, Regular, 9
Height: 20
TabIndex: 1
Width:60
Control Type: CommandButton
Name: cmdDelete
Accelerator: d
BackColor: &H00C0E0FF&
Caption: Delete
Font: Tahoma, Regular, 9
Height: 20
TabIndex: 2
Width:60
List-box to Show the Data
Control Type: ListBox
Name: lstDatabase
BorderColor: &H00000080&
BorderStyle: 1-frmBorderStyleSingle
Font: Tahoma, Regular, 8
ForeColor: &H80000008&
Height: 137
TabIndex: 0
Width:517
Now, we have prepare the Form, created required controls and set the properties as given below. Let’s move to the next step.
4. Import the MyCalendar custom calendar control from the Support Folder.
5. Insert a new module. To insert click on Insert Menu – > Module.
6. Change the name of Module1 to mdDataEntry in properties window.
7. Add the below mentioned code on Double Click event of txtDOB to show the Calendar and pick the DOB from custom calendar control.
Private Sub txtDOB_DblClick(ByVal Cancel As MSForms.ReturnBoolean)
Application.ScreenUpdating = False

Dim sDate As String

On Error Resume Next

sDate = MyCalendar.DatePicker(Me.txtDOB)

Me.txtDOB.Value = Format(sDate, "dd-mmm-yyyy")

On Error GoTo 0

Application.ScreenUpdating = True
End Sub
8. Add the below mentioned code on Click event of imgCalendar to show the Calendar and pick the DOB from custom calendar control.
Private Sub imgCalendar_Click()

Application.ScreenUpdating = False

Dim sDate As String

On Error Resume Next

sDate = MyCalendar.DatePicker(Me.txtDOB)

Me.txtDOB.Value = Format(sDate, "dd-mmm-yyyy")

On Error GoTo 0

Application.ScreenUpdating = True
End Sub
9. Let’s double click on mdDataEntry module and add the code to perform Reset, Validate, Load Image, Transfer, Edit, Delete and others.
Code to Reset and Initialize the form with default value
Sub Reset_Form()
Dim iRow As Long

With frmDataEntry

    .txtStudentName.Text = ""
    .txtStudentName.BackColor = vbWhite

    .txtFatherName.Text = ""
    .txtFatherName.BackColor = vbWhite

    .txtDOB.Text = ""
    .txtDOB.BackColor = vbWhite

    .optFemale.Value = False
    .optMale.Value = False

    .txtMobile.Value = ""
    .txtMobile.BackColor = vbWhite

    .txtEmail.Value = ""
    .txtEmail.BackColor = vbWhite

    .txtAddress.Value = ""
    .txtAddress.BackColor = vbWhite

    .txtRowNumber.Value = ""
    .txtImagePath.Value = ""

    .imgStudent.Picture = LoadPicture(vbNullString)

    .cmdSubmit.Caption = "Submit"

    '.cmbCourse.Clear
    .cmbCourse.BackColor = vbWhite

    'Dynamic range based on Support Sheet
    shSupport.Range("A2", shSupport.Range("A" & Rows.Count).End(xlUp)).Name = "Dynamic"

    .cmbCourse.RowSource = "Dynamic"

    .cmbCourse.Value = ""

    .cmbCourse.Value = ""

    'Assigning RowSource to lstDatabase

    .lstDatabase.ColumnCount = 12
    .lstDatabase.ColumnHeads = True

    .lstDatabase.ColumnWidths = "30,70,70,40,45,70,60,60,70,0,0,0"

    iRow = shDatabase.Range("A" & Rows.Count).End(xlUp).row + 1 ' Identify last blank row

    If iRow > 1 Then

        .lstDatabase.RowSource = "Database!A2:L" & iRow

    Else

        .lstDatabase.RowSource = "Database!A2:L2"

    End If


End With
End Sub
Code to Validate the structure of email entered by user
Function ValidEmail(email As String) As Boolean

 '   A regular expression is a pattern made up of a sequence of characters
 '    that you can use to find a matching pattern in another string.
 '    In order to use Regex in VBA you have to use the RegExp object.
 '    A pattern such as [A-C] can be used to search for and match an
 '    upper case letter from A to C from a sequence.

 Dim oRegEx As Object
 Set oRegEx = CreateObject("VBScript.RegExp")
 With oRegEx
    .Pattern = "^[\w-\.]{1,}\@([\da-zA-Z-]{1,}\.){1,}[\da-zA-Z-]{2,3}$"
    ValidEmail = .Test(email)
 End With
 Set oRegEx = Nothing
End Function
Function to Browse and Select the Image
Function GetImagePath() As String
GetImagePath = ""

With Application.FileDialog(msoFileDialogFilePicker) ' File Picker Dialog box

    .AllowMultiSelect = False
    .Filters.Clear      ' Clear the exisiting filters
    .Filters.Add "Images", "*.gif; *.jpg; *.jpeg" 'Add a filter that includes GIF and JPEG images

    ' show the file picker dialog box
    If .Show <> 0 Then

        GetImagePath = .SelectedItems(1) ' Getting the path of selected file name

    End If

End With
End Function
Sub Procedure to create a folder named ‘Images’ at the same location where Excel Files has been saved.
Sub CreateFolder()
Dim strFolder As String ' To hold the folter path where we need to replicate the image

strFolder = ThisWorkbook.Path & Application.PathSeparator & "Images"
'Check Directory exist or not. If not exist then it will return blank
     If Dir(strFolder, vbDirectory) = "" Then
         MkDir strFolder ' Make a folder with the name of 'Images'
     End If
End Sub
Sub Procedure to Save the selected image in Images folder and load it to Image control imgStudent
Sub LoadImange()
Dim imgSourcePath As String ' To store the path of image selected by user
Dim imgDestination As String ' To store the path of image selected by user

imgSourcePath = Trim(GetImagePath()) ' Call the Function

If imgSourcePath = "" Then Exit Sub

Call CreateFolder   'Create Image folder if not exist

imgDestination = ThisWorkbook.Path & Application.PathSeparator & _
frmDataEntry.txtStudentName & "." & Split(imgSourcePath, ".")(UBound(Split(imgSourcePath, ".")))

FileCopy imgSourcePath, imgDestination ' Code to copy image

frmDataEntry.imgStudent.PictureSizeMode = fmPictureSizeModeStretch 'Stretch mode
frmDataEntry.imgStudent.Picture = LoadPicture(imgDestination) ' Loading picture to imgStudent
frmDataEntry.txtImagePath.Value = imgDestination ' Assigning the path to text box
End Sub
Function to Validate data entered by user
Function ValidEntry() As Boolean

ValidEntry = True

With frmDataEntry

    'Default Color

    .txtStudentName.BackColor = vbWhite
    .txtFatherName.BackColor = vbWhite
    .txtDOB.BackColor = vbWhite
    .txtMobile.BackColor = vbWhite
    .txtEmail.BackColor = vbWhite
    .txtAddress.BackColor = vbWhite
    .cmbCourse.BackColor = vbWhite

    'Validating Student Name

    If Trim(.txtStudentName.Value) = "" Then
        MsgBox "Please enter Student's name.", vbOKOnly + vbInformation, "Student Name"
        .txtStudentName.BackColor = vbRed
        .txtStudentName.SetFocus
        ValidEntry = False
        Exit Function
    End If


    'Validating Father's name

    If Trim(.txtFatherName.Value) = "" Then
        MsgBox "Please enter Father's name.", vbOKOnly + vbInformation, "Father Name"
        .txtFatherName.BackColor = vbRed
        .txtFatherName.SetFocus
        ValidEntry = False
        Exit Function
    End If

    'Validating DOB

    If Trim(.txtDOB.Value) = "" Then
        MsgBox "DOB is blank. Please enter DOB.", vbOKOnly + vbInformation, "Invalid Entry"
        .txtDOB.BackColor = vbRed
        ValidEntry = False
        Exit Function
    End If


    'Validating Gender

    If .optFemale.Value = False And .optMale.Value = False Then
        MsgBox "Please select gender.", vbOKOnly + vbInformation, "Invalid Entry"
        ValidEntry = False
        Exit Function
    End If

    'Validating Course

    If Trim(.cmbCourse.Value) = "" Then
        MsgBox "Please select the Course from drop-down.", vbOKOnly + vbInformation, "Course Applied"
        .cmbCourse.BackColor = vbRed
        ValidEntry = False
        Exit Function
    End If

    'Validating Mobile Number

    If Trim(.txtMobile.Value) = "" Or Len(.txtMobile.Value) < 10 Or Not IsNumeric(.txtMobile.Value) Then
        MsgBox "Please enter a valid mobile number.", vbOKOnly + vbInformation, "Invalid Entry"
        .txtMobile.BackColor = vbRed
        .txtMobile.SetFocus
        ValidEntry = False
        Exit Function
    End If

    'Validating Email

    If ValidEmail(Trim(.txtEmail.Value)) = False Then
        MsgBox "Please enter a valid email address.", vbOKOnly + vbInformation, "Invalid Entry"
        .txtEmail.BackColor = vbRed
        .txtEmail.SetFocus
        ValidEntry = False
        Exit Function
    End If

    'Validating Address

    If Trim(.txtAddress.Value) = "" Then
        MsgBox "Address is blank. Please enter a valid address.", vbOKOnly + vbInformation, "Invalid Entry"
        .txtAddress.BackColor = vbRed
        ValidEntry = False
        Exit Function
    End If

    'Validating Image

    If .imgStudent.Picture Is Nothing Then
       MsgBox "Please upload the PP Size Photo.", vbOKOnly + vbInformation, "Picture"
        ValidEntry = False
        Exit Function
    End If

End With
End Function
Sub Procedure to Transfer the Data from Form to Database sheet
Sub Submit_Data()
Dim iRow As Long

If frmDataEntry.txtRowNumber.Value = "" Then

 iRow = shDatabase.Range("A" & Rows.Count).End(xlUp).row + 1 ' Identify last blank row

Else
    iRow = frmDataEntry.txtRowNumber.Value

End If

With shDatabase.Range("A" & iRow)

.Offset(0, 0).Value = "=Row()-1" 'S. No.

.Offset(0, 1).Value = frmDataEntry.txtStudentName.Value 'Student's Name

.Offset(0, 2).Value = frmDataEntry.txtFatherName.Value    'Father's Name

.Offset(0, 3).Value = frmDataEntry.txtDOB.Value   'DOB

.Offset(0, 4).Value = IIf(frmDataEntry.optFemale.Value = True, "Female", "Male")  'Gender

.Offset(0, 5).Value = frmDataEntry.cmbCourse.Value    'Qualification

.Offset(0, 6).Value = frmDataEntry.txtMobile.Value    'Mobile Number

.Offset(0, 7).Value = frmDataEntry.txtEmail.Value     'Email

.Offset(0, 8).Value = frmDataEntry.txtAddress.Value   'Address

.Offset(0, 9).Value = frmDataEntry.txtImagePath.Value   'Photo

.Offset(0, 10).Value = Application.UserName    'Submitted By

.Offset(0, 11).Value = Format([Now()], "DD-MMM-YYYY HH:MM:SS")   'Submitted On

'Reset the form

Call Reset_Form

Application.ScreenUpdating = True

MsgBox "Data submitted successfully!"
End Sub
Function to find the selection in lstDatabase
Function Selected_List() As Long
Dim i As Long
Selected_List = 0
If frmDataEntry.lstDatabase.ListCount = 1 Then Exit Function ' If no items exist in List Box
For i = 0 To frmDataEntry.lstDatabase.ListCount - 1
If frmDataEntry.lstDatabase.Selected(i) = True Then
   Selected_List = i + 1
   Exit For
End If
Next i
End Function
Sub Procedure to Show the Form
Sub Show_Form()
frmDataEntry.Show
End Sub
Now, we have created all the Sub Procedures and Functions. Let’s call these functions and procedures on click events and form intilization.
Go to Form and double click on ‘cmdLoadImage’ command button to call the ‘LoadImage’ sub procedure.
Private Sub cmdLoadImage_Click()
If Me.txtStudentName.Value = "" Then
 MsgBox "Please enter Student's first.", vbOKOnly + vbCritical, "Error"
 Exit Sub
End If

Call LoadImange
End Sub
Call the Reset_Form sub-procedure on Form Initialization
Private Sub UserForm_Initialize()
Call Reset_Form
End Sub
Assign the code on Click event of Submit Button
Private Sub cmdSubmit_Click()
Dim i As VbMsgBoxResult

i = MsgBox("Do you want to submit the data?", vbYesNo + vbQuestion, "Submit Data")

If i = vbNo Then Exit Sub

If ValidEntry Then

    Call Submit_Data

End If
End Sub
Assign the code on Click event of Reset Button
Private Sub cmdReset_Click()
Dim i As VbMsgBoxResult

i = MsgBox("Do you want to reset the form?", vbYesNo + vbQuestion, "Reset")

If i = vbNo Then Exit Sub

Call Reset_Form
End Sub
Add the below code on double click of lstDatabase to edit the record
Private Sub lstDatabase_DblClick(ByVal Cancel As MSForms.ReturnBoolean)

If Selected_List = 0 Then
     MsgBox "No row is selected.", vbOKOnly + vbInformation, "Edit"
     Exit Sub
End If

Dim sGender As String

'Me.txtRowNumber = Selected_List + 1 ' Assigning Selected Row Number of Database Sheet

Me.txtRowNumber = Me.lstDatabase.List(Me.lstDatabase.ListIndex, 0) + 1

'Assigning the Selected Reocords to Form controls

frmDataEntry.txtStudentName.Value = Me.lstDatabase.List(Me.lstDatabase.ListIndex, 1)

frmDataEntry.txtFatherName.Value = Me.lstDatabase.List(Me.lstDatabase.ListIndex, 2)

frmDataEntry.txtDOB.Value = Format(Me.lstDatabase.List(Me.lstDatabase.ListIndex, 3), "dd-mmm-yyyy")

sGender = Me.lstDatabase.List(Me.lstDatabase.ListIndex, 4)

If sGender = "Female" Then
    frmDataEntry.optFemale.Value = True
Else
    frmDataEntry.optMale.Value = True
End If

frmDataEntry.cmbCourse.Value = Me.lstDatabase.List(Me.lstDatabase.ListIndex, 5)
frmDataEntry.txtMobile.Value = Me.lstDatabase.List(Me.lstDatabase.ListIndex, 6)
frmDataEntry.txtEmail.Value = Me.lstDatabase.List(Me.lstDatabase.ListIndex, 7)
frmDataEntry.txtAddress.Value = Me.lstDatabase.List(Me.lstDatabase.ListIndex, 8)
frmDataEntry.imgStudent.Picture = LoadPicture(Me.lstDatabase.List(Me.lstDatabase.ListIndex, 9))
frmDataEntry.txtImagePath = Me.lstDatabase.List(Me.lstDatabase.ListIndex, 9)
Me.cmdSubmit.Caption = "Update"
MsgBox "Please make the required changes and Click on Update."
End Sub
Write the below code on click event of cmdDelete command button
Private Sub cmdDelete_Click()
If Selected_List = 0 Then

     MsgBox "No row is selected.", vbOKOnly + vbInformation, "Delete"
     Exit Sub

End If

Dim i As VbMsgBoxResult

Dim row As Long

row = Me.lstDatabase.List(Me.lstDatabase.ListIndex, 0) + 1

i = MsgBox("Do you want ot delete the selected record?", vbYesNo + vbQuestion, "Delete")

If i = vbNo Then Exit Sub

ThisWorkbook.Sheets("Database").Rows(row).Delete

Call Reset ' Refresh the controls with latest information

MsgBox "Selected record has been successfully deleted.", vbOKOnly + vbInformation, "Delete"
End Sub
Write the below code on click event of cmdEdit command button
Private Sub cmdEdit_Click()
If Selected_List = 0 Then

     MsgBox "No row is selected.", vbOKOnly + vbInformation, "Edit"
     Exit Sub

End If

Dim sGender As String

Me.txtRowNumber = Me.lstDatabase.List(Me.lstDatabase.ListIndex, 0) + 1

'Assigning the Selected Reocords to Form controls

frmDataEntry.txtStudentName.Value = Me.lstDatabase.List(Me.lstDatabase.ListIndex, 1)

frmDataEntry.txtFatherName.Value = Me.lstDatabase.List(Me.lstDatabase.ListIndex, 2)

frmDataEntry.txtDOB.Value = Format(Me.lstDatabase.List(Me.lstDatabase.ListIndex, 3), "dd-mmm-yyyy")

sGender = Me.lstDatabase.List(Me.lstDatabase.ListIndex, 4)

If sGender = "Female" Then
    frmDataEntry.optFemale.Value = True
Else
    frmDataEntry.optMale.Value = True
End If
frmDataEntry.cmbCourse.Value = Me.lstDatabase.List(Me.lstDatabase.ListIndex, 5)
frmDataEntry.txtMobile.Value = Me.lstDatabase.List(Me.lstDatabase.ListIndex, 6)
frmDataEntry.txtEmail.Value = Me.lstDatabase.List(Me.lstDatabase.ListIndex, 7)
frmDataEntry.txtAddress.Value = Me.lstDatabase.List(Me.lstDatabase.ListIndex, 8)
frmDataEntry.imgStudent.Picture = LoadPicture(Me.lstDatabase.List(Me.lstDatabase.ListIndex, 9))
frmDataEntry.txtImagePath = Me.lstDatabase.List(Me.lstDatabase.ListIndex, 9)
Me.cmdSubmit.Caption = "Update"
MsgBox "Please make the required changes and Click on Update."
End Sub
Now, we have successfully assigned and called all the required functions and procedures on different events. Let’s move ‘Home’ sheet in Excel and assign the macro ‘Show_Form’ on rectangular button so that user can click there to launch the form.
Student’s Registration Form is ready. You can test this form and start using.
Please watch the Step by Step Tutorial on YouTube.
This project file is available for a nominal cost to support our website and cover associated costs.
Download now get this project 100% well formatted VBA codes!

Thanks for your support!


Automated Student’s Registration Form in Excel and VBA download button not work.
Dear Please send me this file
Please download it from the link provided in this post. Thanks!
Brother, It is amazing
Thanks for your feedback!
Thanks for sharing the knowledge
I made a small correction to your code and it works perfectly.
lstDatabase.ColumnWidths = “20 pt;85 pt;85 pt;65 pt;50 pt;60 pt;65 pt;60 pt;0 pt;0 pt;0 pt;0 pt”
Good job. this is an excellent class
Amazing things here. I’m very happy to look your post. Thank you so
much and I am looking forward to contact you. Will you please drop me a mail?