Data Entry Application is one of the highest utilized application in any of the organization. Data Entry Software allows you to enter the details with the form and transfer input data from User Form to Database.
You can go for several paid Data Entry Application but the real pain is Trust, Data Privacy and Info-Sec approval. Most of the time, we can’t download and install the commercial Data Entry Application in our organization. Considering all the issue, cost and data privacy, it’s always a good decision to design your own Multi-User Data Entry form in Microsoft Excel and MS Access. In this tool, you don’t seek any approval from IT or invest extra budget on application.
If you are comfortable with VBA and MS Access then it will be easy for you. But what if you are familiar with Visual Basic For Application and MS Access. In this case, it will be very difficult for you to design the application even though VBA is very simple language.
In this tutorial, we will learn How to Create a Data Entry Application in Excel and MS Access? You just need to be familiar with the Excel sheet and you can follow the steps to create fully dynamic data entry form in Excel and Access.
In this application, we will be using MS Excel as front end of this application and MS Access as Database. With the help of both application, we will design application for shareable environment where multiple users can use the Data Entry Form to transfer the data simultaneously. So without further delay, let’s begin!
First of all, you need to create a Folder where you can save Excel and MS Access file. Let’s create a folder named ‘Data Entry Application’
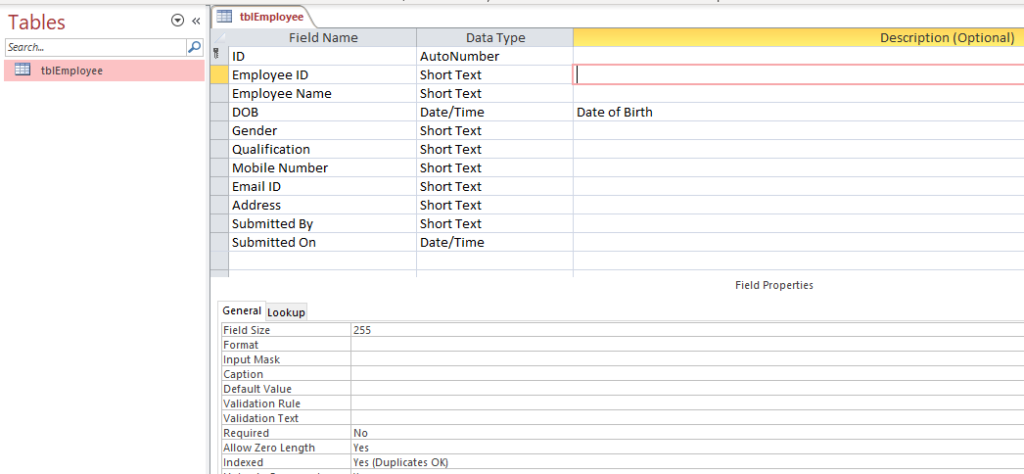
Now, open the MS Access application and create a Blank Database. In MS Access window, create a table named ‘tblEmployee’ and open the table in Design Mode.
Create the required Fields Name with required Data Type. Please see the below image.
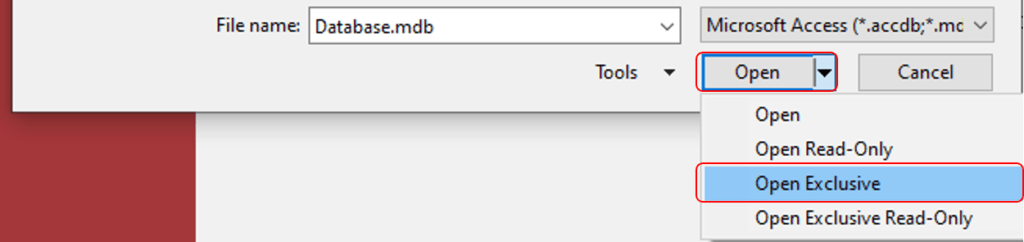
Now Save the Table and go to File and Save the Database. To save the Database, please select ‘Access 2002 -2003 Database (*.mdb) and then Click on Save As. Please see the below image.

Given the database name as ‘Database’ and click on Save. Make sure you selected the same folder which we created for Data Entry Application.
Now, close the current open database and go to File then click on Open. Browse the database file which we created for application and then click on drop-down available beside the Open button and then select ‘Open Exclusive’. Please see the below snapshot.
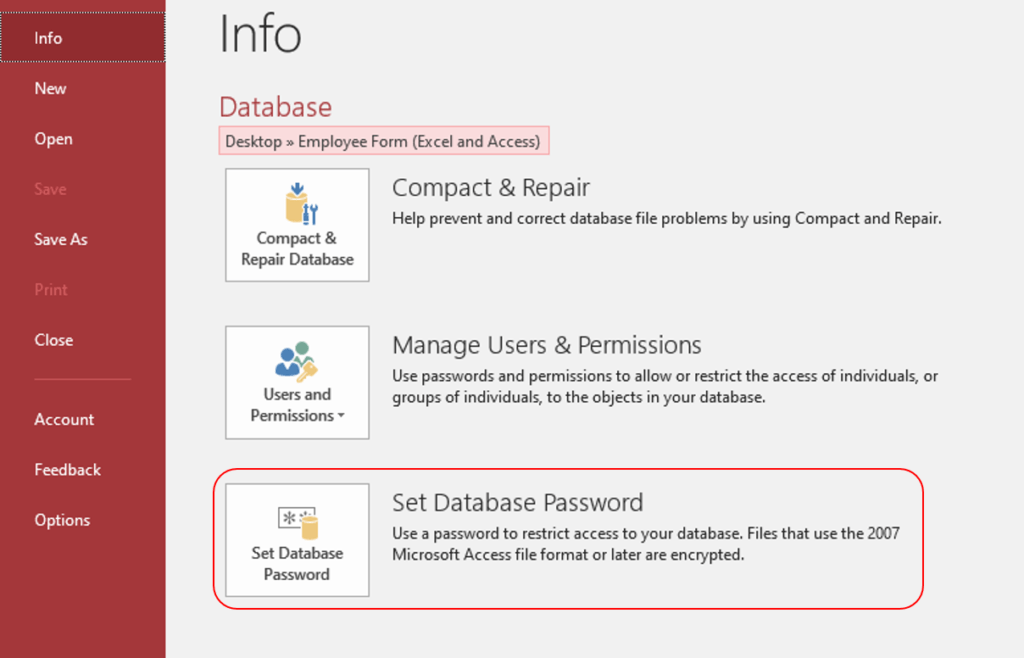
This will open the ‘Database.mdb’ in Exclusive mode so that we can apply the protection on Database file. It will secure our database and users will not be able to open it and make any changes if they will not enter the correct password.
Now, go to File menu and select the Info. Under Info, click on the third option e.i. Set Database Password. Please see the below image.
Now, enter the Password ‘thedatalabs’ in both the Password and Verify text boxes and then click on Okay.
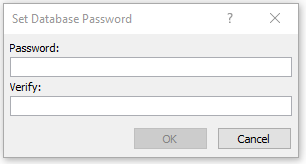
Close the database from the Exclusive mode and open it in normal mode (while opening just click on Open. Don’t select any other option from drop-down available beside the Open button). When you will open the database, it will ask Password. Please enter ‘thedatalabs’ as password to open the database.
Here, we have done with Database designing. Let’s move ahead and create Data Entry form in Excel.
Open MS Excel Application and create a New Workbook. Save the file with the name ‘Data Entry Application in Excel and MS Access’ and select the File Type ‘xlsm’. Macro enabled file is required to retain all the codes which we will write for this Data Entry Form.
Change the Sheet1 name to Home, remove the gridlines, and create labels and rounded rectangle for Launch button. Please see the below pic.

Let’s move to Visual Basic For Application (VBA) window to design the Form and write the required VBA codes.
To open the VBA window, go to Developer Tab in Excel and then click on Visual Basic under Code group. Alternatively, you can also use Shortcut key ALT + F11 to open the VBA window.
In VB window, let’s insert a UserForm. To insert the form, go to Insert menu and click on UserForm.
Let’s set the properties of Form.
Name: frmDataEntry; Caption: Data Entry Application;Height: 428.25; Width: 420
Let’s add other controls and set the properties of each and every controls. Follow the same format which is used in below image.
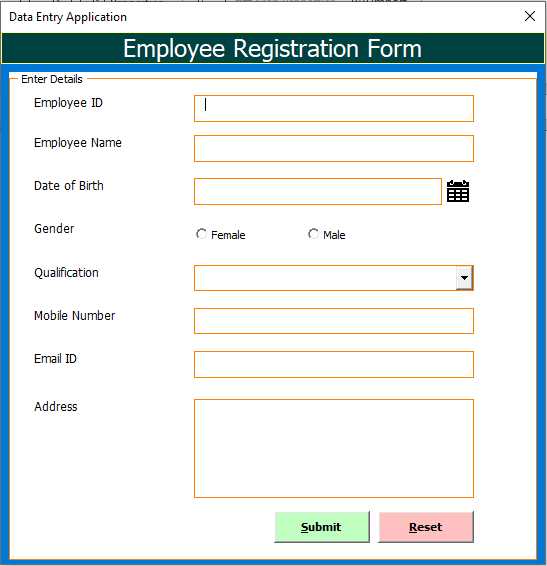
Set the properties for input controls. Name would be txtEmpID, txtName, txtDOB, imgCalendar, optFemale, optMale, cmbQualification, txtMobile, txtEmail, txtAddrss, cmdSubmit, cmdReset
Caption for optFemale would be Female, optMale would be Male, cmdSubmit would be Submit and cmdReset would be Reset.
Set the tab order for all input controls.
Let’s import the Custom Calendar from the Support File. Please see the below image.

Let’s add coding on Double click on txtDOB and imgCalendar. Make sure you have locked the txtDOB so that user will not be able to enter data directly.
Double click on txtDOB and add the below code on double click events.
Private Sub txtDOB_DblClick(ByVal Cancel As MSForms.ReturnBoolean)

Application.ScreenUpdating = False

Dim sDate As String

On Error Resume Next

sDate = MyCalendar.DatePicker(Me.txtDOB)

Me.txtDOB.Value = Format(sDate, "dd-mmm-yyyy")

On Error GoTo 0

Application.ScreenUpdating = True
End Sub
Now, double click on imgCalendar and add the below code on click events.
Private Sub imgCalendar_Click()

Application.ScreenUpdating = False

Dim sDate As String

On Error Resume Next

sDate = MyCalendar.DatePicker(Me.txtDOB)

Me.txtDOB.Value = Format(sDate, "dd-mmm-yyyy")

On Error GoTo 0

Application.ScreenUpdating = True
End Sub
Let’s insert a module in our project. To insert a module go to Insert menu and click on Module. Rename the Module1 to mdDataEntry.
Now double click on mdDataEntry to view the code window.
Add the below code in mdDataEntry to Reset and Initialize the form.
Sub Reset_Form()

With frmDataEntry

    .txtEmpID.Text = ""
    .txtEmpID.BackColor = vbWhite

    .txtName.Text = ""
    .txtName.BackColor = vbWhite

    .txtDOB.Text = ""
    .txtDOB.BackColor = vbWhite

    .optFemale.Value = False
    .optMale.Value = False

    .txtMobile.Value = ""
    .txtMobile.BackColor = vbWhite

    .txtEmail.Value = ""
    .txtEmail.BackColor = vbWhite

    .txtAddress.Value = ""
    .txtAddress.BackColor = vbWhite

    .cmbQualification.Clear
    .cmbQualification.BackColor = vbWhite

    .cmbQualification.AddItem "10+2"
    .cmbQualification.AddItem "Bachelor Degree"
    .cmbQualification.AddItem "Master Degree"
    .cmbQualification.AddItem "PHD"

    .cmbQualification.Value = ""

End With

End Sub
Add the below function in mdlDataEntry to validate the Email Id entered by User.
Function ValidEmail(email As String) As Boolean
Dim oRegEx As Object
 Set oRegEx = CreateObject("VBScript.RegExp")
 With oRegEx
    .Pattern = "^[\w-\.]{1,}\@([\da-zA-Z-]{1,}\.){1,}[\da-zA-Z-]{2,3}$"
    ValidEmail = .Test(email)
 End With
 Set oRegEx = Nothing
End Function
Let’s add one more function to validate all the entries made by user in Data Entry Form. You just need to copy the below code and paste it below the email validation function.
Function ValidEntry() As Boolean
ValidEntry = True
With frmDataEntry
'Default Color
.txtEmpID.BackColor = vbWhite
.txtName.BackColor = vbWhite
.txtDOB.BackColor = vbWhite
.txtMobile.BackColor = vbWhite
.txtEmail.BackColor = vbWhite
.txtAddress.BackColor = vbWhite
.cmbQualification.BackColor = vbWhite
'Validating Name
If Trim(.txtEmpID.Value) = "" Then
MsgBox "Employee ID is blank. Please enter a valid ID.", vbOKOnly + vbInformation, "Emp ID"
.txtEmpID.BackColor = vbRed
ValidEntry = False
Exit Function
End If
'Validating Name
If Trim(.txtName.Value) = "" Then
MsgBox "Employee Name is blank. Please enter a valid name.", vbOKOnly + vbInformation, "Employee Name"
.txtName.BackColor = vbRed
ValidEntry = False
Exit Function
End If
'Validating DOB
If Trim(.txtDOB.Value) = "" Then
MsgBox "DOB is blank. Please enter DOB.", vbOKOnly + vbInformation, "Invalid Entry"
.txtDOB.BackColor = vbRed
ValidEntry = False
Exit Function
End If
'Validating DOB
If .optFemale.Value = False And .optMale.Value = False Then
MsgBox "Please select gender.", vbOKOnly + vbInformation, "Invalid Entry"
ValidEntry = False
Exit Function
End If
'Validating Qualification
If Trim(.cmbQualification.Value) = "" Then
MsgBox "Please select the Qualification from drop-down.", vbOKOnly + vbInformation, "Invalid Entry"
.cmbQualification.BackColor = vbRed
ValidEntry = False
Exit Function
End If
'Validating Mobile Number
If Trim(.txtMobile.Value) = "" Or Len(.txtMobile.Value) < 10 Or Not IsNumeric(.txtMobile.Value) Then
MsgBox "Please enter a valid mobile number.", vbOKOnly + vbInformation, "Invalid Entry"
.txtMobile.BackColor = vbRed
ValidEntry = False
Exit Function
End If
'Validating Email
If ValidEmail(Trim(.txtEmail.Value)) = False Then
MsgBox "Please enter a valid email address.", vbOKOnly + vbInformation, "Invalid Entry"
.txtEmail.BackColor = vbRed
ValidEntry = False
Exit Function
End If
'Validating Address
If Trim(.txtAddress.Value) = "" Then
MsgBox "Address is blank. Please enter a valid address.", vbOKOnly + vbInformation, "Invalid Entry"
.txtAddress.BackColor = vbRed
ValidEntry = False
Exit Function
End If
End With
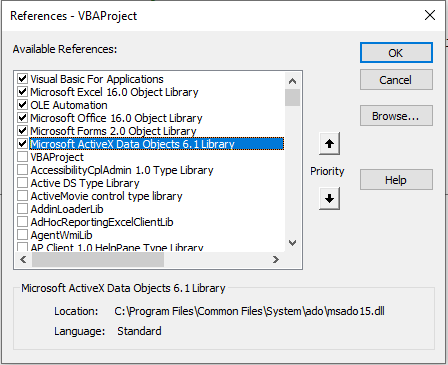
End FunctionLet’s add sub procedure to transfer the data from User Form to Database. Before writing the code, we need to add the reference of ADO library in our project. To do that, just go to Tool menu and select the References… In references window, please select ‘Microsoft ActiveX Data Objects 6.1 Library’ and then click on Okay. Please see the below snapshot.
Now, we have added the reference for ADO. Let’s start coding for Submitting Data. You just need to copy the below code and paste it below the ValidEntry Function. Here, we have utilized dynamic connection string to connect the database. You can check the support folders and use the fixed path link to replace the dynamic code. The same has been explained in our YouTube tutorial. Support file link has been provided at the bottom of this post.
Sub Submit_Data()

Application.EnableCancelKey = xlDisabled
Application.DisplayAlerts = False
Application.ScreenUpdating = False

On Error GoTo ErrorHandler
Dim nConnection As New ADODB.Connection
Dim nRecordset As New ADODB.Recordset

Dim sqlQuery As String

#If Win64 Then
    nConnection.Open "Provider=Microsoft.ACE.OLEDB.12.0;Data Source=" & ThisWorkbook.Path & "\Database.mdb" & ";Jet OLEDB:Database Password=thedatalabs"
#Else
    nConnection.Open "Provider=Microsoft.Jet.OLEDB.4.0;Data Source=" & ThisWorkbook.Path & "\Database.mdb" & ";Jet OLEDB:Database Password=thedatalabs"
#End If

sqlQuery = "Select * from tblEmployee"

nRecordset.Open Source:=sqlQuery, ActiveConnection:=nConnection, CursorType:=adOpenKeyset, LockType:=adLockOptimistic

With nRecordset

    .AddNew ' If new records

    .Fields("Employee ID").Value = frmDataEntry.txtEmpID.Value   'Employee ID
    .Fields("Employee Name").Value = frmDataEntry.txtName.Value   'Employee Name
    .Fields("DOB").Value = frmDataEntry.txtDOB  'DOB
    .Fields("Gender").Value = IIf(frmDataEntry.optFemale.Value = True, "Female", "Male") 'Gender
    .Fields("Qualification").Value = frmDataEntry.cmbQualification.Value   'Qualification
    .Fields("Mobile Number").Value = frmDataEntry.txtMobile.Value   'Mobile Number
    .Fields("Email ID").Value = frmDataEntry.txtEmail.Value   'Email
    .Fields("Address").Value = frmDataEntry.txtAddress.Value   'Address

    .Fields("SUBMITTED BY").Value = Environ("username")
    .Fields("SUBMITTED ON").Value = [Now()]

   .Update

   .Close

End With

nConnection.Close

'Reset the form

Call Reset_Form

Application.DisplayAlerts = True
Application.ScreenUpdating = True

MsgBox "Data submitted successfully!"

Exit Sub
ErrorHandler:
MsgBox Err.Description & " " & Err.Number, vbOKOnly + vbCritical, "Database Error"
Application.DisplayAlerts = True
Application.ScreenUpdating = True
nConnection.Close

End Sub
Add the below code at the bottom of Submit_Data procedure to launch the form. We will utilize this sub procedure to assign it on ‘Launch Form’ button available on Home sheet.
Sub Show_Form()
  frmDataEntry.Show
End Sub
Let’s move to frmDataEntry and add the required code in Form Intilization, Click events of Submit and Reset.
Double click on Form and add the below sub procedure on initialize event.
Private Sub UserForm_Initialize()
Call Reset_Form
End Sub
Code for Click event on Submit Button
Private Sub cmdSubmit_Click()
Dim i As VbMsgBoxResult

i = MsgBox("Do you want to submit the data?", vbYesNo + vbQuestion, "Submit Data")

If i = vbNo Then Exit Sub

If ValidEntry Then

    Call Submit_Data

End If
End Sub
Code for click event on Reset button
Private Sub cmdReset_Click()
Dim i As VbMsgBoxResult

i = MsgBox("Do you want to reset the form?", vbYesNo + vbQuestion, "Reset")

If i = vbNo Then Exit Sub

Call Reset_Form
End Sub
Now coding for this project is done. Let’s move to Excel window and assign the macro on ‘Launch Form’ button available on Home sheet. Right Click on ‘Launch Form’ button and select Assign Macro and then choose the macro named ‘Show_Form’ from the available options.
All done. Let’s launch the form with the help of ‘Launch Form’ button available on Home sheet.
Please watch our step by step tutorial for this form on YouTube.
Please click on below button to download the Excel, Database and other support files.