Table of Contents
Automated Data Collator in Excel
Collating data from several Excel files to one file is really hectic job and it takes a lot of time and manual efforts. Also, there is a high possibility of errors in copying and pasting data. We might miss any of the file or paste the data under different column headers.
Excel always plays an important role in automating the task with Macro or BA code. In this article, we will learn how to create a fully automated data collator tool in Excel and VBA. Please follow the below steps.
Step by Step Tutorial for Automated Data Collator in Excel
Step 1
Create a New Excel File and save it with the name ‘Automated Data Collator’. Make sure the extension should be ‘.xlsm’ otherwise file will not retain the VBA codes.
Step 2
Add two different sheets in the ‘Automated Data Collator’ file. Rename the ‘Sheet1’ to ‘Home’ and ‘Sheet2’ to ‘Collated Data’.
Step 3
Create the label and add a command button (rounded rectangle) from shape with ‘Collate’ caption. Please see the below image.

Step 4
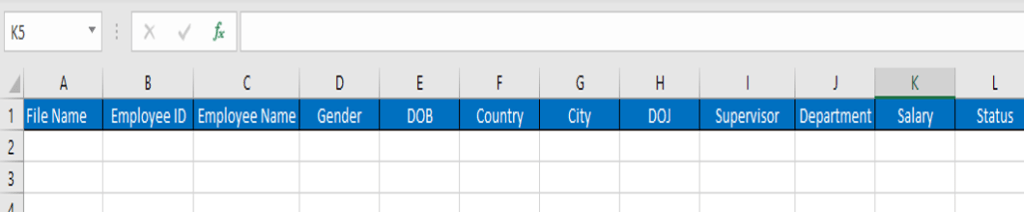
Add the required column headers in ‘Collated Data’ sheet in row 1. Please see the below image and use the same headers and formatting.
Step 5
Let’s move to the Visual Basic Application window. To jump to VBA window, click on Developer Tab then click on VBA in code group. Alternatively, you can press shortcut key ALT + F11.
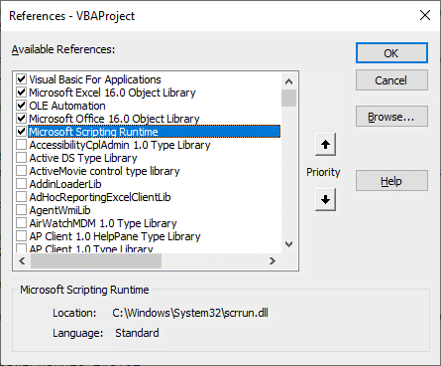
In this tool, we will utilize FileSystemObject(FSO) and it’s methods. So, let’s add the reference of FSO. To do that, click on Tools Menu and then click on ‘Reference’ and select ‘Microsoft Scripting Runtime’ from the available references. Please see the below image.
Step 6
To write the codes, let’s insert a new Module in our project. To add a module, click on Insert menu then click on ‘Module’.

Step 7
Let’s add the below VBA codes in Module1 code window.
Sub CollateData()
Application.ScreenUpdating = False
Dim MyFSO As New FileSystemObject ‘Declaring and Initializing FSO
Dim wkbSource As Workbook ‘ Workbook
Dim iSourceRow As Long 'To store the last row number available in source file
Dim iRow As Long 'To store the last blank row available in collated sheet before pasting data
Dim iTotalRow As Long 'To store the last non-blank row available in collated sheet after pasting data
Dim sPath As String 'To store the folder path
Dim SourceFolder As Folder 'Folder Variable for FSO
Dim MyFile As File 'File Variable for FSO
Dim FileName As String 'To store the File Name only

Dim iTotalFiles As Long     'To store the count of all excel files available in Selected Folder
Dim DialogBox As FileDialog   'File Dialog to select the folder name
Set DialogBox = Application.FileDialog(msoFileDialogFolderPicker) 'Assigning FolderPicker Dialog Box
'Code to open the Dialog Box and select a folder
With DialogBox
    .Title = "Select a Folder"
    .AllowMultiSelect = False
    .InitialFileName = Application.DefaultFilePath
    If .Show <> -1 Then Exit Sub  'no folder selected
    sPath = .SelectedItems(1)
End With
    'Check whether selected folder exist or not
If Not MyFSO.FolderExists(sPath) Then
    MsgBox "Folder is not available.", vbOKOnly + vbCritical, "Error!"
    Exit Sub
End If

Set SourceFolder = MyFSO.GetFolder(sPath)
'Get the count of all excel file available in selected folder
iTotalFiles = 0
For Each MyFile In SourceFolder.Files
    If MyFSO.GetExtensionName(MyFile) = "xlsx" Then
        iTotalFiles = iTotalFiles + 1
    End If
Next MyFile
'Terminate the code if there is no excel file in selected folder
If iTotalFiles = 0 Then
    MsgBox "No Excel file available.", vbOKOnly + vbCritical, "Error!"
    Application.ScreenUpdating = True
    Exit Sub
End If
'Code to compile all files
For Each MyFile In SourceFolder.Files
    If MyFSO.GetExtensionName(MyFile) = "xlsx" Then
   'Code to find the last blank row number before pasting the data
       iRow = ThisWorkbook.Sheets("Collated Data").Range("B" & Rows.Count).End(xlUp).Row + 1
       'extracting the file name from MyFile
       FileName = MyFSO.GetFileName(MyFile)
       'Opening the source file in readonly mode
       Set wkbSource = Workbooks.Open(FileName:=MyFile, ReadOnly:=True)
       'Code to find the last non-blank row number in source file before copying the data
       iSourceRow = wkbSource.Sheets("Data").Range("A" & Rows.Count).End(xlUp).Row
       'If there is no data in the current file then move to next file and ignore it
       If iSourceRow = 1 Then GoTo NextLoop
       'Code to Copy the data
       wkbSource.Sheets("Data").Range("A2:K" & iSourceRow).Copy
       'Code to paste the data
       ThisWorkbook.Sheets("Collated Data").Range("B" & iRow).PasteSpecial Paste:=xlPasteValues
       Application.CutCopyMode = False
       'Code to find the last non-blank row number after pasting the data
       iTotalRow = ThisWorkbook.Sheets("Collated Data").Range("B" & Rows.Count).End(xlUp).Row
       'Code to update the file name
       ThisWorkbook.Sheets("Collated Data").Range("A" & iRow & ":A" & iTotalRow).Value = FileName
NextLoop:
wkbSource.Close savechanges:=False
Set wkbSource = Nothing
End If
Next MyFile
MsgBox "Data have been collated. Thanks for using this tool!", vbOKOnly + vbInformation, "Done"
Application.ScreenUpdating = True
End Sub
Now, we have done with coding. Let’s move to Excel window and assign the macro on ‘Collate’ button available on ‘Home’ sheet.
Watch our Step-By-Step YouTube tutorial
Download Automated Data Collator in Excel
Please click on below button to download the Excel File (Data Collator) used in our tutorial.