Table of Contents
Transfer Data from a Data Entry Form to a Protected Worksheet
While working in MS Excel, we often face situations where we need to transfer data from a form to another sheet or store it in a worksheet. Sometimes, the data is critical, and we don’t want it to be edited or deleted—whether accidentally or intentionally. To prevent this, we apply a worksheet password so the data cannot be modified or removed. Excel’s built-in protection features work well in this regard, but a challenge arises when we need to update data frequently through a custom form. VBA cannot edit or update a protected sheet without first unprotecting it.
In this tutorial, we’ll learn how to transfer data from a data entry form to a protected worksheet in Excel. We’ll use VBA code to unprotect the sheet, transfer the data, and then protect it again automatically. This way, end users won’t know the password and won’t be able to edit or update the sheet manually. This process safeguards the worksheet from accidental changes or deletions and also protects the data from intentional tampering.
Watch our YouTube Tutorial
For a step‑by‑step demonstration, check out our YouTube tutorial: How to Develop a Visitor Data Entry Form in Excel and VBA. It walks you through the process visually, making it easier to follow along with the concepts explained here for ‘Transfer Data from a Data Entry Form to a Protected Worksheet’.
Understanding The Steps Required
I’ve developed a data entry application in Excel and VBA to capture visitor details efficiently. This tool allows you to record and manage visitor information in a structured way, ensuring accuracy and protecting the data from accidental or intentional edits.
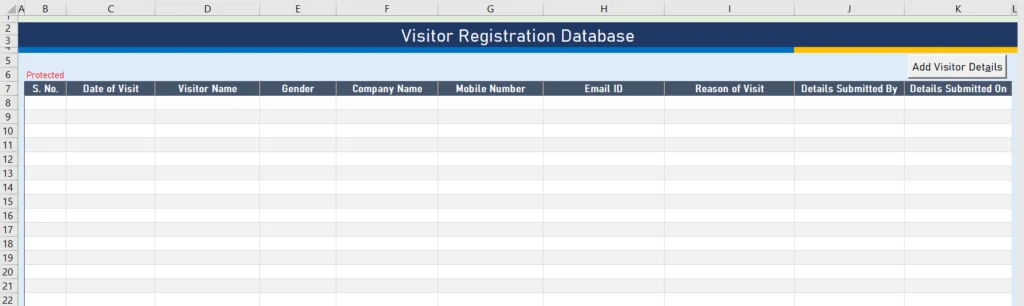
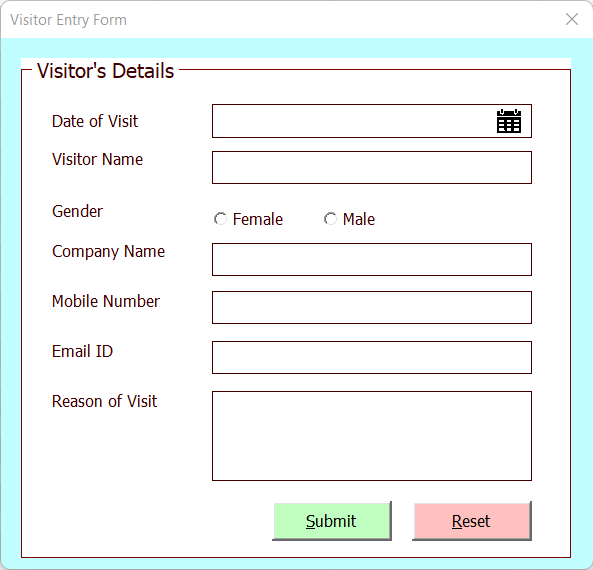
When a user clicks the ‘Add Visitor’s Details’ button, the Visitor Entry UserForm opens. After filling in all the required fields, the user must click the ‘Submit’ button. At this point, the data entered in the ‘Visitor Entry Form’ is automatically transferred to the ‘Home’ sheet.
This workflow ensures that visitor information is captured through the form interface and transfer data from a data entry form to a protected worksheet, without requiring manual edits to the sheet itself.
Handling Protected Worksheets
There are two possible scenarios when transferring data from a form to a worksheet:
- Worksheet not protected – In this case, data can be transferred easily without any restrictions.
- Worksheet protected with a password – Here, data cannot be updated directly. The sheet must be unprotected before transferring the data, and then protected again afterward to prevent users from making changes.
In our file, the ‘Home’ sheet is password‑protected. Therefore, we need to unprotect it before transferring the visitor details. Once the data is updated, the sheet must be protected again to ensure that users cannot edit or delete the information manually.
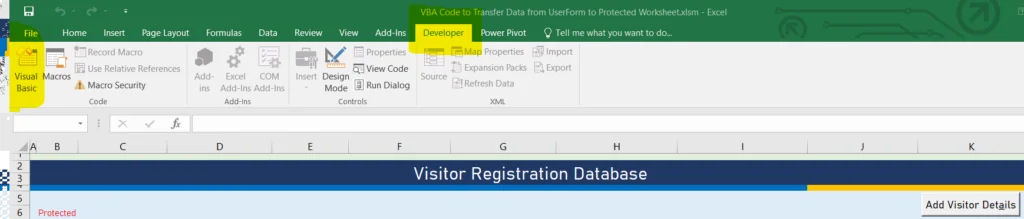
Opening the VBA Window
To write the VBA code for this process, open the VBA editor:
- Go to the Developer tab.
- In the Code group, click on the Visual Basic button.
This will launch the VBA window where we can insert the necessary code to automate unprotecting, updating, and re‑protecting the worksheet.
Opening the VBA Editor
Once you click on the Visual Basic button or press ALT + F11 as the shortcut key, it will open a separate window for Visual Basic for Applications (VBA).
In this project, we have two forms and one module. The first form is used for data entry, and the second form is for the calendar control that we developed. You can find a separate tutorial explaining the calendar control in detail.
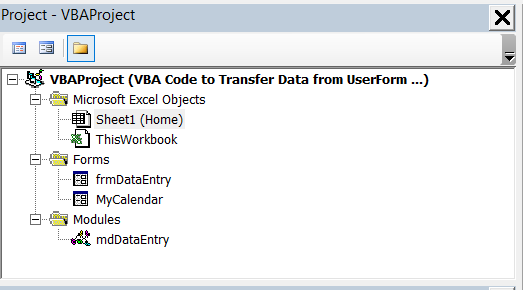
In the module window, we have several Sub Procedures that perform all the required tasks for this project. Each procedure is written to handle a specific part of the process, such as unprotecting the worksheet, transferring the data from the form, and then protecting the worksheet again.
Below, you will see the VBA codes along with a brief explanation of each procedure available in the module window. This breakdown will help you understand how the application works step by step and how each piece of code contributes to the overall functionality.
Code to Reset or Initialize the Visitor Data Entry Form
'Code to Reset and Initialize the form

Sub Reset_Form()

    Dim iRow As Long

    With frmDataEntry

        .txtVisitDate.Value = ""
        .txtVisitDate.BackColor = vbWhite

        .txtVisitorName.Value = ""
        .txtVisitorName.BackColor = vbWhite


        .optFemale.Value = False
        .optMale.Value = False

        .txtCompanyName.Value = ""
        .txtCompanyName.BackColor = vbWhite

        .txtMobile.Value = ""
        .txtMobile.BackColor = vbWhite

        .txtEmail.Value = ""
        .txtEmail.BackColor = vbWhite

        .txtReasonOfVisit.Value = ""
        .txtReasonOfVisit.BackColor = vbWhite


    End With


End Sub
Function to Validate the Email-Id entered by User
Function ValidEmail(email As String) As Boolean


    Dim oRegEx As Object

    Set oRegEx = CreateObject("VBScript.RegExp")

    With oRegEx

        .Pattern = "^[\w-\.]{1,}\@([\da-zA-Z-]{1,}\.){1,}[\da-zA-Z-]{2,3}$"

        ValidEmail = .test(email)

    End With

    Set oRegEx = Nothing

End Function
Function to validate all the entries made by user in Visit Data Entry Form
Function ValidEntry() As Boolean

    ValidEntry = True

    With frmDataEntry

        'Default Color

        .txtVisitDate.BackColor = vbWhite
        .txtVisitorName.BackColor = vbWhite
        .txtCompanyName.BackColor = vbWhite
        .txtMobile.BackColor = vbWhite
        .txtEmail.BackColor = vbWhite
        .txtReasonOfVisit.BackColor = vbWhite

        'Validating Visit Date

        If Trim(.txtVisitDate.Value) = "" Then

            MsgBox "Visit Date is blank. Please select date from Calendar control.", vbOKOnly + vbInformation, "Visit Date"
            .txtVisitDate.BackColor = vbRed
            .txtVisitDate.SetFocus

            ValidEntry = False
            Exit Function

        End If

        'Validating Student's Name

        If Trim(.txtVisitorName.Value) = "" Then

            MsgBox "Please enter visitor's name.", vbOKOnly + vbInformation, "Visitor's Name"
            .txtVisitorName.BackColor = vbRed
            .txtVisitorName.SetFocus

            ValidEntry = False
            Exit Function

        End If

        'Validating Gender

        If .optFemale.Value = False And .optMale.Value = False Then

            MsgBox "Please select Gender.", vbOKOnly + vbInformation, "Gender"
            ValidEntry = False
            Exit Function

        End If

        'Validating Company Name

        If Trim(.txtCompanyName.Value) = "" Then

            MsgBox "Please enter Father's name.", vbOKOnly + vbInformation, "Company Name"
            .txtCompanyName.BackColor = vbRed
            .txtCompanyName.SetFocus

            ValidEntry = False
            Exit Function

        End If

        'Validating Mobile Number

        If Trim(.txtMobile.Value) = "" Or Len(.txtMobile.Value) < 10 Or Not IsNumeric(.txtMobile.Value) Then

            MsgBox "Please enter a valid mobile number.", vbOKOnly + vbInformation, "Mobile Number"
            .txtMobile.BackColor = vbRed
            .txtMobile.SetFocus

            ValidEntry = False
            Exit Function

        End If


        'Validating Email

        If ValidEmail(.txtEmail.Value) = False Then

            MsgBox "Please enter a valid email ID.", vbOKOnly + vbInformation, "Email ID"
            .txtEmail.BackColor = vbRed
            .txtEmail.SetFocus

            ValidEntry = False
            Exit Function

        End If

         'Validating Reason of Visit

        If Trim(.txtReasonOfVisit.Value) = "" Then

            MsgBox "Please enter Address.", vbOKOnly + vbInformation, "Address"
            .txtReasonOfVisit.BackColor = vbRed
            .txtReasonOfVisit.SetFocus

            ValidEntry = False
            Exit Function

        End If

    End With

End Function
Procedure to transfer the data from UserForm to worksheet
Sub Submit_Data()

    Dim iRow As Long

    iRow = Sheets("Home").Range("B" & Rows.Count).End(xlUp).row + 1

    With Sheets("Home").Range("B" & iRow)

        .Offset(0, 0).Value = [Row()-6]

        .Offset(0, 1).Value = frmDataEntry.txtVisitDate.Value

        .Offset(0, 2).Value = frmDataEntry.txtVisitorName.Value

        .Offset(0, 3).Value = frmDataEntry.txtCompanyName.Value

        .Offset(0, 4).Value = IIf(frmDataEntry.optFemale.Value = True, "Female", "Male")

        .Offset(0, 5).Value = frmDataEntry.txtMobile.Value

        .Offset(0, 6).Value = frmDataEntry.txtEmail.Value

        .Offset(0, 7).Value = frmDataEntry.txtReasonOfVisit.Value

        .Offset(0, 8).Value = Application.UserName

        .Offset(0, 9).Value = Format([Now()], "DD-MMM-YYYY HH:MM:SS")

    End With
    'Calling Reset function to reset the form after transferring the data
    Call Reset_Form

    Application.ScreenUpdating = True
    MsgBox "Data Submitted Successfully!"

End Sub
In the frmDataEntry UserForm, we have several codes written to perform different tasks. This UserForm is the main interface where users enter visitor details, and the VBA procedures behind it make sure the data is captured and transferred correctly.
Let’s now explore all the code available in the frmDataEntry UserForm. We will go through each procedure one by one and provide a short explanation of what it does, so you can understand how the form is connected with the worksheet.
Click event procedure of Reset button
Private Sub cmdReset_Click()

    Dim i As VbMsgBoxResult

    i = MsgBox("Do you want to reset the form?", vbYesNo + vbQuestion, "Reset Form")

    If i = vbNo Then Exit Sub

    Call Reset_Form

End Sub
Click event procedure of Calendar image to open the calendar form
Private Sub imgCalendar_Click()

    Application.ScreenUpdating = False

    Dim sDate As String

    On Error Resume Next

    sDate = MyCalendar.DatePicker(Me.txtVisitDate)

    Me.txtVisitDate.Value = Format(sDate, "dd-mmm-yyyy")

    On Error GoTo 0

    Application.ScreenUpdating = True

End Sub
Double click event for Visit Date Text box to open the Calendar form
Private Sub txtVisitDate_DblClick(ByVal Cancel As MSForms.ReturnBoolean)

    Application.ScreenUpdating = False

    Dim sDate As String

    On Error Resume Next

    sDate = MyCalendar.DatePicker(Me.txtVisitDate)

    Me.txtDOB.Value = Format(sDate, "dd-mmm-yyyy")

    On Error GoTo 0

    Application.ScreenUpdating = True

End Sub
Code to reset the UserForm on Form Initialize event
Private Sub UserForm_Initialize()

    Call Reset_Form

End Sub.
In Home worksheet, we have only one sub procedure on click event of button. It will show the form.
Private Sub cmdAdd_Click()
    frmDataEntry.Show
End Sub
Now, we have a fair understanding of all the procedures and functions used in our project. In this project, only one piece of code is pending—to transfer the data on the click event of the Submit button in the UserForm.
Let’s double‑click on the Submit button in the UserForm. This will open the code window with the cmdSubmit_Click procedure.
Please see the code below to get confirmation from the user, then unprotect the sheet, transfer the data, and protect it again.
Private Sub cmdSubmit_Click()

    Dim i As VbMsgBoxResult

    i = MsgBox("Do you want to submit the data?", vbYesNo + vbQuestion, "Submit Data")

    If i = vbNo Then Exit Sub

    If ValidEntry = True Then

        'Code to Unprotect the worksheet

        Sheets("Home").Unprotect ("thedatalabs")

        'Calling Submit_Data procedure to transfer the data from UserForm to Sheet
        Call Submit_Data

        'Code to Protect the worksheet


        Sheets("Home").Protect ("thedatalabs")

    End If

End Sub
Now, we have completed the required code for transfer data from a Data Entry Form to a protected worksheet in MS Excel using VBA. You can visit the Home sheet and run the form to transfer the data to the protected sheet.
Download
Please download the Support File here.


Hi,
Would you please let me know how can we add email functionality in it using outlook so that user can be notified for visitor arrival on reception?