- About Employee Attendance Tracker Excel Template
- Top Reasons to Choose Our Employee Attendance Tracker Excel Template
- System Requirements
- How the Employee Attendance Tracker Excel Template is Structured
- How to Use the Employee Attendance Tracker Excel Template
- YouTube Video
- Download the Ultimate Employee Attendance Management System in Excel
- Frequently Asked Questions (FAQs)
Employee Attendance Tracker Excel Template | Automated, Customizable & Accurate Workforce Solution
Managing attendance efficiently is essential for improving workplace productivity and ensuring smooth operations. TheDataLabs’ Employee Attendance Tracker Excel Template is a powerful tool designed to simplify employee attendance tracking. This user-friendly attendance tracker Excel solution comes with a minimalist design, making it suitable for teams and small organizations. With customizable Employee Attendance Tracker Excel Template, it ensures accurate records and minimizes errors effortlessly.
The Employee Attendance Tracker Excel offers an integrated dashboard that provides a real-time overview of attendance data, helping managers make quick and informed decisions. If you’re looking for reliable tools for managing attendance, this Employee Attendance Tracker Excel is perfect for streamlining the process. Whether you need attendance tracker Excel template or an easy-to-use employee tracking solution, this tool is built to enhance productivity and save time.
If you are looking for Ultimate Task Management Tracker then please read this page.
Top Reasons to Choose Our Employee Attendance Tracker Excel Template
- ⏱ Time-Saving Automation – Cut manual work by up to 80% with powerful VBA-driven features
- 🧠 Lightweight & Efficient – Optimized Excel design ensures smooth performance even with large datasets
- 🛠 Fully Customizable – Easily adapt leaves, attendance types, and weekly offs to fit your company’s policies
- ✅ Accurate & Error-Free – Built-in validations prevent entry mistakes and ensure data accuracy
- 📊 Real-Time Insights – Get instant visual reports on attendance status, trends, and summaries
- 🤖 One-Click Attendance Marking – Mark attendance for individuals or in bulk with a single click
- 📅 Smart Calendar Integration – Select dates quickly using interactive calendar controls
- 📤 Export with One Click – Export filtered or complete attendance records in Excel format effortlessly
- 🎯 Minimalist, Intuitive UI – Clean layout for a smooth user experience and quick navigation
- 🆘 Built-In Guided Help – Pop-up tooltips and clickable walkthroughs simplify usage and onboarding
- 🧩 Structured & Modular Design – Dedicated tabs for Master Data, Dashboards, Reports, and Help for better organization
- 🔐 Sheet Protection – Important formulas and structure are locked to prevent accidental edits
- 📧 Reliable Customer Support – Our dedicated team is just an email away at info@thedatalabs.org
Everything you need in one tool – automation, ease of use, insights, and trustworthy support. Perfect for HRs, managers, and business owners.
System Requirements to Use the Employee Attendance Tracker Excel Template Effectively

Minimum Configuration
- Operating System: Windows 10 or later
- Microsoft Excel: 2013 or newer (Desktop version)
- RAM: 2 GB (4 GB recommended for large teams)
- Storage: 300 Mb free disk space (1 GB recommended)
Critical Settings
- Macros Must Be Enabled: Required for automation features
- Screen Resolution: 1366×768 minimum (1920×1080 recommended)
- Permissions: Unblock file after download (Right-click → Properties → Unblock)
How the Employee Attendance Tracker Excel Template is Structured for Maximum Efficiency
To maximize the benefits of the Employee Attendance Tracker Excel, it’s crucial to familiarize yourself with its structure. Having a clear understanding of how the system works not only helps you gain insight into the process but also enables you to use the Employee Attendance Tracker Excel more effectively and customize it according to your specific needs.
The Employee Attendance Tracker Template is thoughtfully organized into five essential sheets: Attendance Form, Attendance Master, Employee Master, Support Data and Internal Calculation. Each of these plays a unique role in streamlining attendance management and ensuring accuracy. Let’s break down the purpose of each sheet to better understand their functionality.
① Internal Calculation Sheet

The Internal Calculation Worksheet in Employee Attendance Tracker Excel Template is used by the system to summarize attendance data based on attendance types, codes, and categories. This summarized data is displayed in the Dashboard section of the Attendance Form sheet.
The employee attendance tracker Excel automatically generates all statuses, codes, and summaries using the information provided in the Support Data sheet. You don’t need to worry about any changes you made in Support Data Sheet as the Attendance Tracker Excel handles them automatically.
This sheet is for internal use only, so you should not rename it, modify its data, or alter its formulas, as doing so may affect the system’s functionality.
② Support Data Sheet
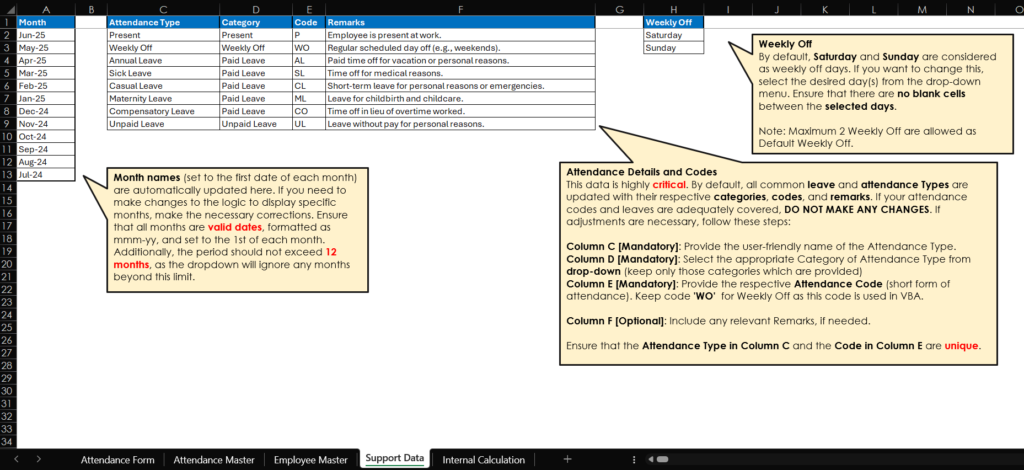
The Support Data Worksheet is an essential part of the Employee Attendance Tracker Excel Template, powering its internal operations. It provides data for various drop-down menus in the Attendance Master and Attendance Form sheets, ensuring smooth functionality.
Here’s a breakdown of how the Support Data Worksheet is structured:
1. Month List (A1:A13): This list displays the names of 12 months: the current month, the next three months, and the previous eight months. It is used in the calendar drop-down within the Attendance Form to select attendance start and end dates.
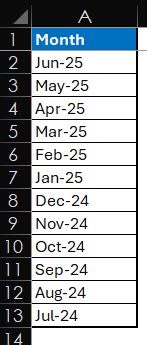
If you need to adjust the displayed months, you can modify the formula. Make sure to:
- The list must always contain exactly 12 months.
- Each date should be entered as the 1st day of the respective month (e.g., 1 January 2025).
- The row and column reference must not be changed, as it may affect the tool’s functionality.
2. Attendance Type and Code (C1:F8):This section defines the various attendance and leave types along with their categories, codes, and remarks. It is pre-filled with commonly used attendance types to streamline selection and tracking.

If you need to make changes, follow these guidelines:
Attendance Type (Mandatory): Enter a clear, user-friendly name for each attendance type. Ensure no blank rows or duplicate entries.
Category (Mandatory): Choose the appropriate category for each attendance type from the drop-down. Only use the categories provided, as these are hardcoded into the tool. Duplicate entries for categories are allowed.
Code (Mandatory): Add a short code for each attendance type. The code ‘WO’ must be used for Weekly Off, as it is critical to the tool’s functionality. Codes must not be duplicated.
Remarks (Optional): Add any relevant notes if needed.
Note: Both the Attendance Type (Column C) and the Attendance Code (Column E) must be unique to ensure accurate tracking.
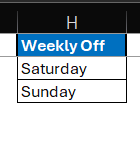
3. Weekly Off (H1:H3): By default, Saturday and Sunday are set as weekly off days. However, users can modify these settings by selecting alternative days from the available drop-down list. When updating the weekly off days, ensure that there are no blank cells between the selected days, the header, and the day names. Any gaps in the list may cause errors in the tool’s functionality.
This Support Data worksheet is vital for the system’s operations. Avoid making unnecessary changes to its structure, formulas, or layout to ensure everything continues to function smoothly.
③ Employee Master Sheet
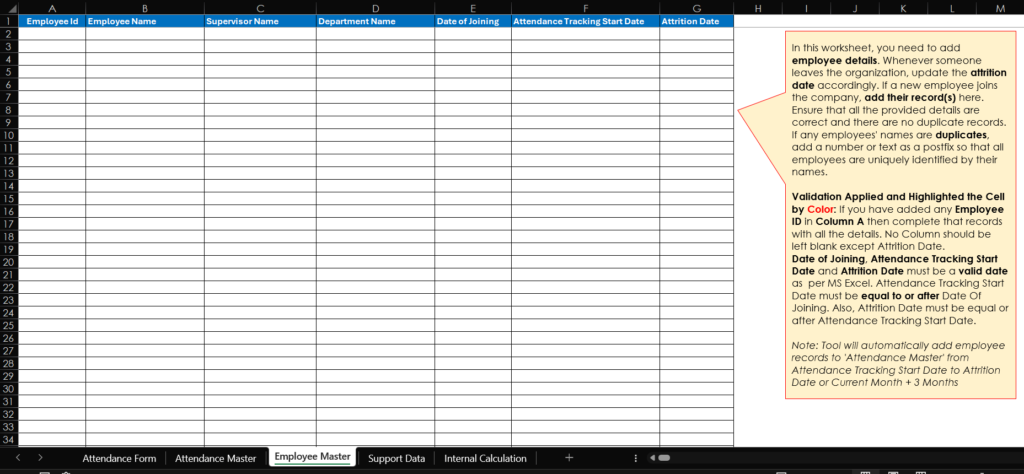
This sheet is designed for end-user input for Employee Attendance Tracker Template, allowing you to manage employee details. If you are using this tool for the first time, you must enter employee details with all the required information. Ensure that the data is accurate and free of duplicate records. If two employees share the same name, add a unique identifier (e.g., a number or text) as a postfix to differentiate them.
When an employee leaves the organization, update their Attrition Date in the respective column. Similarly, when a new employee joins, you must manually add their details to this sheet.
The employee attendance tracker Excel template automatically adds employee records to the Attendance Master Sheet, starting from the Attendance Tracking Start Date and continuing until the Attrition Date or three months beyond the current month (if the employee is still active).
Validation Rules and Highlights
Any invalid or incomplete entries will be highlighted by the tool. Please review the following validation rules and make corrections if needed:
- Employee ID (Column A): Once an Employee ID is entered, all other details for that record must be completed. The Attrition Date can remain blank if the employee is still active.
- Date Fields: The Date of Joining, Attendance Tracking Start Date, and Attrition Date must be valid Excel-recognized dates.
- The Attendance Tracking Start Date must be on or after the Date of Joining.
The Attrition Date must be on or after the Attendance Tracking Start Date.
④ Attendance Master Sheet
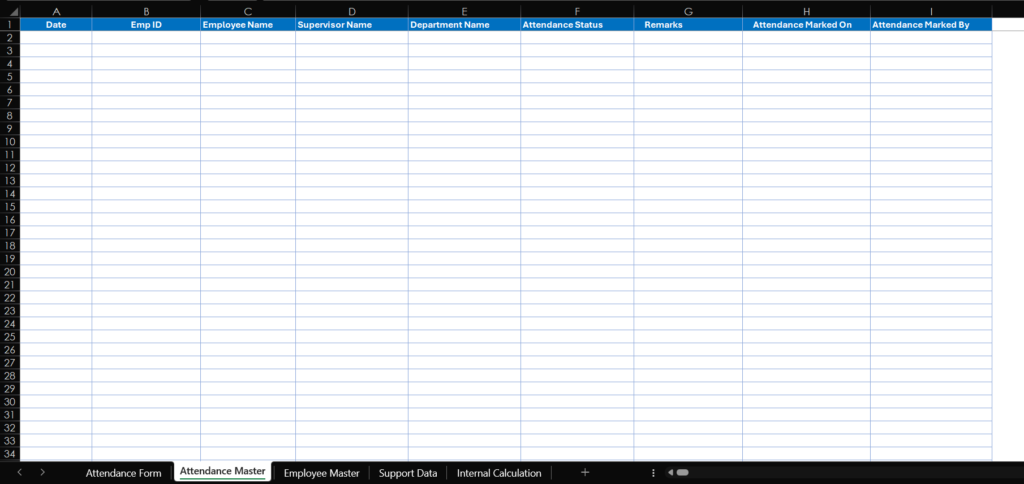
The Attendance Master Sheet in employee attendance tracker Excel template is strictly for the tool’s internal use and is not meant for manual editing. It is automatically updated whenever you add or modify employee details in the Employee Master Sheet.
Here’s how the tool manages the records:
- Record Creation: When you add an employee to the Employee Master Sheet, the tool automatically generates attendance records starting from the Attendance Tracking Start Date up to the next 3 months beyond the current month.
- Attrition Date Handling: If you’ve specified an Attrition Date for an employee, the attendance records will be created only from the Attendance Tracking Start Date to the Attrition Date.
- Updating Attrition Date: If an existing employee’s attrition date is updated in the Employee Master Sheet, the tool will check their records in the Attendance Master Sheet and automatically delete any attendance entries beyond the updated attrition date, if applicable.
- Weekly Offs: Based on the Weekly Off Days defined in the Support Data Sheet, the tool will automatically mark “Weekly Off” for all matching days in this sheet.
This sheet ensures that attendance records are always accurate and up-to-date without requiring manual input. For smooth functionality, avoid making any direct changes to this sheet.
⑤ Attendance Form Sheet
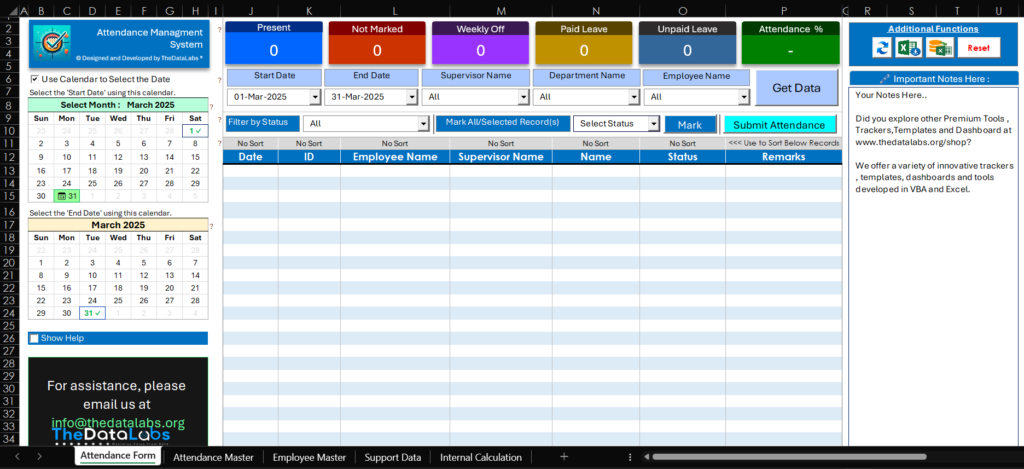
The Attendance Form serves as the primary user interface of the Employee Attendance Tracker Excel Template, where users spend most of their time tracking attendance, marking attendance statuses, updating the Attendance Master Sheet, and performing additional tasks such as exporting data, refreshing, and resetting the tool.
This sheet is thoughtfully designed to provide a logical and clean user interface. It is divided into six sections, ensuring that attendance management remains simple and intuitive.
Let’s explore each section in detail.
1. Calendars and Check Boxes
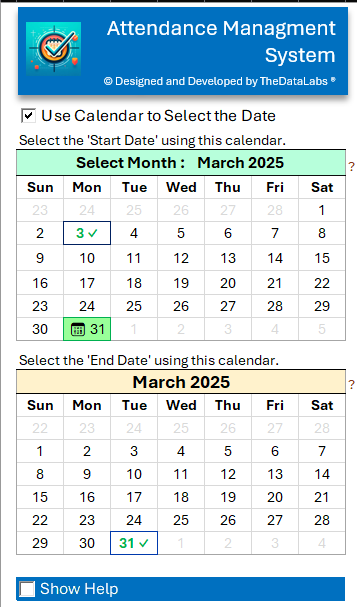
The first section, located on the left side of the screen, contains the “Use Calendar to Select the Date” checkbox, a month selection drop-down, two calendars, and the “Show Help” checkbox.
Enabling the “Use Calendar to Select the Date” option makes date selection interactive, allowing users to choose a Start Date and End Date by clicking on available dates in the calendars.
Below this checkbox is a drop-down menu for selecting the desired month. When a user selects a month, both calendars update to display its dates. Additionally, the Start Date and End Date combo boxes in the filter section on the right update to reflect the selected month’s date range. The Start Date combo box automatically selects the first day of the month, while the End Date combo box defaults to the last day.
Once a month is selected, the two calendars display its corresponding dates. The first calendar is used for selecting the Start Date, and the second for the End Date, provided that the “Use Calendar to Select the Date” checkbox is enabled. To select a Start Date, the user clicks on any available date in the first calendar, and for the End Date, they click on a date in the second calendar. The selected dates automatically update the Start Date and End Date combo boxes in the form.
It is essential to ensure that date selection is logical, meaning the End Date must be the same as or later than the Start Date. If the End Date is earlier than the Start Date, an error message appears when the “Get Data” button is clicked.
The dates in both calendars are visually distinguished using colors and icons. The selected date is marked with a tick (✓), today’s date is highlighted with a calendar icon (📅), and dates without recorded attendance are marked with an exclamation sign (!).
Below the second calendar is a “Show Help” checkbox. When selected, a pop-up help window appears, overlaying the screen with descriptions of all controls in the attendance form. This feature provides users with a quick reference to understand how to use the form and navigate its various functions.

2.Attendance Summary Tiles

The second part of the Attendance Form displays a summary of attendance based on the data available in the form. The attendance data is sourced from Row 12 onward, spanning Columns J to P.
In the summary section, there are six distinct cards that provide a real-time overview of attendance:
- Present – Displays the count of days marked as present.
- Not Marked – Indicates the number of days where attendance has not been recorded.
- Weekly Off – Represents the number of scheduled weekly off days.
- Paid Leave – Shows the total days taken as paid leave.
- Unpaid Leave – Displays the count of unpaid leave days.
- Attendance % – Calculates and presents the overall attendance percentage based on the recorded data.
Each of these cards updates dynamically, providing an at-a-glance summary of attendance trends for the selected date range and other filters in the Attendance Form sheet.
3.Attendance Filters Drop-down and Get Data Button

The third section of the Attendance Form contains several drop-down menus along with a Get Data button. The available drop-downs include Start Date, End Date, Supervisor Name, Department Name, and Employee Name.
The Start Date and End Date drop-downs are linked to the calendars, allowing users to select dates using either the drop-downs or by clicking directly on a date in Calendar 1 for the Start Date and Calendar 2 for the End Date. The selected dates will automatically update in both the calendars and the drop-down fields, ensuring consistency across the form.
Users can choose the required values from the drop-downs and then click on the Get Data button. This action filters the Attendance Master sheet based on the selected criteria and displays the corresponding records in the Attendance Form sheet, ensuring that only the relevant data is retrieved.
4. Filter by Status, Mark Attendance and Submit

The fourth section of the Attendance Form provides controls for filtering and updating attendance records based on status. It includes the ‘Filter By Status’ combo box, ‘Mark All/Selected Record(s)’ drop-down with a ‘Mark’ button, and a ‘Submit Attendance’ button.
The ‘Filter By Status’ combo box allows users to filter attendance data based on a specific status, making it easier to view and manage records.
The ‘Mark All/Selected Record(s)’ drop-down and ‘Mark’ button serve as quick action tools for updating bulk attendance. If you want to apply the same status to multiple records, you can select multiple attendance records while holding the CTRL key (for non-continuous selections). Clicking on any cell within a record will be considered a record selection. All selected record(s) will be highlighted in red font, providing a visual reference for the selection.
Once the records are selected, choose the desired attendance status from the drop-down. After selecting the status, click on the Mark button. It will open a confirmation window to choose the required option to proceed.
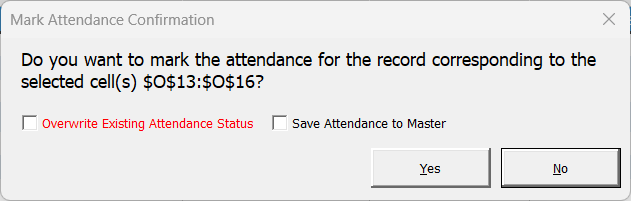
- Overwrite Existing Attendance Status – This option replaces the existing attendance status with the newly selected one.
- Save Attendance to Master – This option saves the selected status to the Attendance Master sheet without modifying previous records.
Tick the required option(s) in the confirmation window or ignore them if not required, and then click the Yes button to mark attendance for the selected records. If you don’t want to proceed, click the No button in the confirmation window.
If you need to apply the same attendance status to all records, simply click outside the attendance data range (J12:P last record), select the desired status from the drop-down, and then click the Mark button. The tool will show a confirmation window to select Overwrite and Save options. Tick the required option(s) in the confirmation window or ignore them if not required, and then click the Yes button to mark attendance for the selected records. If you don’t want to proceed, click the No button in the confirmation window.
For manual attendance marking, you can also select a status directly from the Attendance Status column in the form for the respective attendance record(s).
Once you have manually selected the attendance status, click on Submit Attendance to update it in the Attendance Master sheet.
5. Attendance Table and Sorting
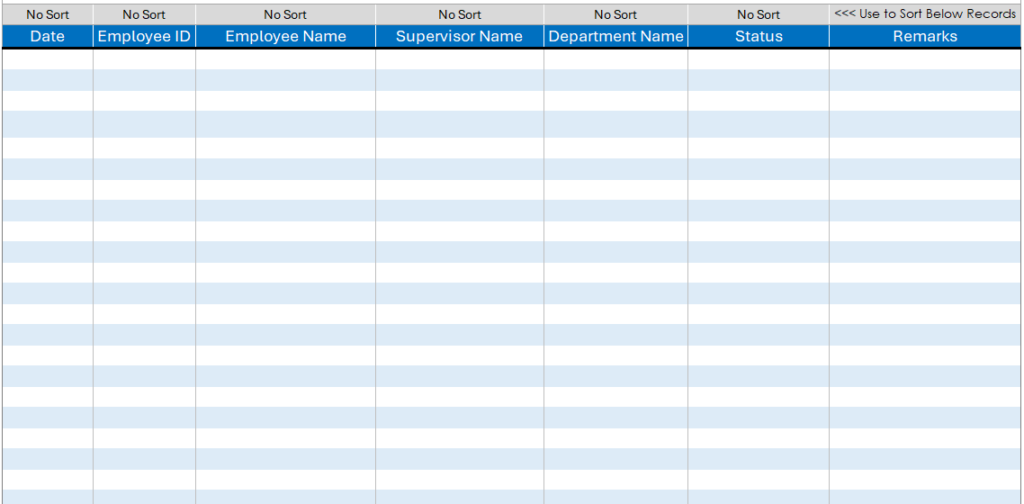
The fifth section of the Attendance Form provides attendance records and sorting features for easy data management. When you click on Get Data, the filtered attendance records will appear in this section under their respective columns.
To sort the data, the tool includes dedicated sorting drop-downs above each column header. Simply click on a drop-down, select the desired sorting option, and the tool will arrange the attendance records accordingly. These sorting features allow you to organize the data efficiently.
The Attendance Form records are primarily used to mark attendance status and update remarks. You can either use the “Mark All/Selected Record(s)” drop-down to update multiple records at once or manually select the status in the Attendance Status column for each record.
The columns Date, Employee ID, Employee Name, Supervisor Name, and Department Name are read-only for end users. Any attempt to modify these fields will be automatically reverted to maintain data integrity.
In the Remarks column, you can update comments if required. Once all attendance updates have been made, click on the “Submit Attendance” button to save the changes in the Attendance Master sheet.
6. Additional Functions and Notes
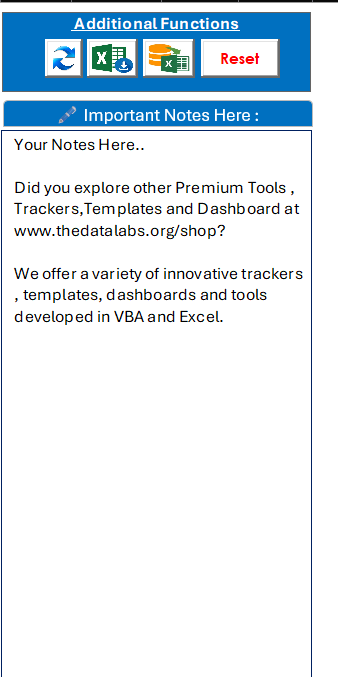
The sixth and final section of the Attendance Form provides additional functionality through a set of action buttons at the top.
- Refresh Button – This button refreshes the tool’s functionalities without affecting any data. It helps resolve issues where features may become unresponsive or disabled due to logical errors.
- Export Attendance Form Data – Clicking this button exports the filtered attendance data from the Attendance Form to an Excel file.
- Export Attendance Master Data – This button exports the complete Attendance Master data to a new Excel file for backup or reporting purposes.
- Reset Tool – Clicking this button (after confirmation) will clear all data from the Employee Master, Attendance Master, and Attendance Form sheets, restoring the tool to its default state.
Below these additional functions, there is a whiteboard that serves as a notepad for taking notes. You can use this space to jot down important details for future reference.
How to Use the Employee Attendance Tracker Excel Template
This guide provides step-by-step instructions for setting up and efficiently managing attendance records using the Employee Attendance Tracker Excel Template.
1. Download and Setup
Download the Employee Attendance Tracker Excel Template from the link provided in your email. Once downloaded, navigate to the file location, right-click on it, and select Properties. In the General tab, check the Unblock box under the Security section, then click Apply and OK.
Double-click to open the file in Microsoft Excel. If prompted, enable macros by clicking the “Enable Content” button. If macros are disabled, enable them manually by going to File → Options → Trust Center → Trust Center Settings → Macro Settings and selecting Enable All Macros.
2. Configuring the Support Data
Open the Support Data sheet and verify or adjust the Calendar Month if needed. Modify the Attendance Status Table to reflect your organization’s policies and update the Weekly Off Days list accordingly. These settings ensure accurate attendance tracking.
3. Adding Employee Records
Go to the Employee Master sheet and enter employee details, ensuring that each employee has a unique Employee ID and valid joining date. Once all employee details are added, they will automatically appear in the Attendance Master sheet, where attendance records will be generated based on the data provided.
4. Managing Attendance Records
Navigate to the Attendance Form sheet and apply filters such as date, department, or supervisor, then click “Get Data” to retrieve attendance records. Sorting options are available above column headers to arrange records as needed.
To mark attendance, use the “Mark All/Selected Record(s)” drop-down for bulk updates or manually update each record by selecting the appropriate status in the Attendance Status column. Additional comments can be added in the Remarks column if necessary. Once all updates are made, click “Submit Attendance” to save the data in the Attendance Master sheet.
5. Additional Features and Export Options
At the top of the Attendance Form, several function buttons provide additional utilities:
- Refresh: Resets tool functionalities if any feature becomes unresponsive, without affecting data.
- Export Attendance Form Data: Saves the current attendance records as an Excel file.
- Export Attendance Master Data: Exports all stored attendance data from the Attendance Master sheet into a new Excel file.
- Reset Tool: Deletes all data from the Employee Master, Attendance Master, and Attendance Form sheets. This action is irreversible, so take a backup before proceeding.
6. Notepad Feature
Below the additional functions, a Notepad (Whiteboard) section is available for making quick notes. This can be used to store important reminders or references related to attendance management.
Final Notes
Ensure that the Support Data is correctly configured before adding employees and processing attendance. Use the Refresh button if any tool functionality appears stuck. Regularly export and save backups of your attendance records to prevent data loss.
This completes the setup and usage guide for the Employee Attendance Tracker Excel Template. If you have any questions or need further assistance, refer to the support documentation or reach out for help.
YouTube Video
Download the Ultimate Employee Attendance Management System in Excel – Fully Automated with VBA
With Your Purchase, You’ll Receive:
✅ Ultimate Attendance Management System in Excel (Windows OS)
✅ 100% Editable and Unprotected VBA Code
✅ Unprotected Worksheets and Workbook (password provided in purchase receipt)
✅ Clean and Minimalist User Interface for a Superior Experience
✅ Full Customer Support
✅ Instant Download
✅ Purchase Receipt with Download Link Through Email

Frequently Asked Questions (FAQs)
- What is the Employee Attendance Tracker Excel Template?
– The Employee Attendance Tracker is a fully automated Excel-based system designed for effortless attendance management. It features one-click attendance marking, dynamic dashboards, and customizable settings powered by VBA automation. - Do I need advanced Excel skills to use this template?
– No. The template is built for ease of use with a minimalist interface and built-in guided help. Basic Excel knowledge is sufficient. - Is this a one-time purchase or subscription-based?
– It’s a one-time purchase. No monthly or yearly charges—just pay once and use it for life. - Can I customize the template based on my organization’s policies?
– Yes. You can customize leave types, attendance statuses, weekly off days, and other settings as per your needs. - Can I mark attendance for multiple employees in one go?
– Yes. The template includes both single and bulk attendance entry options with one-click functionality. - Is attendance data exportable?
– Absolutely. You can export filtered or complete attendance records into a new Excel file instantly. - What are the minimum system requirements?
– Microsoft Excel: Excel 2013 or later (Windows only)
– RAM: Minimum 2 GB (4 GB or more recommended)
– Processor: Dual-core or better
– Hard Disk Space: 300 MB of free space
– Macros: Must be enabled for full functionality
– Note: Not compatible with Excel for Mac due to VBA limitations - Is my payment safe?
– Yes. We use trusted and secure payment gateways—PayPal and Instamojo to ensure your financial data is protected. - What if I don’t receive the file after payment?
– First, check your Inbox, Spam, or Promotions folder.
– If not found, just drop us an email at info@thedatalabs.org and we’ll resend the download link promptly. - How will I receive the file?
– You will get: Instant download access after payment a download link sent to your email with the purchase receipt – Please ensure to check all folders in your mailbox - Can I share or resell the template?
– No. Purchase is valid for one user only.
– Redistribution, resale, or unauthorized sharing is strictly prohibited. The template is copyrighted and owned by TheDataLabs.org. - Do you provide customer support?
– Yes, we’re here to help. For any questions or assistance, please contact us at:
📧 info@thedatalabs.org
– Your satisfaction is our priority.


