Table of Contents
Introduction – SQL Query Executor (Run SQL Query in Excel)
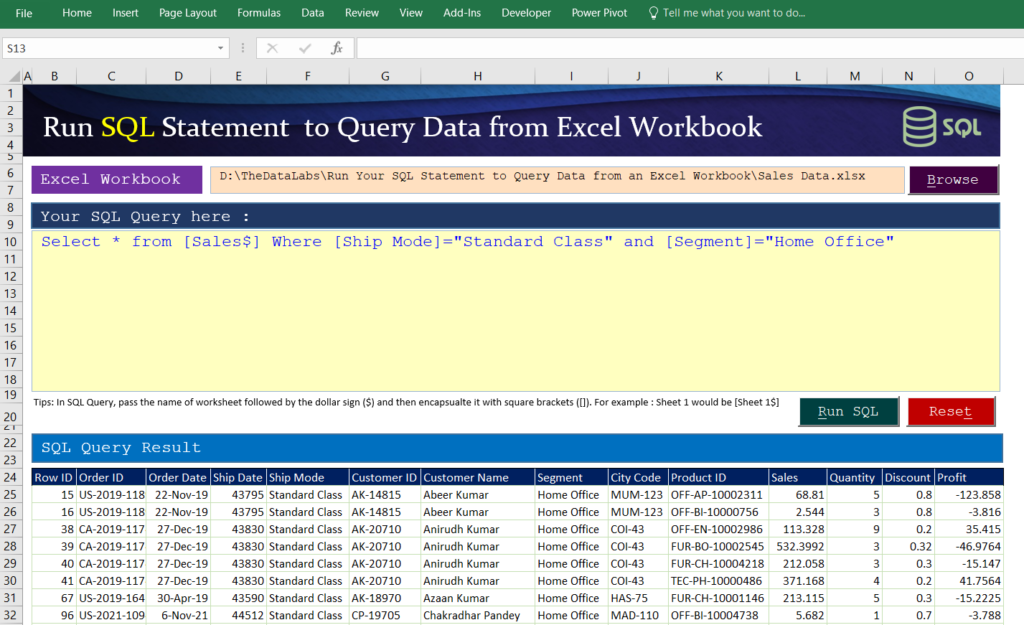
No other tool can replace the usage and flexibilities of SQL. SQL statement provides the output of any simple or complex queries very quickly. You don’t need to click anywhere or follow any steps to query the data. You just need to write the SQL query and it will provide the output in fraction of seconds.
Just imagine, if we can use the SQL statement to query the data from Excel Workbook then it will save a lot of time and also, we can run complex queries which would be practically tough to process in Excel with inbuilt query functions/steps.
SQL Query Executor Application in MS Excel and VBA
In this post, we are going to learn How to create a SQL Query Executor Application in MS Excel and VBA to query data from Excel workbook?
With the help of this post, you can create your custom query application in Excel to run the SQL Query in Excel to and get data from Excel Workbook. You can use the same code after making some minor changes (data source), if required.

Develop SQL Query Executor Application in MS Excel and VBA
Let’s start creating SQL Query Executor from scratch so that you can run SQL Query in Excel!
Create, Save and Design the User Interface of SQL Executor in Microsoft Excel
Open a new Excel Workbook and save the file with the name “SQL Query Executor” and extension should be .XLSM as we are going to write VBA code.
Note: if you will not select .XLSM then Microsoft Excel will not retain your VBA code once you will close the file.

Now, rename the sheet1 to Query Executor in Excel Workbook.

Go to the View Tab and untick the Gridlines checkbox in Show group to hide the gridlines

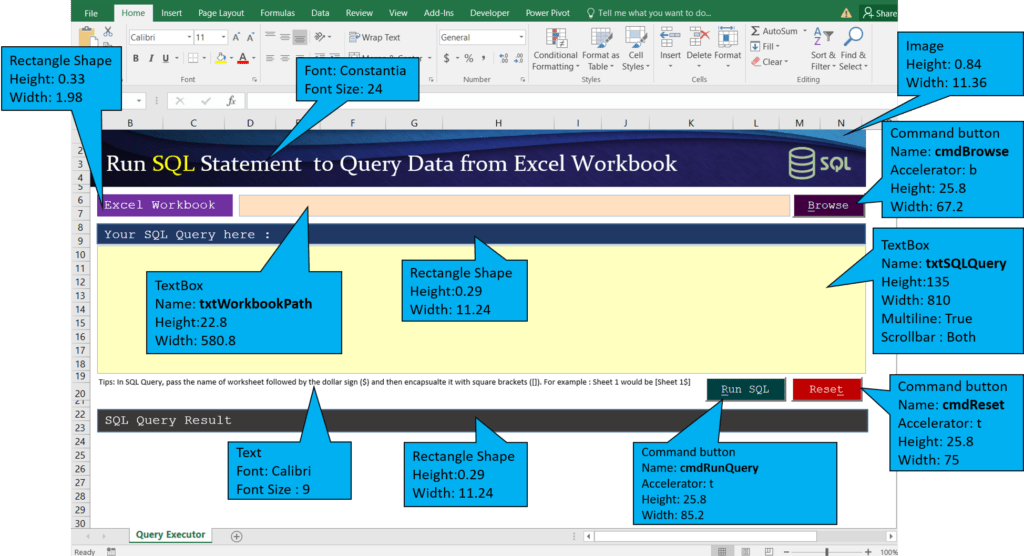
Design the User Interface in Query executor sheet as per below image. This will be the user interface of SQL Query Executor application and through this, you can run SQL query in Excel.

Writing Visual Basic Application Codes for SQL Query Executor in Excel
VBA Codes are required to make the SQL Query Executor actionable. We will write VBA codes in integrated development window of MS Excel i.e. Visual Basic for Application.
To open the VBA Window, just click on Developer tab and then click on VBA Button available in Code Group. You can also press Shortcut key as Alt + F11 to open the VBA window.
Know More – Developer Tab in Excel: Add, Use and Remove – TheDataLabs

Now, you can see that Visual Basic Application window is open.

Here, we need to insert a blank Module to write all the required Procedures and Functions to handle the process.
Let’s click on Insert menu and then click on Module. It will add a blank module to this project.

Before writing the code, we need to add the reference of Microsoft ActiveX Data Object 6.1 Library to this project. This library will help us in running the SQL query in Microsoft Excel and we can use the properties and methods while writing the codes.
Learn more about ADO – Definitive Guide To ADO in Excel and VBA – Get Started With These 5 Steps – TheDataLabs
To add the Microsoft ActiveX Data Object 6.1 reference, just click on Tools Menu and then click on Reference and select Microsoft ActiveX Data Object 6.1 from the available libraries reference.

Let’s write the code on click event of Browse button.
Private Sub cmdBrowse_Click()
     Dim txtFullPath
    'Displays the standard Open dialog box and gets a file name from the user without actually opening any files.
     txtFullPath = Application.GetOpenFilename( _
               FileFilter:="Excel Files (*.xls; *.xlsx; *.xlsm), *.xls; *.xlsx; *.xlsm", _
               Title:="Select Excel File")
      If txtFullPath = False Then Exit Sub
      txtWorkbookPath.Value = txtFullPath
 End Sub
Write the below code on double click event of txtWorkbookPath
Private Sub txtWorkbookPath_DblClick(ByVal Cancel As MSForms.ReturnBoolean)
   Dim txtFullPath
    'Displays the standard Open dialog box and gets a file name from the user without actually opening any files.
     txtFullPath = Application.GetOpenFilename( _
               FileFilter:="Excel Files (*.xls; *.xlsx; *.xlsm), *.xls; *.xlsx; *.xlsm", _
               Title:="Select Excel File")
      If txtFullPath = False Then Exit Sub
      txtWorkbookPath.Value = txtFullPath
 End Sub
Write the below code on click event of cmdReset
Private Sub cmdReset_Click()
   Dim iConfirmation As VbMsgBoxResult
   iconfimration = MsgBox("Do you want reset the Query Executor?", vbYesNo + vbQuestion, "Confirmation")
   If iConfirmation = vbNo Then Exit Sub
   'Deleting Previous Query Result
   ThisWorkbook.Sheets("Query Executor").Rows("24:" & Rows.Count).Clear
    ThisWorkbook.Sheets("Query Executor").txtWorkbookPath.Value = ""
    ThisWorkbook.Sheets("Query Executor").txtSQLQuery.Value = ""
  MsgBox "Done"
End Sub
Let’s move to Module window and start writing the code to run the SQL code.Write the sub procedure in Module window.
Sub Run_SQL_Query()
   On Error GoTo err_handler

   Dim MyConnect As String

   Dim MyRecordset As ADODB.Recordset

   Dim MySQL As String

   ExcelFile = ThisWorkbook.Sheets("Query Executor").txtWorkbookPath.Value

   MySQL = ThisWorkbook.Sheets("Query Executor").txtSQLQuery.Value


    MyConnect = "Provider=Microsoft.ACE.OLEDB.12.0;" & _
                "Data Source= " & ExcelFile & ";" & _
                "Extended Properties=Excel 12.0"

    Set MyRecordset = New ADODB.Recordset

    MyRecordset.Open MySQL, MyConnect, adOpenStatic, adLockReadOnly

   For i = 0 To MyRecordset.Fields.Count - 1

        With ThisWorkbook.Sheets("Query Executor").Cells(24, i + 2)
        	.Value = MyRecordset.Fields(i).Name
        	.Interior.Color = RGB(117, 113, 113)
        	.Font.Color = vbWhite
        End With

    Next

    ThisWorkbook.Sheets("Query Executor").Range("B25").CopyFromRecordset MyRecordset

    ThisWorkbook.Sheets("Query Executor").UsedRange.EntireColumn.AutoFit
     Exit Sub
    err_handler:
         MsgBox "Error! " & Err.Description
        	With ThisWorkbook.Sheets("Query Executor").Range("B25")
               	.Value = "Error! " & Err.Description
                	.Font.Color = vbRed
            End With
End Sub
Now, we are done with writing the VBA procedure to run the SQL Code. You can run the tool and execute any SQL Select query.YouTube tutorial to develop SQL Query Executor in MS Excel
Download the Demo File
Please click on below button to download the sample file used for SQL Query Executor.

Interested in developing Data Entry Form without Using ADO
Easy-To-Follow: Create a Fully Automated Data Entry Userform in Excel and VBA in 5 Easy Steps
How to Create a Multi-User Data Entry Form in Excel (Step-by-step Guide)
Advance Data Entry Form


