


Table of Contents
Introduction to Create a Live Analog Clock in MS Excel
You can watch our YouTube Tutorial to learn how to create a live Analog Clock in MS Excel.
Microsoft Excel is a versatile tool known primarily for its spreadsheet capabilities. However, it offers much more than just number crunching. In this blog post, we’ll explore how to create a live analog clock using VBA (Visual Basic for Applications) within MS Excel. By leveraging the power of VBA, we can turn Excel into a dynamic clock application, providing a visually appealing and functional timekeeping tool.
So, let’s dive in and learn how to create a live Analog Clock in MS Excel!
Steps Required to Create a Live Analog Clock in MS Excel:
Step 1: Creating a New Workbook and Saving with Macro Enabled Extension for Live Analog Clock
Begin by creating a fresh Excel workbook. Then, save the file with the title ‘Analog Clock’ and ensure to use the macro-enabled extension ‘.xlsm,’ as shown in the image below.


Step 2: Setting up the Worksheet for Live Analog Clock in MS Excel
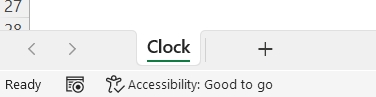
To proceed, insert a new worksheet into your Excel workbook. Rename this newly added worksheet as ‘Clock’ to signify its purpose.

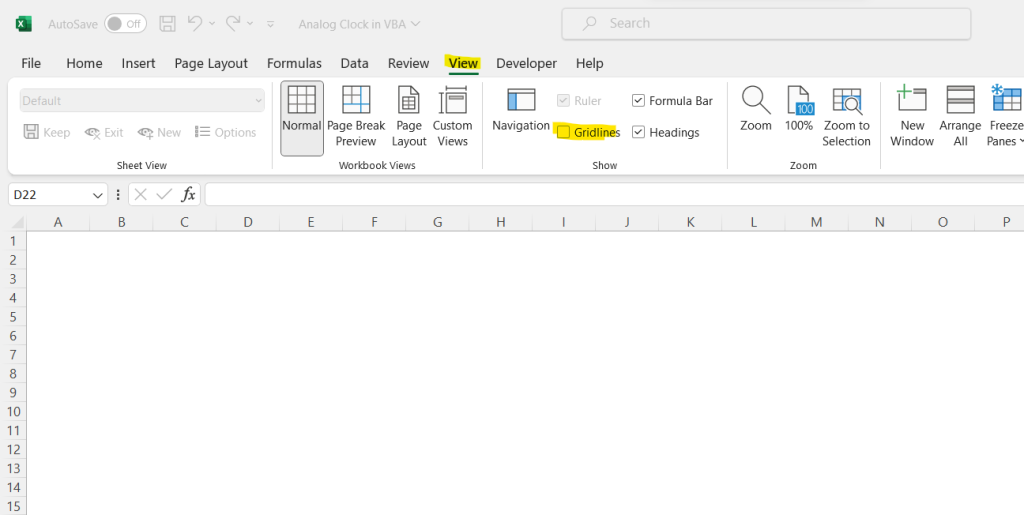
Once the worksheet is created, it’s important to remove the gridlines for a cleaner appearance. To accomplish this, navigate to the ‘View’ tab located at the top of the Excel window. Within the ‘View’ tab, locate the ‘Gridlines’ option and uncheck it. By deselecting this option, the gridlines will no longer be displayed on the ‘Clock’ worksheet, resulting in a more streamlined and focused presentation.

Step 3: Open the VBA Editor and insert a blank module for all the VBA Procedures and Functions.
Open the VBA editor in MS Excel by pressing “Alt + F11” or navigating through the “Developer” tab and then click on VBA Button.


In the VBA editor, insert a new module to write the required VBA codes for creating Analog Clock in Excel. To insert a blank module, click on Insert and then Module.


Step 4: Declare Global variables for ‘glassShape‘ for Clock in Module window.
Option Explicit

Global glassShape As Shape
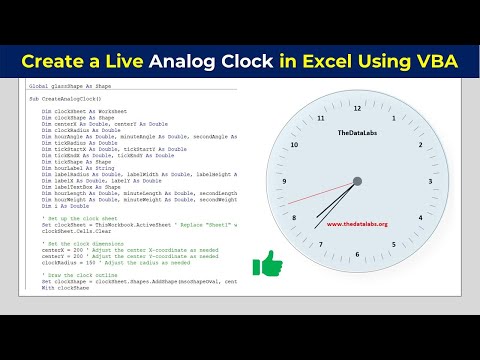
Step 5: Write a VBA Procedure to create Analog Clock in Module window.
Sub CreateAnalogClock()

    Dim clockSheet As Worksheet
    Dim clockShape As Shape
    Dim centerX As Double, centerY As Double
    Dim clockRadius As Double
    Dim hourAngle As Double, minuteAngle As Double, secondAngle As Double
    Dim tickRadius As Double
    Dim tickStartX As Double, tickStartY As Double
    Dim tickEndX As Double, tickEndY As Double
    Dim tickShape As Shape
    Dim hourLabel As String
    Dim labelRadius As Double, labelWidth As Double, labelHeight As Double
    Dim labelX As Double, labelY As Double
    Dim labelTextBox As Shape
    Dim hourLength As Double, minuteLength As Double, secondLength As Double
    Dim hourWeight As Double, minuteWeight As Double, secondWeight As Double
    Dim i As Double

    ' Set up the clock sheet
    Set clockSheet = ThisWorkbook.ActiveSheet ' Replace "Sheet1" with the name of your sheet
    clockSheet.Cells.Clear

    ' Set the clock dimensions
    centerX = 200 ' Adjust the center X-coordinate as needed
    centerY = 200 ' Adjust the center Y-coordinate as needed
    clockRadius = 150 ' Adjust the radius as needed

    ' Draw the clock outline
    Set clockShape = clockSheet.Shapes.AddShape(msoShapeOval, centerX - clockRadius, centerY - clockRadius, clockRadius * 2, clockRadius * 2)
    With clockShape
        .Fill.ForeColor.RGB = RGB(255, 255, 255) ' Adjust the color as needed
        .Line.Visible = msoTrue ' Set line visible to true
        .Line.ForeColor.RGB = RGB(128, 128, 128) ' Adjust the border color as needed
        .Line.weight = 0.5 ' Adjust the border thickness as needed
    End With

    ' Draw the hour labels

    For i = 1 To 12
        hourLabel = CStr(i)
        labelRadius = clockRadius * 0.8 ' Adjust the label radius as needed

        ' Calculate the position of the label
        labelX = centerX + labelRadius * Sin(i * 30 * WorksheetFunction.Pi / 180)
        labelY = centerY - labelRadius * Cos(i * 30 * WorksheetFunction.Pi / 180)

        ' Add the label to the clock dial
        Set labelTextBox = clockSheet.Shapes.AddTextbox(msoTextOrientationHorizontal, labelX - 15, labelY - 10, 30, 20)
        With labelTextBox
            .TextFrame2.TextRange.Text = hourLabel
            .TextFrame2.TextRange.Font.Size = 12 ' Adjust the font size as needed
            .TextFrame2.TextRange.Font.Bold = True ' Adjust the font style as needed
            .TextFrame2.TextRange.Font.Fill.ForeColor.RGB = RGB(0, 0, 0) ' Adjust the font color as needed
            .TextFrame2.VerticalAnchor = msoAnchorMiddle
            .TextFrame2.TextRange.ParagraphFormat.Alignment = msoAlignCenter
            .Line.Visible = msoFalse
        End With
    Next i


   ' Add the company name label


    labelWidth = 100 ' Adjust the width of the label as needed
    labelHeight = 20 ' Adjust the height of the label as needed

    ' Calculate the position of the company name label
    labelX = centerX - labelWidth / 2 ' Position the label in the center horizontally
    labelY = (centerY - clockRadius * 0.8) + 30 ' Adjust the Y-coordinate position of the company name label

    Set labelTextBox = clockSheet.Shapes.AddTextbox(msoTextOrientationHorizontal, labelX, labelY, labelWidth, labelHeight)
    With labelTextBox
        .TextFrame2.TextRange.Text = "TheDataLabs"
        .TextFrame2.TextRange.Font.Size = 12 ' Adjust the font size as needed
        .TextFrame2.TextRange.Font.Bold = True ' Adjust the font style as needed
        .TextFrame2.TextRange.Font.Fill.ForeColor.RGB = RGB(0, 0, 0) ' Adjust the font color as needed
        .TextFrame2.VerticalAnchor = msoAnchorMiddle
        .TextFrame2.TextRange.ParagraphFormat.Alignment = msoAlignCenter
        .Line.Visible = msoFalse
    End With


    ' Add the company website label


    labelWidth = 150 ' Adjust the width of the label as needed
    labelHeight = 20 ' Adjust the height of the label as needed

    ' Calculate the position of the company name label
    labelX = centerX - labelWidth / 2 ' Position the label in the center horizontally
    labelY = (centerY - clockRadius * 0.8) + 180 ' Adjust the Y-coordinate position of the company name label

    Set labelTextBox = clockSheet.Shapes.AddTextbox(msoTextOrientationHorizontal, labelX, labelY, labelWidth, labelHeight)
    With labelTextBox
        .TextFrame2.TextRange.Text = "www.thedatalabs.org"
        .TextFrame2.TextRange.Font.Size = 11 ' Adjust the font size as needed
        .TextFrame2.TextRange.Font.Bold = True ' Adjust the font style as needed
        .TextFrame2.TextRange.Font.Fill.ForeColor.RGB = RGB(255, 0, 0) ' Adjust the font color as needed
        .TextFrame2.VerticalAnchor = msoAnchorMiddle
        .TextFrame2.TextRange.ParagraphFormat.Alignment = msoAlignCenter
        .Line.Visible = msoFalse
    End With

    ' Draw the minute tick marks

    For i = 1 To 60
        If i Mod 5 <> 0 Then ' Skip drawing tick marks for hour positions
            tickRadius = clockRadius * 0.9 ' Adjust the tick radius as needed

            ' Calculate the position of the tick mark
            tickStartX = centerX + tickRadius * Sin(i * 6 * WorksheetFunction.Pi / 180)
            tickStartY = centerY - tickRadius * Cos(i * 6 * WorksheetFunction.Pi / 180)
            tickEndX = centerX + (tickRadius - 10) * Sin(i * 6 * WorksheetFunction.Pi / 180)
            tickEndY = centerY - (tickRadius - 10) * Cos(i * 6 * WorksheetFunction.Pi / 180)

            ' Draw the tick mark
            Set tickShape = clockSheet.Shapes.AddLine(tickStartX, tickStartY, tickEndX, tickEndY)
            With tickShape
                .Line.weight = 0.5 ' Adjust the line thickness as needed
                .Line.ForeColor.RGB = RGB(128, 128, 128) ' Adjust the color as needed
            End With
        End If
    Next i

    ' Set the hand lengths

    hourLength = clockRadius * 0.6  ' Adjust the hour hand length as needed
    minuteLength = clockRadius * 0.7  ' Adjust the minute hand length as needed
    secondLength = clockRadius * 0.8 ' Adjust the second hand length as needed

    'Set the hand weight
    hourWeight = 2
    minuteWeight = 1
    secondWeight = 0.5

    ' Draw the hour hand
    hourAngle = Hour(Now) * 30 + Minute(Now) * 0.5 ' Calculate the angle for the hour hand
    DrawClockHand clockSheet, centerX, centerY, hourAngle, hourLength, RGB(13, 13, 13), "HourHand", hourWeight ' Adjust the color as needed

    ' Draw the minute hand
    minuteAngle = Minute(Now) * 6 ' Calculate the angle for the minute hand
    DrawClockHand clockSheet, centerX, centerY, minuteAngle, minuteLength, RGB(0, 0, 0), "MinuteHand", minuteWeight ' Adjust the color as needed

    ' Draw the second hand
    secondAngle = Second(Now) * 6 ' Calculate the angle for the second hand
    DrawClockHand clockSheet, centerX, centerY, secondAngle, secondLength, RGB(255, 0, 0), "SecondHand", secondWeight ' Adjust the color as needed

    ' Draw the center circle
    Dim centerCircle As Shape
    Dim circleRadius As Double
    circleRadius = clockRadius * 0.05 ' Adjust the circle radius as needed

    ' Calculate the position of the center circle
    Dim circleX As Double, circleY As Double
    circleX = centerX - circleRadius
    circleY = centerY - circleRadius

    ' Draw the center circle
    Set centerCircle = clockSheet.Shapes.AddShape(msoShapeOval, circleX, circleY, circleRadius * 2, circleRadius * 2)
    With centerCircle
        .Fill.ForeColor.RGB = RGB(128, 128, 128) ' Adjust the color as needed
        .Line.Visible = msoFalse
    End With

    ' Add the glass effect
    AddGlassEffect clockSheet, centerX, centerY, clockRadius


    ' Update the clock hands every second
    Do
        ' Calculate the angles for the clock hands
        hourAngle = Hour(Now) * 30 + Minute(Now) * 0.5 ' Calculate the angle for the hour hand
        minuteAngle = Minute(Now) * 6 ' Calculate the angle for the minute hand
        secondAngle = Second(Now) * 6 ' Calculate the angle for the second hand

        ' Clear the previous clock hands
        clockSheet.Shapes.Range(Array("HourHand", "MinuteHand", "SecondHand")).Delete


        centerCircle.ZOrder msoBringToFront 'bring it to front
        glassShape.ZOrder msoBringToFront 'bring it to front

        ' Draw the hour hand
        DrawClockHand clockSheet, centerX, centerY, hourAngle, hourLength, RGB(13, 13, 13), "HourHand", hourWeight ' Adjust the color as needed

        centerCircle.ZOrder msoBringToFront 'bring it to front
        glassShape.ZOrder msoBringToFront 'bring it to front

        ' Draw the minute hand
        DrawClockHand clockSheet, centerX, centerY, minuteAngle, minuteLength, RGB(0, 0, 0), "MinuteHand", minuteWeight ' Adjust the color as needed

        centerCircle.ZOrder msoBringToFront 'bring it to front
        glassShape.ZOrder msoBringToFront 'bring it to front

        ' Draw the second hand
        DrawClockHand clockSheet, centerX, centerY, secondAngle, secondLength, RGB(255, 0, 0), "SecondHand", secondWeight ' Adjust the color as needed

        centerCircle.ZOrder msoBringToFront 'bring it to front
        glassShape.ZOrder msoBringToFront 'bring it to front

        ' Wait for one second
        Application.Wait (Now + TimeValue("0:00:01"))

        centerCircle.ZOrder msoBringToFront 'bring it to front
        glassShape.ZOrder msoBringToFront 'bring it to front

        DoEvents

    Loop

End Sub
Step 6: Write a VBA Procedure to create Clock Hand in Module window.
Sub DrawClockHand(sheet As Worksheet, centerX As Double, centerY As Double, angle As Double, length As Double, color As Long, name As String, L_Weight As Double)
    Dim handStartX As Double, handStartY As Double
    Dim handEndX As Double, handEndY As Double
    Dim handShape As Shape

    ' Calculate the position of the hand
    handStartX = centerX
    handStartY = centerY
    handEndX = centerX + length * Sin(angle * WorksheetFunction.Pi / 180)
    handEndY = centerY - length * Cos(angle * WorksheetFunction.Pi / 180)

    ' Draw the hand
    Set handShape = sheet.Shapes.AddLine(handStartX, handStartY, handEndX, handEndY)
    With handShape
        .name = name
        .Line.weight = L_Weight ' Adjust the line thickness as needed
        .Line.ForeColor.RGB = color ' Adjust the color as needed
    End With
End Sub
Step 7: Write a VBA Procedure to add glass efects in clock in Module window.
Sub AddGlassEffect(clockSheet As Worksheet, centerX As Double, centerY As Double, clockRadius As Double)

    Dim glassTopLeftX As Double, glassTopLeftY As Double
    Dim glassWidth As Double, glassHeight As Double

    ' Set the dimensions and position of the glass shape
    glassTopLeftX = centerX - clockRadius
    glassTopLeftY = centerY - clockRadius
    glassWidth = clockRadius * 2
    glassHeight = clockRadius * 2

    ' Draw the glass shape
    Set glassShape = clockSheet.Shapes.AddShape(msoShapeOval, glassTopLeftX, glassTopLeftY, glassWidth, glassHeight)

    With glassShape
        ' Apply 3D effects
        .ShapeStyle = msoShapeStylePreset40 ' Apply a glass-like 3D style
        .ThreeD.Visible = msoTrue ' Enable 3D appearance
        .ThreeD.SetPresetCamera (msoCameraOrthographicFront)  ' Set the camera perspective for a 3D effect
        .ThreeD.RotationX = 0
        .ThreeD.RotationY = 0
        .ThreeD.RotationZ = 0
        .ThreeD.FieldOfView = 0
        .ThreeD.LightAngle = 145
        .ThreeD.PresetLighting = msoLightRigGlow
        .ThreeD.PresetMaterial = msoMaterialMatte2
        .ThreeD.Depth = 0
        .ThreeD.ContourWidth = 0
        .ThreeD.BevelTopType = msoBevelCircle
        .ThreeD.BevelTopInset = 10
        .ThreeD.BevelTopDepth = 5
        .ThreeD.BevelBottomType = msoBevelNone

        ' Apply shadow effects
        .Shadow.Type = msoShadow25
        .Shadow.Visible = msoTrue
        .Shadow.Style = msoShadowStyleOuterShadow
        .Shadow.Blur = 15
        .Shadow.OffsetX = 12.7279220614
        .Shadow.OffsetY = 12.7279220614
        .Shadow.RotateWithShape = msoTrue
        .Shadow.ForeColor.RGB = RGB(0, 0, 0)
        .Shadow.Transparency = 0.6800000072
        .Shadow.Size = 100

        ' Apply fill properties
        .Fill.Visible = msoTrue
        .Fill.ForeColor.RGB = RGB(0, 176, 240)
        .Fill.Transparency = 0.8980392218
        .Fill.Solid

        ' Hide the outline
        .Line.Visible = msoFalse
    End With

    glassShape.Fill.Transparency = 0.9

End Sub
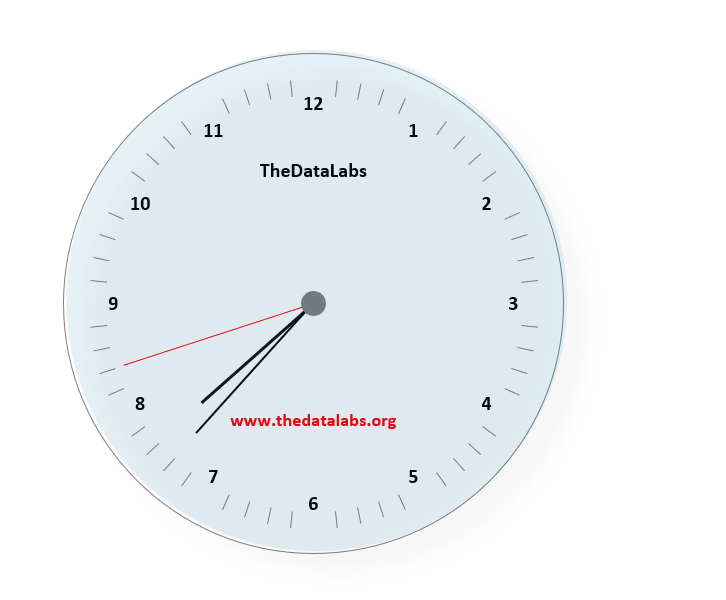
Step 8: Run the Procedure named ‘CreateAnalogClock’ to create Live Analog Clock in Active sheet.
To run the procedure, keep your cursor in Sub Procedure ‘CreateAnalogClock’ and then click on Run button available in toolbar or press F5.


With these steps, you can successfully create a Live Analog Clock in MS Excel.
Download the MS Excel file used in the tutorial (Create a Live Analog Clock in MS Excel)


Thanks for visiting our website to learn how to Create a Live Analog Clock in MS Excel. Please post your comments and questions here.


